GigaStudio 3 Installation and Use: QuickStart Guide - 4.37 - Tascam
GigaStudio 3 Installation and Use: QuickStart Guide - 4.37 - Tascam
GigaStudio 3 Installation and Use: QuickStart Guide - 4.37 - Tascam
You also want an ePaper? Increase the reach of your titles
YUMPU automatically turns print PDFs into web optimized ePapers that Google loves.
DSP – AUX BUSES AND AUX EFFECTS<br />
26<br />
^<br />
&<br />
page 26 ÿ <strong>GigaStudio</strong> 3 Quick Start <strong>Guide</strong><br />
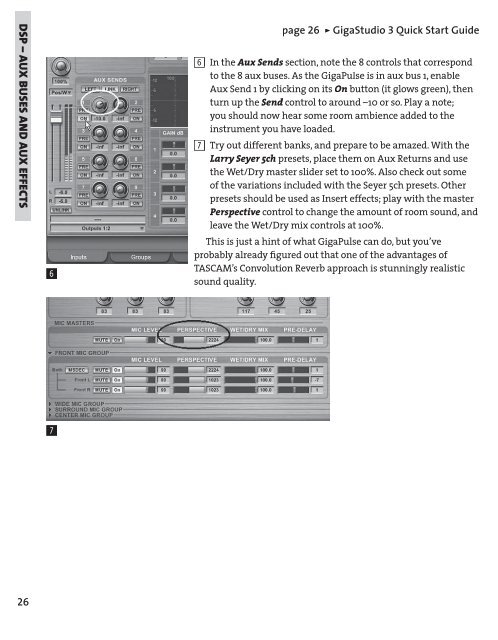
6 In the Aux Sends section, note the 8 controls that correspond<br />
to the 8 aux buses. As the GigaPulse is in aux bus 1, enable<br />
Aux Send 1 by clicking on its On button (it glows green), then<br />
turn up the Send control to around –10 or so. Play a note;<br />
you should now hear some room ambience added to the<br />
instrument you have loaded.<br />
7 Try out different banks, <strong>and</strong> prepare to be amazed. With the<br />
Larry Seyer 5ch presets, place them on Aux Returns <strong>and</strong> use<br />
the Wet/Dry master slider set to 100%. Also check out some<br />
of the variations included with the Seyer 5ch presets. Other<br />
presets should be used as Insert effects; play with the master<br />
Perspective control to change the amount of room sound, <strong>and</strong><br />
leave the Wet/Dry mix controls at 100%.<br />
This is just a hint of what GigaPulse can do, but you’ve<br />
probably already fi gured out that one of the advantages of<br />
TASCAM’s Convolution Reverb approach is stunningly realistic<br />
sound quality.


