GigaStudio 3 Installation and Use: QuickStart Guide - 4.37 - Tascam
GigaStudio 3 Installation and Use: QuickStart Guide - 4.37 - Tascam
GigaStudio 3 Installation and Use: QuickStart Guide - 4.37 - Tascam
You also want an ePaper? Increase the reach of your titles
YUMPU automatically turns print PDFs into web optimized ePapers that Google loves.
MEET THE WIZARD<br />
38<br />
$<br />
%<br />
page 38 ÿ <strong>GigaStudio</strong> 3 Quick Start <strong>Guide</strong><br />
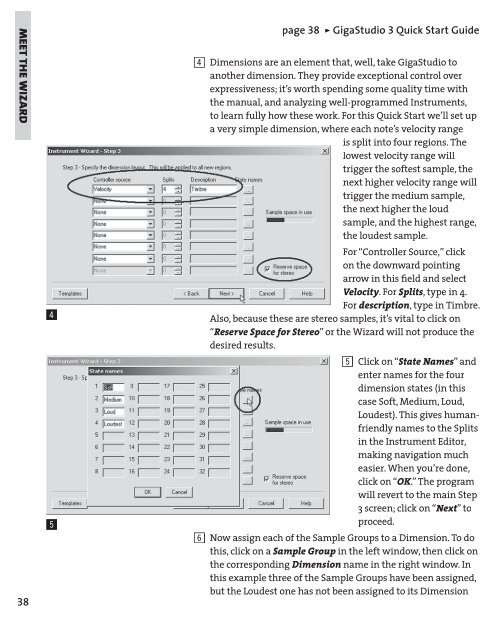
4 Dimensions are an element that, well, take <strong>GigaStudio</strong> to<br />
another dimension. They provide exceptional control over<br />
expressiveness; it’s worth spending some quality time with<br />
the manual, <strong>and</strong> analyzing well-programmed Instruments,<br />
to learn fully how these work. For this Quick Start we’ll set up<br />
a very simple dimension, where each note’s velocity range<br />
is split into four regions. The<br />
lowest velocity range will<br />
trigger the softest sample, the<br />
next higher velocity range will<br />
trigger the medium sample,<br />
the next higher the loud<br />
sample, <strong>and</strong> the highest range,<br />
the loudest sample.<br />
For “Controller Source,” click<br />
on the downward pointing<br />
arrow in this fi eld <strong>and</strong> select<br />
Velocity. Velocity For<br />
Splits, type in 4.<br />
For description, type in Timbre.<br />
Also, because these are stereo samples, it’s vital to click on<br />
“Reserve Space for Stereo” or the Wizard will not produce the<br />
desired results.<br />
5 Click on “ State Names” <strong>and</strong><br />
enter names for the four<br />
dimension states (in this<br />
case Soft, Medium, Loud,<br />
Loudest). This gives humanfriendly<br />
names to the Splits<br />
in the Instrument Editor,<br />
making navigation much<br />
easier. When you’re done,<br />
click on “OK.” OK.” OK The program<br />
will revert to the main Step<br />
3 screen; click on “Next” to<br />
proceed.<br />
6 Now assign each of the Sample Groups to a Dimension. To do<br />
this, click on a Sample Group in the left window, then click on<br />
the corresponding Dimension name in the right window. In<br />
this example three of the Sample Groups have been assigned,<br />
but the Loudest one has not been assigned to its Dimension


