- Page 1 and 2: Contents Connections Playback Setti
- Page 3 and 4: Contents Connections Playback Playi
- Page 5 and 6: Contents Settings Connections Playb
- Page 7 and 8: Contents Accessories Connections Ch
- Page 9 and 10: Contents Features High quality soun
- Page 11 and 12: Contents Connections Playback • S
- Page 13 and 14: Contents Connections Playback u y t
- Page 15 and 16: Contents Connections Q4Q3 Q2Q1 Q0 Q
- Page 17 and 18: Contents Main Display Connections P
- Page 19 and 20: Contents Sub Display Connections Pl
- Page 21 and 22: Contents Rear panel AM FM (75Ω) NE
- Page 23 and 24: AM FM Contents Q7Q6Q5Q4Q3 Q2 (75Ω)
- Page 25 and 26: Contents u i o Q0 Q1 Q2 Q3 Q4 Conne
- Page 27 and 28: Contents Connections W3 W4 W5 W6 W5
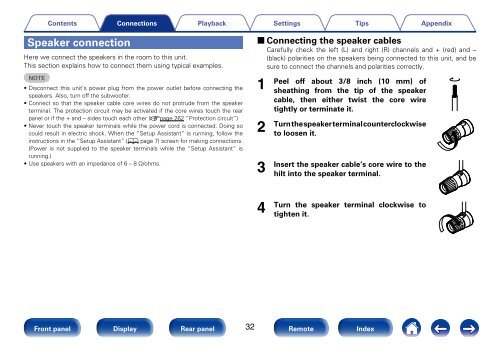
- Page 29 and 30: Contents Connections Speaker connec
- Page 31: Contents 2 Typical speaker layout F
- Page 35 and 36: Contents Connections Playback 2 Sta
- Page 37 and 38: Contents Connections Playback Setti
- Page 39 and 40: Contents Connecting a TV Connection
- Page 41 and 42: Contents Connections Playback Setti
- Page 43 and 44: Contents Connections Connecting a p
- Page 45 and 46: Contents Connections Connecting a D
- Page 47 and 48: Contents Connections Connecting a t
- Page 49 and 50: Contents Connections Playback Setti
- Page 51 and 52: Contents Connections Playback Conne
- Page 53 and 54: Contents Connections Playback Conne
- Page 55 and 56: Contents Connections Playback Conne
- Page 57 and 58: Contents Connections Playback Remot
- Page 59 and 60: Contents Playback Connections Turni
- Page 61 and 62: Contents Connections Adjusting the
- Page 63 and 64: Contents Connections Listening to m
- Page 65 and 66: Contents Connections Playback Opera
- Page 67 and 68: Contents Connections Playing a USB
- Page 69 and 70: Contents Connections Playback 2 Ope
- Page 71 and 72: Contents Connections Playback • A
- Page 73 and 74: Contents Connections Playback Tunin
- Page 75 and 76: Contents Connections Playback Prese
- Page 77 and 78: Contents Connections Skipping prese
- Page 79 and 80: Contents Connections Listening to I
- Page 81 and 82: 5 Contents Connections Playback rad
- Page 83 and 84:
Contents Connections Playback Playi
- Page 85 and 86:
Contents Connections Playback Playi
- Page 87 and 88:
Contents Connections Playback Viewi
- Page 89 and 90:
8 Contents Connections Playback Use
- Page 91 and 92:
Contents Connections Listening to P
- Page 93 and 94:
5 6 Contents Connections Input “E
- Page 95 and 96:
Contents Connections Listening to a
- Page 97 and 98:
Contents Sign Out Connections Disas
- Page 99 and 100:
3 4 Contents Connections Playback U
- Page 101 and 102:
Contents Connections Listening to S
- Page 103 and 104:
6 7 Contents Connections Playback A
- Page 105 and 106:
Contents Connections Playback Addin
- Page 107 and 108:
Contents AirPlay function Connectio
- Page 110 and 111:
Contents Connections Convenience fu
- Page 112 and 113:
Contents Connections Registering to
- Page 114 and 115:
Contents Connections Playback Setti
- Page 116 and 117:
Contents Connections Playback Adjus
- Page 118 and 119:
Contents Connections Selecting a so
- Page 120 and 121:
Contents Direct playback Connection
- Page 122 and 123:
Contents Connections 2 Description
- Page 124 and 125:
Contents Audyssey DSX® sound mode
- Page 126 and 127:
Contents Connections Playback Setti
- Page 128 and 129:
Multi-channel z4 Contents Connectio
- Page 130 and 131:
Contents Connections Playback Setti
- Page 132 and 133:
Contents Connections HDMI control f
- Page 134 and 135:
Contents Connections Switching inpu
- Page 136 and 137:
Contents Rec out function Input sou
- Page 138 and 139:
Contents Connections Web control fu
- Page 140 and 141:
Contents Connections Dual backup me
- Page 142 and 143:
Contents Connections Canceling the
- Page 144 and 145:
Contents Connections Playback Switc
- Page 146 and 147:
Contents Connections Playback Setti
- Page 148 and 149:
Contents Connections Playback Setti
- Page 150 and 151:
Contents Connections Playback 2 Adj
- Page 152 and 153:
Contents Connections Playback Setti
- Page 154 and 155:
Contents Connections Playback Setti
- Page 156 and 157:
Contents 2 General Connections Play
- Page 158 and 159:
Contents ZONE SELECT uio p ENTER BA
- Page 160 and 161:
Contents Connections Using the keyb
- Page 162 and 163:
Contents Surround Parameter Connect
- Page 164 and 165:
Contents Connections Playback 2 Cen
- Page 166 and 167:
Contents Audio Delay Connections Pl
- Page 168 and 169:
Contents Connections Playback 2 Dyn
- Page 170 and 171:
Contents Connections Playback 2 Aud
- Page 172 and 173:
Video Contents Make video-related s
- Page 174 and 175:
Contents Connections Playback 2 Vid
- Page 176 and 177:
Contents Connections Playback 2 i/p
- Page 178 and 179:
Contents On Screen Display Connecti
- Page 180 and 181:
Contents Connections Playback 2 HDM
- Page 182 and 183:
Contents Input Select Connections P
- Page 184 and 185:
Contents Connections Playback 2 Abo
- Page 186 and 187:
3 Contents Connections Playback Con
- Page 188 and 189:
10 11 Contents Connections Repeat s
- Page 190 and 191:
Contents Error messages Connections
- Page 192 and 193:
Contents Manual Setup Connections P
- Page 194 and 195:
Contents Connections 2 Subwoofer Se
- Page 196 and 197:
Contents Connections Playback 2 Set
- Page 198 and 199:
Bass Contents Connections Set subwo
- Page 200 and 201:
Contents Settings Connections Playb
- Page 202 and 203:
Contents Maintenance Mode Connectio
- Page 204 and 205:
Contents Connections 2 Lch Level Ad
- Page 206 and 207:
Contents Auto Standby Connections P
- Page 208 and 209:
Contents Connections Playback 2 Not
- Page 210 and 211:
Contents Connections Playback 2 Add
- Page 212 and 213:
Contents Connections Playback Setti
- Page 214 and 215:
Contents Connections Playback n Reg
- Page 216 and 217:
Contents Operating devices Connecti
- Page 218 and 219:
Contents Connections Playback n CBL
- Page 220 and 221:
Contents Connections Operating lear
- Page 222 and 223:
Contents Connections Playback 2 Del
- Page 224 and 225:
Contents Connections Playback Setti
- Page 226 and 227:
Tips Contents Connections Playback
- Page 228 and 229:
Contents Troubleshooting Connection
- Page 230 and 231:
Contents 2 No sound comes out Conne
- Page 232 and 233:
Contents Connections Playback Setti
- Page 234 and 235:
Contents Connections 2 No video is
- Page 236 and 237:
Contents Connections 2 iPod cannot
- Page 238 and 239:
Contents Connections Playback Setti
- Page 240 and 241:
Contents Connections Playback 2 The
- Page 242 and 243:
Contents Appendix About HDMI Connec
- Page 244 and 245:
Contents Connections 2 Supported au
- Page 246 and 247:
Contents Connections Playback Setti
- Page 248 and 249:
Contents Connections Playback Playi
- Page 250 and 251:
Contents Connections Playback Sound
- Page 252 and 253:
Contents Sound mode (vpage 118) Con
- Page 254 and 255:
Contents Connections Playback Setti
- Page 256 and 257:
Contents Connections Playback Setti
- Page 258 and 259:
Contents B Connections Playback Blu
- Page 260 and 261:
Contents Connections Playback DTS D
- Page 262 and 263:
Contents Connections Playback L LFE
- Page 264 and 265:
Contents Connections Trademark info
- Page 266 and 267:
Contents Specifications Connections
- Page 268 and 269:
Contents Connections Playback Setti
- Page 270 and 271:
v F Contents Connections Firmware u
- Page 272 and 273:
Contents License Connections This s
- Page 274 and 275:
Contents Connections 6. Representat
- Page 276 and 277:
Contents n Tremor http://wiki.xiph.
- Page 278 and 279:
Contents Connections 2 License Info
- Page 280 and 281:
Contents TV group Registrable input
- Page 282 and 283:
Contents CD group Registrable input
- Page 284 and 285:
Contents Blu-ray group Registrable
- Page 286:
D&M Holdings Inc. 3520 10237 00AM


