NetSure ITM Installation Manual - Gruber Power
NetSure ITM Installation Manual - Gruber Power
NetSure ITM Installation Manual - Gruber Power

Create successful ePaper yourself
Turn your PDF publications into a flip-book with our unique Google optimized e-Paper software.
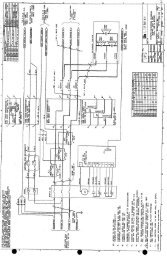
Electrical Connections<br />
exiting the top of the SM-DU+). Remove the CAN-Bus End Resistor plugged into this cable only if<br />
there are Expansion Modules.<br />
2. Locate the short CAN-Bus interconnect cable jumper connected to the SM-DU in the last (end)<br />
Expansion Module (black/white wire twisted pair located behind the SM-DU sheetmetal<br />
enclosure). Plug the CAN-Bus End Resistor into this cable.<br />
1st Expansion Module to Primary Module<br />
1. Locate the long CAN-Bus interconnect cable (RPM 628 351/1) coiled up on the right side of the 1st<br />
Expansion Module (black/white wire twisted pair).<br />
2. Route this cable through the openings in the sides of the cabinets to the Primary Module.<br />
3. Route this cable through the top lip of the Primary Module’s SM-DU+ sheetmetal enclosure.<br />
4. Connect this cable to the mating CAN-Bus interconnect cable connected to the SM-DU+ in the<br />
Primary Module (black/white wire twisted pair located behind the SM-DU+ sheetmetal enclosure<br />
and exiting the top of the SM-DU+).<br />
2nd Expansion Module to 1st Expansion Module<br />
1. Locate the long CAN-Bus interconnect cable (RPM 628 351/1) coiled up on the right side of the<br />
2nd Expansion Module (black/white wire twisted pair).<br />
2. Route this cable through the openings in the sides of the cabinets to the 1st Expansion Module.<br />
3. Connect this cable to the mating CAN-Bus interconnect cable connected to the SM-DU in the 1st<br />
Expansion Module (black/white wire twisted pair located behind the SM-DU sheetmetal<br />
enclosure).<br />
Additional Expansion Modules<br />
1. Make similar connections between each remaining Expansion Module.<br />
4.6.3 BLVD Module-to-Module Interconnect<br />
1st Expansion Module to Primary Module<br />
1. Locate the BLVD control interconnect cable (RPM 628 466/3) coiled up on the right side of the 1st<br />
Expansion Module (the Expansion Module’s BLVD cable is factory connected to the bottom<br />
connector on the LVD Relay Board, and exits at the back of the LVD Relay Board’s sheetmetal<br />
enclosure).<br />
2. Route this cable through the openings in the sides of the cabinets to the Primary Module.<br />
3. Route the cable through the back of the Primary Module’s LVD Relay Board sheetmetal<br />
enclosure.<br />
4. Connect this cable to the mating BLVD control interconnect cable (RPM 628 465/3) in the<br />
Primary Module (the Primary Module’s BLVD cable is factory connected to the bottom connector<br />
located on the LVD Relay Board).<br />
2nd Expansion Module to 1st Expansion Module<br />
1. Locate the BLVD control interconnect cable (RPM 628 466/3) coiled up on the right side of the 2nd<br />
Expansion Module (the Expansion Module’s BLVD cable is factory connected to the bottom<br />
connector on the LVD Relay Board, and exits at the back of the LVD Relay Board’s sheetmetal<br />
enclosure).<br />
2. Route this cable through the openings in the sides of the cabinets to the 1st Expansion Module.<br />
3. Route the cable through the back of the 1st Expansion Module’s LVD Relay Board sheetmetal<br />
enclosure.<br />
4. Connect this cable to the mating BLVD control interconnect cable (RPM 628 465/3) in the 1st<br />
Expansion Module (the 1st Expansion Module’s BLVD cable is factory connected to the bottom<br />
connector located on the LVD Relay Board).<br />
Additional Expansion Modules<br />
1. Make similar connections between each remaining Expansion Module.<br />
35