NetSure ITM Installation Manual - Gruber Power
NetSure ITM Installation Manual - Gruber Power
NetSure ITM Installation Manual - Gruber Power

You also want an ePaper? Increase the reach of your titles
YUMPU automatically turns print PDFs into web optimized ePapers that Google loves.
Start-Up Instructions<br />
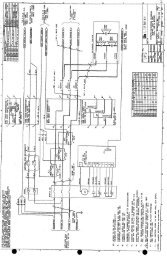
Figure 27 Making Final Battery Shelf Battery Interconnect Link Connections<br />
DC UPS Module Rear View (B attery Compartment)<br />
Typical Monitoring<br />
Lead Connections<br />
Lead Labeled<br />
1.5+ (Battery One Link)<br />
2.5+ (Battery Two Link)<br />
3.5+ (Battery Three Link)<br />
Red<br />
Monitoring<br />
Lead<br />
Temperature<br />
Sensor Lead<br />
(white and<br />
white/black<br />
leads)<br />
Black<br />
Monitoring<br />
Lead<br />
Bolt<br />
Lock Washer<br />
Flat Washer<br />
Double Tab Washer<br />
Single Tab Washer<br />
Interconnect<br />
Strap<br />
Final Battery Shelf Interconnections<br />
1) Connect supplied Battery Interconnect<br />
Links between these points.<br />
2) Place faston ring lugs for factory wired<br />
battery monitoring leads on top of<br />
interconnect link as shown in illustration.<br />
DO NOT PLACE BETWEEN LINK AND<br />
BATTERY TERMINALS.<br />
3) Torque to 97 in-lbs (11 Nm).<br />
Battery<br />
Terminal<br />
Typical Hardware Build-Up<br />
4) Place plastic cover over battery terminals<br />
and interconnect links.<br />
5) Connect battery monitoring leads to faston<br />
terminals as shown in illustration.<br />
6) Check torque on remaining battery terminals<br />
(factory connections).<br />
43