NetSure ITM Installation Manual - Gruber Power
NetSure ITM Installation Manual - Gruber Power
NetSure ITM Installation Manual - Gruber Power

Create successful ePaper yourself
Turn your PDF publications into a flip-book with our unique Google optimized e-Paper software.
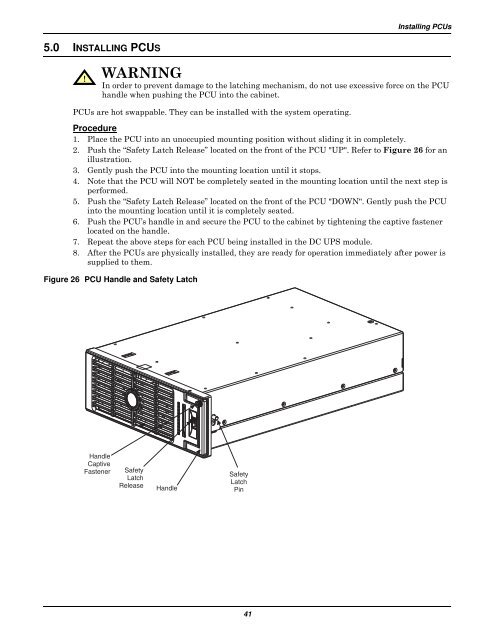
Installing PCUs<br />
5.0 INSTALLING PCUS<br />
!<br />
WARNING<br />
In order to prevent damage to the latching mechanism, do not use excessive force on the PCU<br />
handle when pushing the PCU into the cabinet.<br />
PCUs are hot swappable. They can be installed with the system operating.<br />
Procedure<br />
1. Place the PCU into an unoccupied mounting position without sliding it in completely.<br />
2. Push the “Safety Latch Release” located on the front of the PCU "UP". Refer to Figure 26 for an<br />
illustration.<br />
3. Gently push the PCU into the mounting location until it stops.<br />
4. Note that the PCU will NOT be completely seated in the mounting location until the next step is<br />
performed.<br />
5. Push the “Safety Latch Release” located on the front of the PCU "DOWN". Gently push the PCU<br />
into the mounting location until it is completely seated.<br />
6. Push the PCU’s handle in and secure the PCU to the cabinet by tightening the captive fastener<br />
located on the handle.<br />
7. Repeat the above steps for each PCU being installed in the DC UPS module.<br />
8. After the PCUs are physically installed, they are ready for operation immediately after power is<br />
supplied to them.<br />
Figure 26 PCU Handle and Safety Latch<br />
Handle<br />
Captive<br />
Fastener<br />
Safety<br />
Latch<br />
Release<br />
Handle<br />
Safety<br />
Latch<br />
Pin<br />
41