Case Controller Supermarket Control Solutions - Sporlan Online
Case Controller Supermarket Control Solutions - Sporlan Online
Case Controller Supermarket Control Solutions - Sporlan Online

You also want an ePaper? Increase the reach of your titles
YUMPU automatically turns print PDFs into web optimized ePapers that Google loves.
2<br />
Hardware Installation/Configuring the Defrost Scheduler From Alliance<br />
Installing the <strong>Case</strong> <strong><strong>Control</strong>ler</strong><br />
Wiring the <strong>Case</strong> <strong><strong>Control</strong>ler</strong> (cont.)<br />
When routing wires, please<br />
follow good wiring practices to<br />
avoid undesired interference<br />
on the network cable. High<br />
voltage wires should be routed<br />
at least 12” away from the<br />
communication cable, and<br />
the two should never be run<br />
through the same conduit. If a<br />
communication cable needs<br />
to cross a high voltage cable,<br />
make sure the two wires NO COMcross<br />
NC<br />
and are secured perpendicular<br />
to each other to reduce<br />
L1<br />
noise.<br />
Finally, connect the L2 120/240V<br />
to the power input’s removable<br />
NO COM<br />
L1<br />
L2<br />
terminal connector, and plug in<br />
to the board. Make sure leads<br />
are connected as shown.<br />
NC<br />
NO COM<br />
NC<br />
After all connections are made<br />
and the protective<br />
L1<br />
covers of the<br />
controller are L2 installed, apply<br />
power to the controller.<br />
Antisw<br />
Solid State Relay<br />
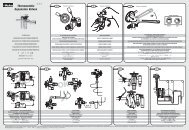
On-Board Relay Connections<br />
FANS LIGHTS DEFROST<br />
HEATERS<br />
External Relay Connections<br />
NO COM<br />
NC<br />
NO COM<br />
NC<br />
NO COM<br />
NC<br />
NO COM<br />
NC<br />
NO COM<br />
NC<br />
NO COM<br />
NC<br />
Tdef<br />
mperature Sensor<br />
ount per Manufacturer’s<br />
pecifications (optional)<br />
L1<br />
L2<br />
L1<br />
L2<br />
L1<br />
L2<br />
L1<br />
L2<br />
COM<br />
L1<br />
L2<br />
COM<br />
L1<br />
L2<br />
COM<br />
FANS LIGHTS DEFROST<br />
HEATERS<br />
NO NC<br />
NO NC<br />
NO NC<br />
V<br />
lation, are not shown.<br />
NO COM<br />
Mounting / Wiring the MT-504 Board<br />
L1<br />
NC<br />
The MT-504 control COM board should COM be mounted COM in an electrical panel, and can be located anywhere on the<br />
L2<br />
L2<br />
L2<br />
LonWorks® network.<br />
NO NC<br />
Connect the 18AWG network cable to the network terminals on the controller. The connections are not polarized.<br />
Connect the other end of the cable to the network terminal on another controller in the electrical panel.<br />
FANS<br />
LIGHTS<br />
DEFROST<br />
Connect 24VAC to the power input’s removable terminal block, and plug in to the board. After all connections are made,<br />
HEATERS<br />
apply power to the controller.<br />
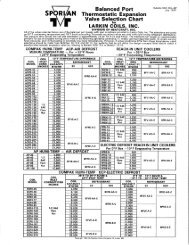
Configuring the Defrost Scheduler From Alliance<br />
Getting Started<br />
NO COM<br />
In order to begin the software<br />
setup, the installer will need<br />
proper credentials to access the<br />
Configuration Mode in Alliance.<br />
© 2013 Parker Hannifin Corporation<br />
The DTSecCool installation<br />
requires setting up a ‘Node’ to<br />
program the controller, and a<br />
‘Plug-In’ to configure the settings<br />
used by the controller.<br />
After logging into Alliance, select<br />
the Refrigeration System and<br />
Configuration Mode. Select the<br />
L1<br />
NC<br />
NO NC<br />
L1<br />
NO COM<br />
NC<br />
NO NC<br />
FANS<br />
appropriate view, based upon<br />
the location of the DTSecCool<br />
node. Click-and-Drag the “Node”<br />
component from the list and<br />
drop it in the desired location on<br />
the active view. The icon can be<br />
moved at any time by holding<br />
the “CTRL” key and dragging the<br />
node to the new desired location.<br />
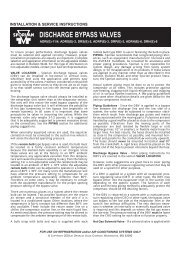
In the “Pick Node Type and<br />
Model” dialog box, select the<br />
communications channel that<br />
the node is connected to. For<br />
LIGHTS<br />
DEFROST<br />
HEATERS<br />
node type, select “Custom Node.”<br />
For manufacturer, select “Micro<br />
Thermo.” And for model, select<br />
“Dual Temp Sec Cool V7.0.”<br />
6