Case Controller Supermarket Control Solutions - Sporlan Online
Case Controller Supermarket Control Solutions - Sporlan Online
Case Controller Supermarket Control Solutions - Sporlan Online

You also want an ePaper? Increase the reach of your titles
YUMPU automatically turns print PDFs into web optimized ePapers that Google loves.
4<br />
Replacement<br />
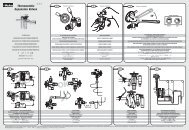
Replacing a <strong>Case</strong> <strong><strong>Control</strong>ler</strong><br />
Under certain circumstances, it may<br />
become necessary to replace a faulty<br />
controller. Bringing a new controller<br />
online involves:<br />
1. Installing the new hardware<br />
2. Sending the configuration settings<br />
from the Alliance interface<br />
Replacing Original Hardware<br />
To remove the original controller, first disconnect power from the unit.<br />
The power leads do not need to be disconnected from the terminal<br />
block. The extractable connector can be lifted off of the board, and later<br />
be reapplied to the new controller.<br />
Next, disconnect the remaining wire connections on the <strong>Case</strong> <strong><strong>Control</strong>ler</strong>.<br />
Carefully label each wire, noting the specific location from which it was<br />
removed. Detach the controller from its mounting:<br />
If the controller is wall mounted:<br />
With the cover off, loosen the two screws on each side of the controller.<br />
Gently slide the controller upwards, aligning the screw heads with the<br />
lower opening, and lift the controller free.<br />
If the controller is DIN Rail mounted:<br />
With the cover off, insert a flat screwdriver into the slotted tab at the<br />
top of the controller. Gently lift the tab upwards while pulling the top<br />
of the controller away from the mounting surface. Once the top is free<br />
from the DIN rail, lift the controller free.<br />
If the controller is SnapTrack mounted:<br />
If space permits, the <strong>Case</strong> <strong><strong>Control</strong>ler</strong> can be slid off one end of the<br />
SnapTrack. The controller can also be pulled directly off the track.<br />
Starting at one corner of the controller, gently pull the lip of the<br />
SnapTrack away from the controller. The mounting leg will come free<br />
easily. Repeat this for each remaining mounting leg.<br />
Mount the new <strong>Case</strong> <strong><strong>Control</strong>ler</strong>, reversing the previous steps<br />
taken to remove the original device. See Section 2 for complete<br />
installation instructions.<br />
30