
You also want an ePaper? Increase the reach of your titles
YUMPU automatically turns print PDFs into web optimized ePapers that Google loves.
<strong>TM</strong>/<strong>TM</strong>C/RM/RMC-<strong>2030GE</strong><br />
3.1.1 To use the integrated GigE camera software:<br />
1. Start the Camera Interface Application (this is the Coyote application used above). The dialog box<br />
shown in Figure 9 appears.<br />
2. Click the Detect button to detect the device and driver in the “Device Actions” panel.<br />
3. Click Select Camera and select <strong>TM</strong>-<strong>2030GE</strong> or <strong>TM</strong>C-<strong>2030GE</strong> (color) from the camera list.<br />
4. Select the Acquisition tab and click Configure. The camera configuration dialog box displays.<br />
5. Select the GigE Camera Software tab. This is the Integrated GigE Camera Software shown in<br />
Figure 11.<br />
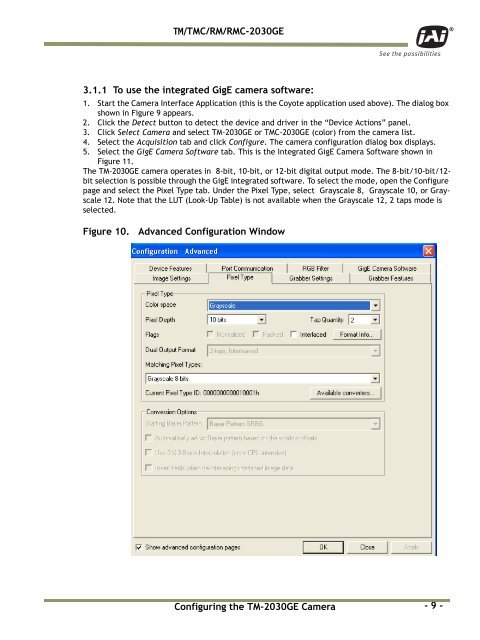
The <strong>TM</strong>-<strong>2030GE</strong> camera operates in 8-bit, 10-bit, or 12-bit digital output mode. The 8-bit/10-bit/12-<br />
bit selection is possible through the GigE integrated software. To select the mode, open the Configure<br />
page and select the Pixel Type tab. Under the Pixel Type, select Grayscale 8, Grayscale 10, or Grayscale<br />
12. Note that the LUT (Look-Up Table) is not available when the Grayscale 12, 2 taps mode is<br />
selected.<br />
Figure 10.<br />
Advanced Configuration Window<br />
Configuring the <strong>TM</strong>-<strong>2030GE</strong> Camera<br />
- 9 -