
Create successful ePaper yourself
Turn your PDF publications into a flip-book with our unique Google optimized e-Paper software.
Introducti<strong>on</strong><br />
Thank you for purchasing <str<strong>on</strong>g>the</str<strong>on</strong>g> <strong>Korg</strong> <str<strong>on</strong>g>D32XD</str<strong>on</strong>g> Xtended Definiti<strong>on</strong>/<str<strong>on</strong>g>D16XD</str<strong>on</strong>g> Xtended Definiti<strong>on</strong><br />
Digital Recording Studio.<br />
To take full advantage of <str<strong>on</strong>g>the</str<strong>on</strong>g> <str<strong>on</strong>g>D32XD</str<strong>on</strong>g>/<str<strong>on</strong>g>D16XD</str<strong>on</strong>g>’s functi<strong>on</strong>s, and to enjoy troublefree<br />
use, please read this manual carefully and use this product <strong>on</strong>ly as directed.<br />
Keep this manual in a safe place for future reference.<br />
Included items<br />
Make sure that <str<strong>on</strong>g>the</str<strong>on</strong>g> following included items are present.<br />
• Owner’s Manual (this document) • Power cable<br />
Before using <str<strong>on</strong>g>the</str<strong>on</strong>g> <str<strong>on</strong>g>D32XD</str<strong>on</strong>g>/<str<strong>on</strong>g>D16XD</str<strong>on</strong>g> for <str<strong>on</strong>g>the</str<strong>on</strong>g> first time<br />
Please observe <str<strong>on</strong>g>the</str<strong>on</strong>g> following points when using <str<strong>on</strong>g>the</str<strong>on</strong>g> <str<strong>on</strong>g>D32XD</str<strong>on</strong>g>/<str<strong>on</strong>g>D16XD</str<strong>on</strong>g>.<br />
Power <strong>on</strong>/off<br />
The <str<strong>on</strong>g>D32XD</str<strong>on</strong>g>/<str<strong>on</strong>g>D16XD</str<strong>on</strong>g> is a precisi<strong>on</strong> instrument, similar to a pers<strong>on</strong>al computer,<br />
equipped with an internal hard disk drive and a CD-R/RW drive. When turning<br />
<str<strong>on</strong>g>the</str<strong>on</strong>g> power <strong>on</strong> and off, follow <str<strong>on</strong>g>the</str<strong>on</strong>g> procedures shown below.<br />
Before you turn <strong>on</strong> <str<strong>on</strong>g>the</str<strong>on</strong>g> power, make sure that <str<strong>on</strong>g>the</str<strong>on</strong>g> power cable is firmly plugged into <str<strong>on</strong>g>the</str<strong>on</strong>g><br />
<str<strong>on</strong>g>D32XD</str<strong>on</strong>g>/<str<strong>on</strong>g>D16XD</str<strong>on</strong>g> and into an AC outlet.<br />
● Power-<strong>on</strong><br />
Important<br />
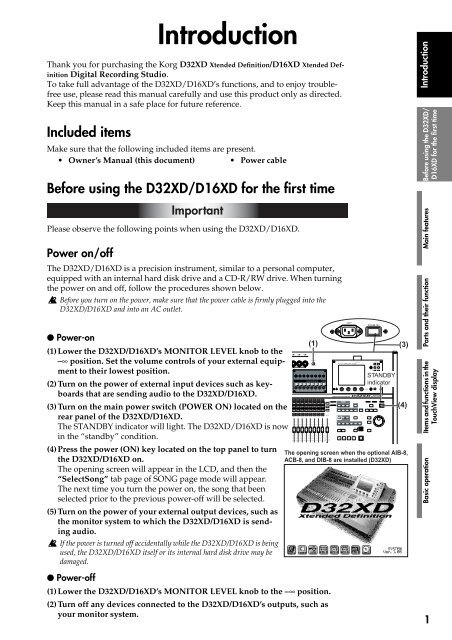
(1)Lower <str<strong>on</strong>g>the</str<strong>on</strong>g> <str<strong>on</strong>g>D32XD</str<strong>on</strong>g>/<str<strong>on</strong>g>D16XD</str<strong>on</strong>g>’s MONITOR LEVEL knob to <str<strong>on</strong>g>the</str<strong>on</strong>g><br />
–∞ positi<strong>on</strong>. Set <str<strong>on</strong>g>the</str<strong>on</strong>g> volume c<strong>on</strong>trols of your external equipment<br />
to <str<strong>on</strong>g>the</str<strong>on</strong>g>ir lowest positi<strong>on</strong>.<br />
(2)<str<strong>on</strong>g>Turn</str<strong>on</strong>g> <strong>on</strong> <str<strong>on</strong>g>the</str<strong>on</strong>g> power of external input devices such as keyboards<br />
that are sending audio to <str<strong>on</strong>g>the</str<strong>on</strong>g> <str<strong>on</strong>g>D32XD</str<strong>on</strong>g>/<str<strong>on</strong>g>D16XD</str<strong>on</strong>g>.<br />
(3)<str<strong>on</strong>g>Turn</str<strong>on</strong>g> <strong>on</strong> <str<strong>on</strong>g>the</str<strong>on</strong>g> main power switch (POWER ON) located <strong>on</strong> <str<strong>on</strong>g>the</str<strong>on</strong>g><br />
rear panel of <str<strong>on</strong>g>the</str<strong>on</strong>g> <str<strong>on</strong>g>D32XD</str<strong>on</strong>g>/<str<strong>on</strong>g>D16XD</str<strong>on</strong>g>.<br />
The STANDBY indicator will light. The <str<strong>on</strong>g>D32XD</str<strong>on</strong>g>/<str<strong>on</strong>g>D16XD</str<strong>on</strong>g> is now<br />
in <str<strong>on</strong>g>the</str<strong>on</strong>g> “standby” c<strong>on</strong>diti<strong>on</strong>.<br />
(4)Press <str<strong>on</strong>g>the</str<strong>on</strong>g> power (ON) key located <strong>on</strong> <str<strong>on</strong>g>the</str<strong>on</strong>g> top panel to turn<br />
<str<strong>on</strong>g>the</str<strong>on</strong>g> <str<strong>on</strong>g>D32XD</str<strong>on</strong>g>/<str<strong>on</strong>g>D16XD</str<strong>on</strong>g> <strong>on</strong>.<br />
The opening screen will appear in <str<strong>on</strong>g>the</str<strong>on</strong>g> LCD, and <str<strong>on</strong>g>the</str<strong>on</strong>g>n <str<strong>on</strong>g>the</str<strong>on</strong>g><br />
“SelectS<strong>on</strong>g” tab page of SONG page mode will appear.<br />
The next time you turn <str<strong>on</strong>g>the</str<strong>on</strong>g> power <strong>on</strong>, <str<strong>on</strong>g>the</str<strong>on</strong>g> s<strong>on</strong>g that been<br />
selected prior to <str<strong>on</strong>g>the</str<strong>on</strong>g> previous power-off will be selected.<br />
(5)<str<strong>on</strong>g>Turn</str<strong>on</strong>g> <strong>on</strong> <str<strong>on</strong>g>the</str<strong>on</strong>g> power of your external output devices, such as<br />
<str<strong>on</strong>g>the</str<strong>on</strong>g> m<strong>on</strong>itor system to which <str<strong>on</strong>g>the</str<strong>on</strong>g> <str<strong>on</strong>g>D32XD</str<strong>on</strong>g>/<str<strong>on</strong>g>D16XD</str<strong>on</strong>g> is sending<br />
audio.<br />
If <str<strong>on</strong>g>the</str<strong>on</strong>g> power is turned off accidentally while <str<strong>on</strong>g>the</str<strong>on</strong>g> <str<strong>on</strong>g>D32XD</str<strong>on</strong>g>/<str<strong>on</strong>g>D16XD</str<strong>on</strong>g> is being<br />
used, <str<strong>on</strong>g>the</str<strong>on</strong>g> <str<strong>on</strong>g>D32XD</str<strong>on</strong>g>/<str<strong>on</strong>g>D16XD</str<strong>on</strong>g> itself or its internal hard disk drive may be<br />
damaged.<br />
(1) (3)<br />
STANDBY<br />
indicator<br />
(4)<br />
The opening screen when <str<strong>on</strong>g>the</str<strong>on</strong>g> opti<strong>on</strong>al AIB-8,<br />
ACB-8, and DIB-8 are installed (<str<strong>on</strong>g>D32XD</str<strong>on</strong>g>)<br />
Introducti<strong>on</strong><br />
Before using <str<strong>on</strong>g>the</str<strong>on</strong>g> <str<strong>on</strong>g>D32XD</str<strong>on</strong>g>/<br />
<str<strong>on</strong>g>D16XD</str<strong>on</strong>g> for <str<strong>on</strong>g>the</str<strong>on</strong>g> first time<br />
Main features<br />
Parts and <str<strong>on</strong>g>the</str<strong>on</strong>g>ir functi<strong>on</strong><br />
Items and functi<strong>on</strong>s in <str<strong>on</strong>g>the</str<strong>on</strong>g><br />
TouchView display<br />
Basic operati<strong>on</strong><br />
● Power-off<br />
(1)Lower <str<strong>on</strong>g>the</str<strong>on</strong>g> <str<strong>on</strong>g>D32XD</str<strong>on</strong>g>/<str<strong>on</strong>g>D16XD</str<strong>on</strong>g>’s MONITOR LEVEL knob to <str<strong>on</strong>g>the</str<strong>on</strong>g> –∞ positi<strong>on</strong>.<br />
(2)<str<strong>on</strong>g>Turn</str<strong>on</strong>g> off any devices c<strong>on</strong>nected to <str<strong>on</strong>g>the</str<strong>on</strong>g> <str<strong>on</strong>g>D32XD</str<strong>on</strong>g>/<str<strong>on</strong>g>D16XD</str<strong>on</strong>g>’s outputs, such as<br />
your m<strong>on</strong>itor system.<br />
1