
Create successful ePaper yourself
Turn your PDF publications into a flip-book with our unique Google optimized e-Paper software.
The highlighted area will <str<strong>on</strong>g>the</str<strong>on</strong>g>n move <strong>on</strong>e step toward <str<strong>on</strong>g>the</str<strong>on</strong>g> right. Repeat this<br />
step to edit <str<strong>on</strong>g>the</str<strong>on</strong>g> s<strong>on</strong>g name.<br />
If you want to edit <strong>on</strong>ly a porti<strong>on</strong> of <str<strong>on</strong>g>the</str<strong>on</strong>g> s<strong>on</strong>g name, use <str<strong>on</strong>g>the</str<strong>on</strong>g> butt<strong>on</strong>s to<br />
move <str<strong>on</strong>g>the</str<strong>on</strong>g> highlighted area, and <str<strong>on</strong>g>the</str<strong>on</strong>g>n press a character or numeral butt<strong>on</strong>.<br />
Use <str<strong>on</strong>g>the</str<strong>on</strong>g> butt<strong>on</strong>s in <str<strong>on</strong>g>the</str<strong>on</strong>g> LCD screen to perform <str<strong>on</strong>g>the</str<strong>on</strong>g> following operati<strong>on</strong>s.<br />
“0...9”: Input a numeral (e.g., “0”)<br />
“A...@_...”: Input an alphabetical character (e.g., “A”) or symbol (e.g., @, _).<br />
: Input a space.<br />
: Switch <str<strong>on</strong>g>the</str<strong>on</strong>g> alphabet butt<strong>on</strong>s between lower case and upper case.<br />
: Insert a space, and move <str<strong>on</strong>g>the</str<strong>on</strong>g> subsequent characters backward.<br />
: Delete <str<strong>on</strong>g>the</str<strong>on</strong>g> character at <str<strong>on</strong>g>the</str<strong>on</strong>g> cursor locati<strong>on</strong>.<br />
: Erase <str<strong>on</strong>g>the</str<strong>on</strong>g> entire name.<br />
(5)C<strong>on</strong>firm <str<strong>on</strong>g>the</str<strong>on</strong>g> changes.<br />
When you have finished naming your s<strong>on</strong>g, press <str<strong>on</strong>g>the</str<strong>on</strong>g> OK butt<strong>on</strong> in <str<strong>on</strong>g>the</str<strong>on</strong>g> LCD<br />
screen.<br />
If you decide not to change <str<strong>on</strong>g>the</str<strong>on</strong>g> name, press <str<strong>on</strong>g>the</str<strong>on</strong>g> Cancel butt<strong>on</strong>.<br />
As an alternative to <str<strong>on</strong>g>the</str<strong>on</strong>g> above procedure, you can use <str<strong>on</strong>g>the</str<strong>on</strong>g> Name Library to change <str<strong>on</strong>g>the</str<strong>on</strong>g> name.<br />
Refer to “Using <str<strong>on</strong>g>the</str<strong>on</strong>g> name library” (→p.37).<br />
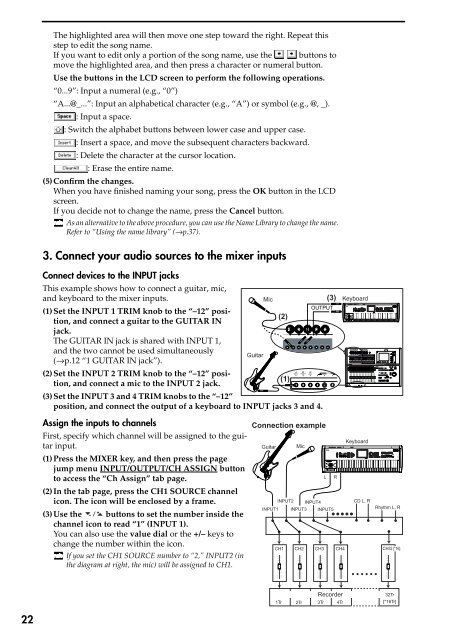
3. C<strong>on</strong>nect your audio sources to <str<strong>on</strong>g>the</str<strong>on</strong>g> mixer inputs<br />
C<strong>on</strong>nect devices to <str<strong>on</strong>g>the</str<strong>on</strong>g> INPUT jacks<br />
This example shows how to c<strong>on</strong>nect a guitar, mic,<br />
and keyboard to <str<strong>on</strong>g>the</str<strong>on</strong>g> mixer inputs.<br />
Mic<br />
(1)Set <str<strong>on</strong>g>the</str<strong>on</strong>g> INPUT 1 TRIM knob to <str<strong>on</strong>g>the</str<strong>on</strong>g> “–12” positi<strong>on</strong>,<br />
and c<strong>on</strong>nect a guitar to <str<strong>on</strong>g>the</str<strong>on</strong>g> GUITAR IN<br />
(2)<br />
jack.<br />
The GUITAR IN jack is shared with INPUT 1,<br />
and <str<strong>on</strong>g>the</str<strong>on</strong>g> two cannot be used simultaneously<br />
Guitar<br />
(→p.12 “1 GUITAR IN jack”).<br />
(2)Set <str<strong>on</strong>g>the</str<strong>on</strong>g> INPUT 2 TRIM knob to <str<strong>on</strong>g>the</str<strong>on</strong>g> “–12” positi<strong>on</strong>,<br />
and c<strong>on</strong>nect a mic to <str<strong>on</strong>g>the</str<strong>on</strong>g> INPUT 2 jack.<br />
(1)<br />
(3)Set <str<strong>on</strong>g>the</str<strong>on</strong>g> INPUT 3 and 4 TRIM knobs to <str<strong>on</strong>g>the</str<strong>on</strong>g> “–12”<br />
positi<strong>on</strong>, and c<strong>on</strong>nect <str<strong>on</strong>g>the</str<strong>on</strong>g> output of a keyboard to INPUT jacks 3 and 4.<br />
(3)<br />
OUTPUT<br />
Keyboard<br />
Assign <str<strong>on</strong>g>the</str<strong>on</strong>g> inputs to channels<br />
First, specify which channel will be assigned to <str<strong>on</strong>g>the</str<strong>on</strong>g> guitar<br />
input.<br />
(1)Press <str<strong>on</strong>g>the</str<strong>on</strong>g> MIXER key, and <str<strong>on</strong>g>the</str<strong>on</strong>g>n press <str<strong>on</strong>g>the</str<strong>on</strong>g> page<br />
jump menu INPUT/OUTPUT/CH ASSIGN butt<strong>on</strong><br />
to access <str<strong>on</strong>g>the</str<strong>on</strong>g> “Ch Assign” tab page.<br />
(2)In <str<strong>on</strong>g>the</str<strong>on</strong>g> tab page, press <str<strong>on</strong>g>the</str<strong>on</strong>g> CH1 SOURCE channel<br />
ic<strong>on</strong>. The ic<strong>on</strong> will be enclosed by a frame.<br />
(3)Use <str<strong>on</strong>g>the</str<strong>on</strong>g> butt<strong>on</strong>s to set <str<strong>on</strong>g>the</str<strong>on</strong>g> number inside <str<strong>on</strong>g>the</str<strong>on</strong>g><br />
channel ic<strong>on</strong> to read “1” (INPUT 1).<br />
You can also use <str<strong>on</strong>g>the</str<strong>on</strong>g> value dial or <str<strong>on</strong>g>the</str<strong>on</strong>g> +/– keys to<br />
change <str<strong>on</strong>g>the</str<strong>on</strong>g> number within <str<strong>on</strong>g>the</str<strong>on</strong>g> ic<strong>on</strong>.<br />
If you set <str<strong>on</strong>g>the</str<strong>on</strong>g> CH1 SOURCE number to “2,” INPUT2 (in<br />
<str<strong>on</strong>g>the</str<strong>on</strong>g> diagram at right, <str<strong>on</strong>g>the</str<strong>on</strong>g> mic) will be assigned to CH1.<br />
C<strong>on</strong>necti<strong>on</strong> example<br />
Keyboard<br />
Guitar Mic<br />
L R<br />
INPUT2 INPUT4<br />
CD L, R<br />
INPUT1<br />
CH1<br />
INPUT3<br />
CH2<br />
INPUT5<br />
CH3 CH4<br />
Rhythm L, R<br />
CH32 [*16]<br />
Recorder<br />
1Tr 2Tr 3Tr 4Tr<br />
32Tr<br />
[*16Tr]<br />
22