
Create successful ePaper yourself
Turn your PDF publications into a flip-book with our unique Google optimized e-Paper software.
• Set <str<strong>on</strong>g>the</str<strong>on</strong>g> CH ON/SOLO mode key to CH ON, and turn<br />
<str<strong>on</strong>g>the</str<strong>on</strong>g> channel 1 and 2 CH ON/SOLO keys <strong>on</strong> (keys lit).<br />
• Set <str<strong>on</strong>g>the</str<strong>on</strong>g> channel 1 and 2 REC/PLAY keys to REC (keys<br />
lit red).<br />
(4) Adjust <str<strong>on</strong>g>the</str<strong>on</strong>g> input level settings.<br />
•Press <str<strong>on</strong>g>the</str<strong>on</strong>g> METER key to display <str<strong>on</strong>g>the</str<strong>on</strong>g> Meter Trk View<br />
screen.<br />
•Press <str<strong>on</strong>g>the</str<strong>on</strong>g> Meter Trk Type butt<strong>on</strong> to display <str<strong>on</strong>g>the</str<strong>on</strong>g> Meter<br />
Trk Type dialog box.<br />
• In “Select Level Meter Positi<strong>on</strong>,” select “CH-Input”<br />
as <str<strong>on</strong>g>the</str<strong>on</strong>g> level meter mode, and press <str<strong>on</strong>g>the</str<strong>on</strong>g> OK butt<strong>on</strong> to<br />
return to <str<strong>on</strong>g>the</str<strong>on</strong>g> previous screen.<br />
• When you play back your CD player, <str<strong>on</strong>g>the</str<strong>on</strong>g> CH 1 and 2<br />
level meters will move in resp<strong>on</strong>se to <str<strong>on</strong>g>the</str<strong>on</strong>g> input.<br />
(5) Check <str<strong>on</strong>g>the</str<strong>on</strong>g> audio.<br />
• Set <str<strong>on</strong>g>the</str<strong>on</strong>g> channel 1 and 2 faders to unity gain (0 dB).<br />
• Access <str<strong>on</strong>g>the</str<strong>on</strong>g> MIXER, SOLO/MONITOR, “M<strong>on</strong>itor”<br />
tab page.<br />
• Select “Master LR,” and turn it <strong>on</strong> (highlighted).<br />
• Gradually raise <str<strong>on</strong>g>the</str<strong>on</strong>g> MASTER fader and PHONES<br />
VOLUME knob or MONITOR LEVEL knob, and verify<br />
that you hear <str<strong>on</strong>g>the</str<strong>on</strong>g> sound from your headph<strong>on</strong>es or<br />
your m<strong>on</strong>itor system c<strong>on</strong>nected to <str<strong>on</strong>g>the</str<strong>on</strong>g> MONITOR<br />
OUT jacks.<br />
Inputting <str<strong>on</strong>g>the</str<strong>on</strong>g> digital audio signal from an ADAT<br />
device<br />
Assigning eight sources from an ADAT device to channels<br />
1–8.<br />
The opti<strong>on</strong>al ADAT I/O board must be installed (→p.178).<br />
ADAT input cannot be assigned if <str<strong>on</strong>g>the</str<strong>on</strong>g> current s<strong>on</strong>g is 96 kHz/24-<br />
bit.<br />
(1) C<strong>on</strong>nect your ADAT device.<br />
Lower <str<strong>on</strong>g>the</str<strong>on</strong>g> <str<strong>on</strong>g>D32XD</str<strong>on</strong>g>/<str<strong>on</strong>g>D16XD</str<strong>on</strong>g>’s MASTER fader, and use an<br />
optical digital cable to c<strong>on</strong>nect <str<strong>on</strong>g>the</str<strong>on</strong>g> ADAT OUT jack of<br />
your ADAT device to <str<strong>on</strong>g>the</str<strong>on</strong>g> <str<strong>on</strong>g>D32XD</str<strong>on</strong>g>/<str<strong>on</strong>g>D16XD</str<strong>on</strong>g>’s ADAT IN<br />
jack.<br />
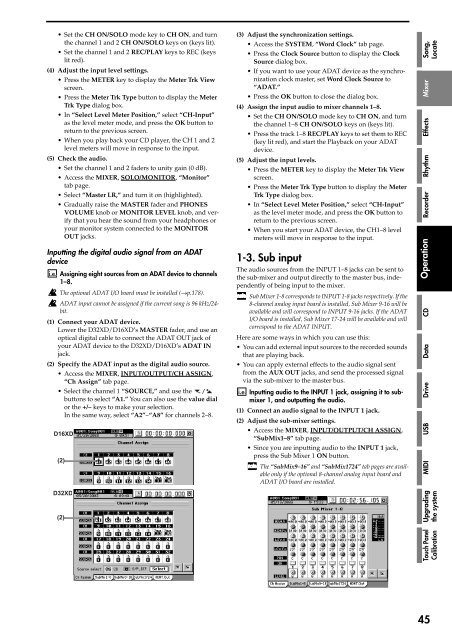
(2) Specify <str<strong>on</strong>g>the</str<strong>on</strong>g> ADAT input as <str<strong>on</strong>g>the</str<strong>on</strong>g> digital audio source.<br />
• Access <str<strong>on</strong>g>the</str<strong>on</strong>g> MIXER, INPUT/OUTPUT/CH ASSIGN,<br />
“Ch Assign” tab page.<br />
• Select <str<strong>on</strong>g>the</str<strong>on</strong>g> channel 1 “SOURCE,” and use <str<strong>on</strong>g>the</str<strong>on</strong>g><br />
butt<strong>on</strong>s to select “A1.” You can also use <str<strong>on</strong>g>the</str<strong>on</strong>g> value dial<br />
or <str<strong>on</strong>g>the</str<strong>on</strong>g> +/– keys to make your selecti<strong>on</strong>.<br />
In <str<strong>on</strong>g>the</str<strong>on</strong>g> same way, select “A2”–“A8” for channels 2–8.<br />
<str<strong>on</strong>g>D16XD</str<strong>on</strong>g><br />
(2)<br />
<str<strong>on</strong>g>D32XD</str<strong>on</strong>g><br />
(2)<br />
(3) Adjust <str<strong>on</strong>g>the</str<strong>on</strong>g> synchr<strong>on</strong>izati<strong>on</strong> settings.<br />
• Access <str<strong>on</strong>g>the</str<strong>on</strong>g> SYSTEM, “Word Clock” tab page.<br />
•Press <str<strong>on</strong>g>the</str<strong>on</strong>g> Clock Source butt<strong>on</strong> to display <str<strong>on</strong>g>the</str<strong>on</strong>g> Clock<br />
Source dialog box.<br />
• If you want to use your ADAT device as <str<strong>on</strong>g>the</str<strong>on</strong>g> synchr<strong>on</strong>izati<strong>on</strong><br />
clock master, set Word Clock Source to<br />
“ADAT.”<br />
•Press <str<strong>on</strong>g>the</str<strong>on</strong>g> OK butt<strong>on</strong> to close <str<strong>on</strong>g>the</str<strong>on</strong>g> dialog box.<br />
(4) Assign <str<strong>on</strong>g>the</str<strong>on</strong>g> input audio to mixer channels 1–8.<br />
• Set <str<strong>on</strong>g>the</str<strong>on</strong>g> CH ON/SOLO mode key to CH ON, and turn<br />
<str<strong>on</strong>g>the</str<strong>on</strong>g> channel 1–8 CH ON/SOLO keys <strong>on</strong> (keys lit).<br />
•Press <str<strong>on</strong>g>the</str<strong>on</strong>g> track 1–8 REC/PLAY keys to set <str<strong>on</strong>g>the</str<strong>on</strong>g>m to REC<br />
(key lit red), and start <str<strong>on</strong>g>the</str<strong>on</strong>g> Playback <strong>on</strong> your ADAT<br />
device.<br />
(5) Adjust <str<strong>on</strong>g>the</str<strong>on</strong>g> input levels.<br />
•Press <str<strong>on</strong>g>the</str<strong>on</strong>g> METER key to display <str<strong>on</strong>g>the</str<strong>on</strong>g> Meter Trk View<br />
screen.<br />
•Press <str<strong>on</strong>g>the</str<strong>on</strong>g> Meter Trk Type butt<strong>on</strong> to display <str<strong>on</strong>g>the</str<strong>on</strong>g> Meter<br />
Trk Type dialog box.<br />
• In “Select Level Meter Positi<strong>on</strong>,” select “CH-Input”<br />
as <str<strong>on</strong>g>the</str<strong>on</strong>g> level meter mode, and press <str<strong>on</strong>g>the</str<strong>on</strong>g> OK butt<strong>on</strong> to<br />
return to <str<strong>on</strong>g>the</str<strong>on</strong>g> previous screen.<br />
• When you start your ADAT device, <str<strong>on</strong>g>the</str<strong>on</strong>g> CH1–8 level<br />
meters will move in resp<strong>on</strong>se to <str<strong>on</strong>g>the</str<strong>on</strong>g> input.<br />
1-3. Sub input<br />
The audio sources from <str<strong>on</strong>g>the</str<strong>on</strong>g> INPUT 1–8 jacks can be sent to<br />
<str<strong>on</strong>g>the</str<strong>on</strong>g> sub-mixer and output directly to <str<strong>on</strong>g>the</str<strong>on</strong>g> master bus, independently<br />
of being input to <str<strong>on</strong>g>the</str<strong>on</strong>g> mixer.<br />
Sub Mixer 1-8 corresp<strong>on</strong>ds to INPUT 1-8 jacks respectively. If <str<strong>on</strong>g>the</str<strong>on</strong>g><br />
8-channel analog input board is installed, Sub Mixer 9-16 will be<br />
available and will corresp<strong>on</strong>d to INPUT 9-16 jacks. If <str<strong>on</strong>g>the</str<strong>on</strong>g> ADAT<br />
I/O board is installed, Sub Mixer 17-24 will be available and will<br />
corresp<strong>on</strong>d to <str<strong>on</strong>g>the</str<strong>on</strong>g> ADAT INPUT.<br />
Here are some ways in which you can use this:<br />
•You can add external input sources to <str<strong>on</strong>g>the</str<strong>on</strong>g> recorded sounds<br />
that are playing back.<br />
•You can apply external effects to <str<strong>on</strong>g>the</str<strong>on</strong>g> audio signal sent<br />
from <str<strong>on</strong>g>the</str<strong>on</strong>g> AUX OUT jacks, and send <str<strong>on</strong>g>the</str<strong>on</strong>g> processed signal<br />
via <str<strong>on</strong>g>the</str<strong>on</strong>g> sub-mixer to <str<strong>on</strong>g>the</str<strong>on</strong>g> master bus.<br />
Inputting audio to <str<strong>on</strong>g>the</str<strong>on</strong>g> INPUT 1 jack, assigning it to submixer<br />
1, and outputting <str<strong>on</strong>g>the</str<strong>on</strong>g> audio.<br />
(1) C<strong>on</strong>nect an audio signal to <str<strong>on</strong>g>the</str<strong>on</strong>g> INPUT 1 jack.<br />
(2) Adjust <str<strong>on</strong>g>the</str<strong>on</strong>g> sub-mixer settings.<br />
• Access <str<strong>on</strong>g>the</str<strong>on</strong>g> MIXER, INPUT/OUTPUT/CH ASSIGN,<br />
“SubMix1–8” tab page.<br />
• Since you are inputting audio to <str<strong>on</strong>g>the</str<strong>on</strong>g> INPUT 1 jack,<br />
press <str<strong>on</strong>g>the</str<strong>on</strong>g> Sub Mixer 1 ON butt<strong>on</strong>.<br />
The “SubMix9–16” and “SubMix1724” tab pages are available<br />
<strong>on</strong>ly if <str<strong>on</strong>g>the</str<strong>on</strong>g> opti<strong>on</strong>al 8-channel analog input board and<br />
ADAT I/O board are installed.<br />
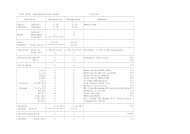
Operati<strong>on</strong> Recorder Rhythm Effects<br />
Mixer S<strong>on</strong>g,<br />
CD<br />
Data<br />
Drive<br />
USB<br />
MIDI<br />
Locate<br />
Upgrading<br />
<str<strong>on</strong>g>the</str<strong>on</strong>g> system<br />
Touch Panel<br />
Calibrati<strong>on</strong><br />
45