
Create successful ePaper yourself
Turn your PDF publications into a flip-book with our unique Google optimized e-Paper software.
(5) Press <str<strong>on</strong>g>the</str<strong>on</strong>g> REC key to put <str<strong>on</strong>g>the</str<strong>on</strong>g> <str<strong>on</strong>g>D32XD</str<strong>on</strong>g>/<str<strong>on</strong>g>D16XD</str<strong>on</strong>g> in recordready<br />
c<strong>on</strong>diti<strong>on</strong>.<br />
Trigger/RecStart<br />
The REC key and PLAY key will blink.<br />
Trigger/Punch In<br />
The REC key will blink.<br />
(6) Begin recording.<br />
Trigger/RecStart<br />
When <str<strong>on</strong>g>the</str<strong>on</strong>g> input signal exceeds <str<strong>on</strong>g>the</str<strong>on</strong>g> threshold level,<br />
recording and playback will start automatically (REC<br />
and PLAY keys will light).<br />
Trigger/Punch In<br />
Press <str<strong>on</strong>g>the</str<strong>on</strong>g> PLAY key to start playback (<str<strong>on</strong>g>the</str<strong>on</strong>g> REC key<br />
will blink, and <str<strong>on</strong>g>the</str<strong>on</strong>g> PLAY key will light). At <str<strong>on</strong>g>the</str<strong>on</strong>g> locati<strong>on</strong><br />
that you want to record, begin performing <strong>on</strong><br />
your instrument. When <str<strong>on</strong>g>the</str<strong>on</strong>g> input signal exceeds <str<strong>on</strong>g>the</str<strong>on</strong>g><br />
threshold level, recording will start automatically<br />
(REC and PLAY keys will light).<br />
(7) When you have finished performing, press <str<strong>on</strong>g>the</str<strong>on</strong>g> STOP<br />
key to stop.<br />
(“1-1. Basic recording” (→p.64), step (10))<br />
1-5. Re-recording a specific area<br />
(Punch-in/out)<br />
If you made a mistake in a recorded performance, or are not<br />
satisfied with a porti<strong>on</strong> of <str<strong>on</strong>g>the</str<strong>on</strong>g> performance, you can use<br />
“punch-in/out” recording to fix just that porti<strong>on</strong> without<br />
having to record <str<strong>on</strong>g>the</str<strong>on</strong>g> entire part over again. Punch-in/out recording<br />
can be d<strong>on</strong>e manually or automatically<br />
Punch-in: Switches from <str<strong>on</strong>g>the</str<strong>on</strong>g> playback mode to <str<strong>on</strong>g>the</str<strong>on</strong>g><br />
record mode.<br />
Punch-out: Switches from <str<strong>on</strong>g>the</str<strong>on</strong>g> record mode back to <str<strong>on</strong>g>the</str<strong>on</strong>g><br />
playback mode.<br />
Manual punch-in/out<br />
Here’s how to punch-in and punch-out manually.<br />
During playback, press <str<strong>on</strong>g>the</str<strong>on</strong>g> REC key or an opti<strong>on</strong>al PS-1 foot<br />
switch to begin recording, and <str<strong>on</strong>g>the</str<strong>on</strong>g>n press <str<strong>on</strong>g>the</str<strong>on</strong>g> REC key, PLAY<br />
key, or foot switch to stop recording.<br />
(1) Prepare to record.<br />
Refer to “1-1. Basic recording” (→p.64), steps (1)–(8).<br />
(2) Adjust <str<strong>on</strong>g>the</str<strong>on</strong>g> playback level.<br />
If you want to hear <str<strong>on</strong>g>the</str<strong>on</strong>g> recorded sound before and after<br />
<str<strong>on</strong>g>the</str<strong>on</strong>g> punch-in/out regi<strong>on</strong>, access <str<strong>on</strong>g>the</str<strong>on</strong>g> MIXER, SOLO/<br />
MONITOR, “M<strong>on</strong>itor” tab page, and turn “Cue” <strong>on</strong>.<br />
Then go to <str<strong>on</strong>g>the</str<strong>on</strong>g> “CueLevel” tab page, and adjust <str<strong>on</strong>g>the</str<strong>on</strong>g><br />
“LEVEL” of <str<strong>on</strong>g>the</str<strong>on</strong>g> track that you want to re-record<br />
(→p.51).<br />
(3) Move <str<strong>on</strong>g>the</str<strong>on</strong>g> locati<strong>on</strong> to a point earlier than <str<strong>on</strong>g>the</str<strong>on</strong>g> point<br />
where you want to start recording. (→p.38)<br />
(4) Press <str<strong>on</strong>g>the</str<strong>on</strong>g> PLAY key to begin playback (<str<strong>on</strong>g>the</str<strong>on</strong>g> PLAY key<br />
will light).<br />
The s<strong>on</strong>g will play back, and you will hear <str<strong>on</strong>g>the</str<strong>on</strong>g> sound of<br />
<str<strong>on</strong>g>the</str<strong>on</strong>g> playback tracks as well as <str<strong>on</strong>g>the</str<strong>on</strong>g> sound of <str<strong>on</strong>g>the</str<strong>on</strong>g> track you<br />
will be re-recording.<br />
(5) When you reach <str<strong>on</strong>g>the</str<strong>on</strong>g> point that you want to re-record,<br />
press <str<strong>on</strong>g>the</str<strong>on</strong>g> REC key. (The REC and PLAY keys will<br />
light.)<br />
Recording will begin (manual punch-in), and you can rerecord<br />
your performance.<br />
(6) When you reach <str<strong>on</strong>g>the</str<strong>on</strong>g> point at which you want to stop<br />
re-recording, press <str<strong>on</strong>g>the</str<strong>on</strong>g> REC key or <str<strong>on</strong>g>the</str<strong>on</strong>g> PLAY key. (The<br />
REC key will go dark.)<br />
Recording will stop (manual punch-out), and normal<br />
playback will resume. By repeating steps (5) and (6), you<br />
can re-record more than <strong>on</strong>e secti<strong>on</strong> in <strong>on</strong>e pass.<br />
(7) Press <str<strong>on</strong>g>the</str<strong>on</strong>g> STOP key to stop. (The PLAY key will go<br />
dark.)<br />
After you stop recording, move <str<strong>on</strong>g>the</str<strong>on</strong>g> locati<strong>on</strong> to a point<br />
earlier than where you began recording, and play back<br />
to verify that <str<strong>on</strong>g>the</str<strong>on</strong>g> re-recording is satisfactory.<br />
Using a foot switch for manual punch-in/out<br />
You can switch between playback and recording by pressing<br />
a PS-1 foot switch (sold separately).<br />
This lets you punch-in/out while you perform, or when <str<strong>on</strong>g>the</str<strong>on</strong>g><br />
<str<strong>on</strong>g>D32XD</str<strong>on</strong>g>/<str<strong>on</strong>g>D16XD</str<strong>on</strong>g> is located at a distance.<br />
(1) C<strong>on</strong>nect a foot switch to <str<strong>on</strong>g>the</str<strong>on</strong>g> FOOT SWITCH jack.<br />
(2) Access <str<strong>on</strong>g>the</str<strong>on</strong>g> SYSTEM, “C<strong>on</strong>trol” tab page, and specify<br />
<str<strong>on</strong>g>the</str<strong>on</strong>g> functi<strong>on</strong> of <str<strong>on</strong>g>the</str<strong>on</strong>g> foot switch.<br />
Set “Functi<strong>on</strong>” to “PunchIn-Out.”<br />
If you are using <str<strong>on</strong>g>the</str<strong>on</strong>g> PS-1 foot switch, make sure that “Polarity”<br />
is set to “–” (→p.126).<br />
(3) Perform manual punch-in/out recording.<br />
Follow <str<strong>on</strong>g>the</str<strong>on</strong>g> procedure described in “Manual punch-in/<br />
out.” When doing so, you can press <str<strong>on</strong>g>the</str<strong>on</strong>g> foot switch at<br />
steps (5) and (6) to switch between punch-in and punchout.<br />
Auto punch-in/out<br />
Here’s how to punch-in and punch-out automatically at <str<strong>on</strong>g>the</str<strong>on</strong>g><br />
locati<strong>on</strong>s you specify beforehand.<br />
You will not be able to execute recording if MIDI SYNC is set to<br />
MTC.<br />
(1) Prepare to record.<br />
Refer to “1-1. Basic recording” (→p.64), steps (1)–(5) and<br />
(7).<br />
(2) Set <str<strong>on</strong>g>the</str<strong>on</strong>g> playback level.<br />
If you want to hear <str<strong>on</strong>g>the</str<strong>on</strong>g> recorded sound before and after<br />
<str<strong>on</strong>g>the</str<strong>on</strong>g> regi<strong>on</strong> you are re-recording, access <str<strong>on</strong>g>the</str<strong>on</strong>g> MIXER,<br />
SOLO/MONITOR, “M<strong>on</strong>itor” tab page, and turn<br />
“Cue” <strong>on</strong>. Then go to <str<strong>on</strong>g>the</str<strong>on</strong>g> “CueLevel” tab page, and<br />
adjust <str<strong>on</strong>g>the</str<strong>on</strong>g> “LEVEL” of <str<strong>on</strong>g>the</str<strong>on</strong>g> track that you want to rerecord<br />
(→p.51).<br />
(3) Store <str<strong>on</strong>g>the</str<strong>on</strong>g> locati<strong>on</strong> at which you want to start recording<br />
in <str<strong>on</strong>g>the</str<strong>on</strong>g> IN (punch-in) locate point, and store <str<strong>on</strong>g>the</str<strong>on</strong>g> locati<strong>on</strong><br />
at which you want to stop recording in <str<strong>on</strong>g>the</str<strong>on</strong>g> OUT<br />
(punch-out) locate point.<br />
For details <strong>on</strong> setting <str<strong>on</strong>g>the</str<strong>on</strong>g> IN and OUT locati<strong>on</strong>s, refer to<br />
“Assigning locati<strong>on</strong>s to <str<strong>on</strong>g>the</str<strong>on</strong>g> Locate keys” (→p.38).<br />
(4) Access <str<strong>on</strong>g>the</str<strong>on</strong>g> REC/PLAY MODE, “Rec/Play” tab page,<br />
select <str<strong>on</strong>g>the</str<strong>on</strong>g> Auto Punch butt<strong>on</strong>, and turn <strong>on</strong> <str<strong>on</strong>g>the</str<strong>on</strong>g> auto<br />
punch-in/out functi<strong>on</strong>.<br />
The AUTO PUNCH indicator will light.<br />
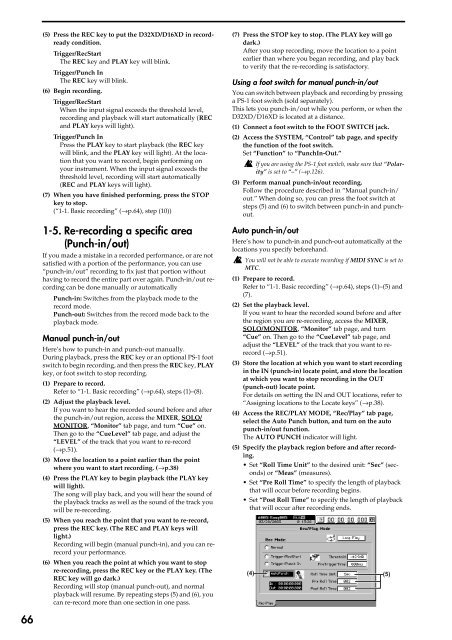
(5) Specify <str<strong>on</strong>g>the</str<strong>on</strong>g> playback regi<strong>on</strong> before and after recording.<br />
• Set “Roll Time Unit” to <str<strong>on</strong>g>the</str<strong>on</strong>g> desired unit: “Sec” (sec<strong>on</strong>ds)<br />
or “Meas” (measures).<br />
• Set “Pre Roll Time” to specify <str<strong>on</strong>g>the</str<strong>on</strong>g> length of playback<br />
that will occur before recording begins.<br />
• Set “Post Roll Time” to specify <str<strong>on</strong>g>the</str<strong>on</strong>g> length of playback<br />
that will occur after recording ends.<br />
(4)<br />
(5)<br />
66