
You also want an ePaper? Increase the reach of your titles
YUMPU automatically turns print PDFs into web optimized ePapers that Google loves.
Removing a disc<br />
(1) Press <str<strong>on</strong>g>the</str<strong>on</strong>g> eject butt<strong>on</strong> to open <str<strong>on</strong>g>the</str<strong>on</strong>g> disc tray. The tray will open about halfway.<br />
Manually pull <str<strong>on</strong>g>the</str<strong>on</strong>g> tray out far enough to remove <str<strong>on</strong>g>the</str<strong>on</strong>g> disc from <str<strong>on</strong>g>the</str<strong>on</strong>g> tray.<br />
(2)Gently remove <str<strong>on</strong>g>the</str<strong>on</strong>g> disc from <str<strong>on</strong>g>the</str<strong>on</strong>g> disc tray.<br />
(3)Push <str<strong>on</strong>g>the</str<strong>on</strong>g> disc tray in until it is completely closed.<br />
Emergency disc removal<br />
Normally you will be able to remove <str<strong>on</strong>g>the</str<strong>on</strong>g> disc as described<br />
above. However, if this is not possible due to a power failure or<br />
o<str<strong>on</strong>g>the</str<strong>on</strong>g>r problem, you can also remove <str<strong>on</strong>g>the</str<strong>on</strong>g> disc as follows.<br />
Insert a pin-like object of less than 1 mm diameter, such as a<br />
straightened paper clip, into <str<strong>on</strong>g>the</str<strong>on</strong>g> manual eject pinhole and push.<br />
The disc tray will be forced open.<br />
Excessive use of this method may cause <str<strong>on</strong>g>the</str<strong>on</strong>g> CD-R/RW drives to malfuncti<strong>on</strong>.<br />
This procedure must be performed with <str<strong>on</strong>g>the</str<strong>on</strong>g> power off.<br />
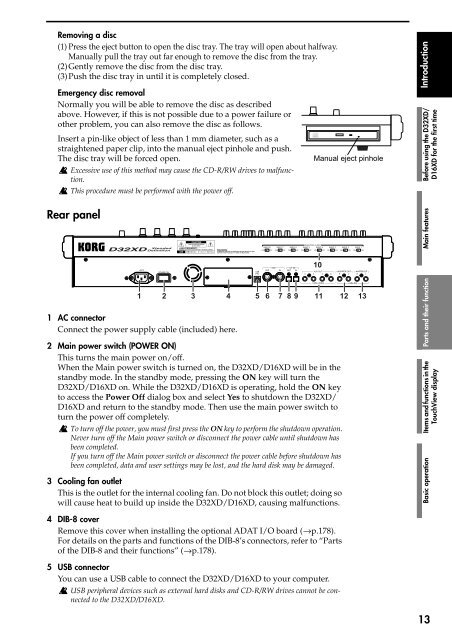
Manual eject pinhole<br />
Introducti<strong>on</strong><br />
Before using <str<strong>on</strong>g>the</str<strong>on</strong>g> <str<strong>on</strong>g>D32XD</str<strong>on</strong>g>/<br />
<str<strong>on</strong>g>D16XD</str<strong>on</strong>g> for <str<strong>on</strong>g>the</str<strong>on</strong>g> first time<br />
Rear panel<br />
Main features<br />
10<br />
1 2 3 4 5 6 7 8 9<br />
1 AC c<strong>on</strong>nector<br />
C<strong>on</strong>nect <str<strong>on</strong>g>the</str<strong>on</strong>g> power supply cable (included) here.<br />
11 12 13<br />
2 Main power switch (POWER ON)<br />
This turns <str<strong>on</strong>g>the</str<strong>on</strong>g> main power <strong>on</strong>/off.<br />
When <str<strong>on</strong>g>the</str<strong>on</strong>g> Main power switch is turned <strong>on</strong>, <str<strong>on</strong>g>the</str<strong>on</strong>g> <str<strong>on</strong>g>D32XD</str<strong>on</strong>g>/<str<strong>on</strong>g>D16XD</str<strong>on</strong>g> will be in <str<strong>on</strong>g>the</str<strong>on</strong>g><br />
standby mode. In <str<strong>on</strong>g>the</str<strong>on</strong>g> standby mode, pressing <str<strong>on</strong>g>the</str<strong>on</strong>g> ON key will turn <str<strong>on</strong>g>the</str<strong>on</strong>g><br />
<str<strong>on</strong>g>D32XD</str<strong>on</strong>g>/<str<strong>on</strong>g>D16XD</str<strong>on</strong>g> <strong>on</strong>. While <str<strong>on</strong>g>the</str<strong>on</strong>g> <str<strong>on</strong>g>D32XD</str<strong>on</strong>g>/<str<strong>on</strong>g>D16XD</str<strong>on</strong>g> is operating, hold <str<strong>on</strong>g>the</str<strong>on</strong>g> ON key<br />
to access <str<strong>on</strong>g>the</str<strong>on</strong>g> Power Off dialog box and select Yes to shutdown <str<strong>on</strong>g>the</str<strong>on</strong>g> <str<strong>on</strong>g>D32XD</str<strong>on</strong>g>/<br />
<str<strong>on</strong>g>D16XD</str<strong>on</strong>g> and return to <str<strong>on</strong>g>the</str<strong>on</strong>g> standby mode. Then use <str<strong>on</strong>g>the</str<strong>on</strong>g> main power switch to<br />
turn <str<strong>on</strong>g>the</str<strong>on</strong>g> power off completely.<br />
To turn off <str<strong>on</strong>g>the</str<strong>on</strong>g> power, you must first press <str<strong>on</strong>g>the</str<strong>on</strong>g> ON key to perform <str<strong>on</strong>g>the</str<strong>on</strong>g> shutdown operati<strong>on</strong>.<br />
Never turn off <str<strong>on</strong>g>the</str<strong>on</strong>g> Main power switch or disc<strong>on</strong>nect <str<strong>on</strong>g>the</str<strong>on</strong>g> power cable until shutdown has<br />
been completed.<br />
If you turn off <str<strong>on</strong>g>the</str<strong>on</strong>g> Main power switch or disc<strong>on</strong>nect <str<strong>on</strong>g>the</str<strong>on</strong>g> power cable before shutdown has<br />
been completed, data and user settings may be lost, and <str<strong>on</strong>g>the</str<strong>on</strong>g> hard disk may be damaged.<br />
3 Cooling fan outlet<br />
This is <str<strong>on</strong>g>the</str<strong>on</strong>g> outlet for <str<strong>on</strong>g>the</str<strong>on</strong>g> internal cooling fan. Do not block this outlet; doing so<br />
will cause heat to build up inside <str<strong>on</strong>g>the</str<strong>on</strong>g> <str<strong>on</strong>g>D32XD</str<strong>on</strong>g>/<str<strong>on</strong>g>D16XD</str<strong>on</strong>g>, causing malfuncti<strong>on</strong>s.<br />
Parts and <str<strong>on</strong>g>the</str<strong>on</strong>g>ir functi<strong>on</strong><br />
Items and functi<strong>on</strong>s in <str<strong>on</strong>g>the</str<strong>on</strong>g><br />
TouchView display<br />
Basic operati<strong>on</strong><br />
4 DIB-8 cover<br />
Remove this cover when installing <str<strong>on</strong>g>the</str<strong>on</strong>g> opti<strong>on</strong>al ADAT I/O board (→p.178).<br />
For details <strong>on</strong> <str<strong>on</strong>g>the</str<strong>on</strong>g> parts and functi<strong>on</strong>s of <str<strong>on</strong>g>the</str<strong>on</strong>g> DIB-8’s c<strong>on</strong>nectors, refer to “Parts<br />
of <str<strong>on</strong>g>the</str<strong>on</strong>g> DIB-8 and <str<strong>on</strong>g>the</str<strong>on</strong>g>ir functi<strong>on</strong>s” (→p.178).<br />
5 USB c<strong>on</strong>nector<br />
You can use a USB cable to c<strong>on</strong>nect <str<strong>on</strong>g>the</str<strong>on</strong>g> <str<strong>on</strong>g>D32XD</str<strong>on</strong>g>/<str<strong>on</strong>g>D16XD</str<strong>on</strong>g> to your computer.<br />
USB peripheral devices such as external hard disks and CD-R/RW drives cannot be c<strong>on</strong>nected<br />
to <str<strong>on</strong>g>the</str<strong>on</strong>g> <str<strong>on</strong>g>D32XD</str<strong>on</strong>g>/<str<strong>on</strong>g>D16XD</str<strong>on</strong>g>.<br />
13