
Create successful ePaper yourself
Turn your PDF publications into a flip-book with our unique Google optimized e-Paper software.
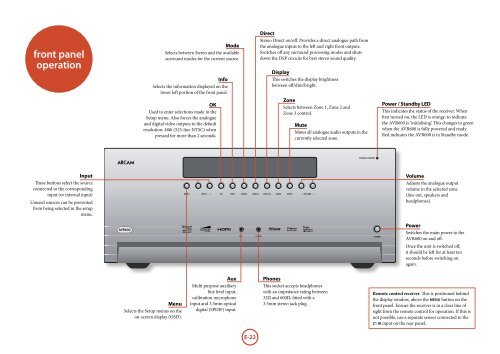
front panel<br />
operation<br />
Mode<br />
Selects between Stereo and the available<br />
surround modes for the current source.<br />
Info<br />
Selects the information displayed on the<br />
lower left portion of the front panel.<br />
OK<br />
Used to enter selections made in the<br />
Setup menu. Also forces the analogue<br />
and digital video outputs to the default<br />
resolution: 480i (525-line NTSC) when<br />
pressed for more than 2 seconds.<br />
Direct<br />
Stereo Direct on/off. Provides a direct analogue path from<br />
the analogue inputs to the left and right front outputs.<br />
Switches off any surround processing modes and shuts<br />
down the DSP circuits for best stereo sound quality.<br />
Display<br />
This switches the display brightness<br />
between off/dim/bright.<br />
Zone<br />
Selects between Zone 1, Zone 2 and<br />
Zone 3 control.<br />
Mute<br />
Mutes all analogue audio outputs in the<br />
currently selected zone.<br />
Power / Standby LED<br />
This indicates the status of the receiver. When<br />
first turned on, the LED is orange, to indicate<br />
the <strong>AVR600</strong> is ‘initialising’. This changes to green<br />
when the <strong>AVR600</strong> is fully powered and ready.<br />
Red indicates the <strong>AVR600</strong> is in Standby mode.<br />
<br />
Input<br />
These buttons select the source<br />
connected to the corresponding<br />
input (or internal input)<br />
Unused sources can be prevented<br />
from being selected in the setup<br />
menu.<br />
<br />
<br />
<br />
<br />
<br />
<br />
<br />
<br />
<br />
<br />
Volume<br />
Adjusts the analogue output<br />
volume in the selected zone<br />
(line out, speakers and<br />
headphones).<br />
<br />
<br />
<br />
<br />
<br />
Power<br />
Switches the main power to the<br />
<strong>AVR600</strong> on and off.<br />
Once the unit is switched off,<br />
it should be left for at least ten<br />
seconds before switching on<br />
again.<br />
Menu<br />
Selects the Setup menus on the<br />
on-screen display (OSD).<br />
Aux<br />
Multi purpose auxiliary<br />
line level input,<br />
calibration microphone<br />
input and 3.5mm optical<br />
digital (SPDIF) input.<br />
Phones<br />
This socket accepts headphones<br />
with an impedance rating between<br />
32Ω and 600Ω, fitted with a<br />
3.5mm stereo jack plug.<br />
Remote control receiver. This is positioned behind<br />
the display window, above the MENU button on the<br />
front panel. Ensure the receiver is in a clear line of<br />
sight from the remote control for operation. If this is<br />
not possible, use a separate sensor connected to the<br />
Z1 IR input on the rear panel.<br />
E-22