Create successful ePaper yourself
Turn your PDF publications into a flip-book with our unique Google optimized e-Paper software.
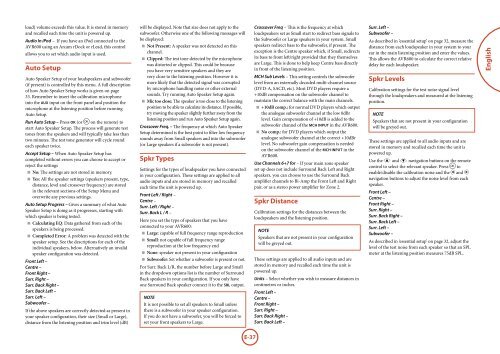
loud) volume exceeds this value. It is stored in memory<br />
and recalled each time the unit is powered up.<br />
Audio In iPod – If you have an iPod connected to the<br />
<strong>AVR600</strong> using an <strong>Arcam</strong> rDock or rLead, this control<br />
allows you to set which audio input is used.<br />
Auto Setup<br />
Auto Speaker Setup of your loudspeakers and subwoofer<br />
(if present) is controlled by this menu. A full description<br />
of how Auto Speaker Setup works is given on page<br />
33. Remember to insert the calibration microphone<br />
into the AUX input on the front panel and position the<br />
microphone at the listening position before running<br />
Auto Setup.<br />
Run Auto Setup – Press OK (or O on the remote) to<br />
start Auto Speaker Setup. The process will generate test<br />
tones from the speakers and will typically take less than<br />
two minutes. The test tone generator will cycle round<br />
each speaker twice.<br />
Accept Setup – When Auto Speaker Setup has<br />
completed without errors you can choose to accept or<br />
reject the settings<br />
< No: The settings are not stored in memory.<br />
< Yes: All the speaker settings (speakers present, type,<br />
distance, level and crossover frequency) are stored<br />
in the relevant sections of the Setup Menu and<br />
overwrite any previous settings.<br />
Auto Setup Progress – Gives a summary of what Auto<br />
Speaker Setup is doing as it progresses, starting with<br />
which speaker is being tested.<br />
< Calculating EQ: Data gathered from each of the<br />
speakers is being processed.<br />
< Completed Error: A problem was detected with the<br />
speaker setup. See the descriptions for each of the<br />
individual speakers, below. Alternatively an invalid<br />
speaker configuration was detected.<br />
Front Left –<br />
Centre –<br />
Front Right –<br />
Surr. Right –<br />
Surr. Back Right –<br />
Surr. Back Left –<br />
Surr. Left –<br />
Subwoofer –<br />
If the above speakers are correctly detected as present in<br />
your speaker configuration, their size (Small or Large),<br />
distance from the listening position and trim level (dB)<br />
will be displayed. Note that size does not apply to the<br />
subwoofer. Otherwise one of the following messages will<br />
be displayed:<br />
< Not Present: A speaker was not detected on this<br />
channel.<br />
< Clipped: The test tone detected by the microphone<br />
was distorted or clipped. This could be because<br />
you have very sensitive speakers and they are<br />
very close to the listening position. However it is<br />
more likely that the detected signal was corrupted<br />
by microphone handling noise or other external<br />
sounds. Try running Auto Speaker Setup again.<br />
< Mic too close: The speaker is too close to the listening<br />
position to be able to calculate its distance. If possible,<br />
try moving the speaker slightly further away from the<br />
listening position and run Auto Speaker Setup again.<br />
Crossover Freq. – The frequency at which Auto Speaker<br />
Setup determined is the best point to filter low frequency<br />
sounds away from Small speakers and into the subwoofer<br />
(or Large speakers if a subwoofer is not present).<br />
Spkr Types<br />
Settings for the types of loudspeaker you have connected<br />
in your configuration. These settings are applied to all<br />
audio inputs and are stored in memory and recalled<br />
each time the unit is powered up.<br />
Front Left / Right –<br />
Centre –<br />
Surr. Left / Right –<br />
Surr. Back L / R –<br />
Here you set the type of speakers that you have<br />
connected to your <strong>AVR600</strong>:<br />
< Large: capable of full frequency range reproduction<br />
< Small: not capable of full frequency range<br />
reproduction at the low frequency end<br />
< None: speaker not present in your configuration<br />
< Subwoofer: Set whether a subwoofer is present or not.<br />
For Surr. Back L/R, the number before Large and Small<br />
in the dropdown options list is the number of Surround<br />
Back speakers in your configuration. If you only have<br />
one Surround Back speaker connect it to the SBL output.<br />
NOTE<br />
It is not possible to set all speakers to Small unless<br />
there is a subwoofer in your speaker configuration.<br />
If you do not have a subwoofer, you will be forced to<br />
set your front speakers to Large.<br />
Crossover Freq – This is the frequency at which<br />
loudspeakers set as Small start to redirect bass signals to<br />
the Subwoofer or Large speakers in your system. Small<br />
speakers redirect bass to the subwoofer, if present. The<br />
exception is the Centre speaker which, if Small, redirects<br />
its bass to front left/right provided that they themselves<br />
are Large. This is done to help keep Centre bass directly<br />
in front of the listening position.<br />
MCH Sub Levels – This setting controls the subwoofer<br />
level from an externally decoded multi-channel source<br />
(DVD-A, SACD, etc). Most DVD players require a<br />
+10dB compensation on the subwoofer channel to<br />
maintain the correct balance with the main channels.<br />
< +10dB comp.: for normal DVD players which output<br />
the analogue subwoofer channel at the low 0dBr<br />
level. Gain compensation of +10dB is added to the<br />
subwoofer channel of the MCH input in the <strong>AVR600</strong>.<br />
< No comp.: for DVD players which output the<br />
analogue subwoofer channel at the correct +10dBr<br />
level. No subwoofer gain compensation is needed<br />
on the subwoofer channel of the MCH input in the<br />
<strong>AVR600</strong>.<br />
Use Channels 6+7 for – If your main zone speaker<br />
set up does not include Surround Back Left and Right<br />
speakers, you can choose to use the Surround Back<br />
amplifier channels to Bi-Amp the Front Left and Right<br />
pair, or as a stereo power amplifier for Zone 2.<br />
Spkr Distance<br />
Calibration settings for the distances between the<br />
loudspeakers and the listening position.<br />
NOTE<br />
Speakers that are not present in your configuration<br />
will be greyed out.<br />
These settings are applied to all audio inputs and are<br />
stored in memory and recalled each time the unit is<br />
powered up.<br />
Units – Select whether you wish to measure distances in<br />
centimetres or inches.<br />
Front Left –<br />
Centre –<br />
Front Right –<br />
Surr. Right –<br />
Surr. Back Right –<br />
Surr. Back Left –<br />
Surr. Left –<br />
Subwoofer –<br />
As described in ‘essential setup’ on page 32, measure the<br />
distance from each loudspeaker in your system to your<br />
ear in the main listening position and enter the values.<br />
This allows the <strong>AVR600</strong> to calculate the correct relative<br />
delay for each loudspeaker.<br />
Spkr Levels<br />
Calibration settings for the test noise signal level<br />
through the loudspeakers and measured at the listening<br />
position.<br />
NOTE<br />
Speakers that are not present in your configuration<br />
will be greyed out.<br />
These settings are applied to all audio inputs and are<br />
stored in memory and recalled each time the unit is<br />
powered up.<br />
Use the B and C navigation buttons on the remote<br />
control to select the relevant speaker. Press O to<br />
enable/disable the calibration noise and the D and E<br />
navigation buttons to adjust the noise level from each<br />
speaker.<br />
Front Left –<br />
Centre –<br />
Front Right –<br />
Surr. Right –<br />
Surr. Back Right –<br />
Surr. Back Left –<br />
Surr. Left –<br />
Subwoofer –<br />
As described in ‘essential setup’ on page 32, adjust the<br />
level of the test noise from each speaker so that an SPL<br />
meter at the listening position measures 75dB SPL.<br />
English<br />
E-37


