
Create successful ePaper yourself
Turn your PDF publications into a flip-book with our unique Google optimized e-Paper software.
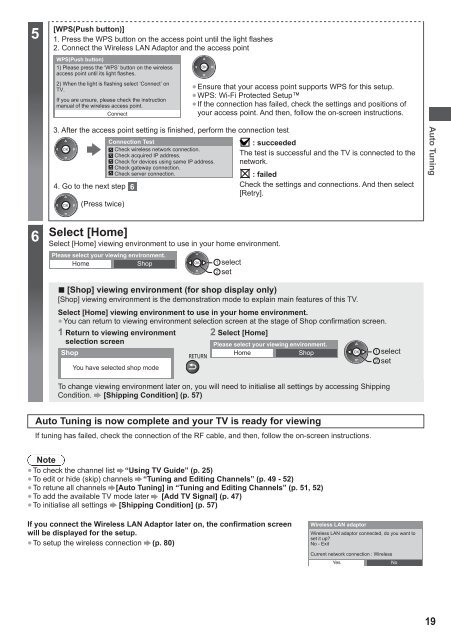
5<br />
[WPS(Push button)]<br />
1. Press the WPS button on the access point until the light flashes<br />
2. Connect the Wireless LAN Adaptor and the access point<br />
WPS(Push button)<br />
1) Please press the ‘WPS’ button on the wireless<br />
access point until its light flashes.<br />
2) When the light is flashing select ‘Connect’ on<br />
TV.<br />
If you are unsure, please check the instruction<br />
manual of the wireless access point.<br />
Connect<br />
● Ensure that your access point supports WPS for this setup.<br />
● WPS: Wi-Fi Protected Setup<br />
● If the connection has failed, check the settings and positions of<br />
your access point. And then, follow the on-screen instructions.<br />
3. After the access point setting is finished, perform the connection test<br />
4. Go to the next step<br />
(Press twice)<br />
Connection Test : succeeded<br />
Check wireless network connection.<br />
Check acquired IP address.<br />
Check for devices using same IP address.<br />
Check gateway connection.<br />
Check server connection.<br />
The test is successful and the TV is connected to the<br />
network.<br />
: failed<br />
Check the settings and connections. And then select<br />
[Retry].<br />
Auto Tuning<br />
6<br />
Select [Home]<br />
Select [Home] viewing environment to use in your home environment.<br />
Please select your viewing environment.<br />
Home Shop select<br />
set<br />
■ [Shop] viewing environment (for shop display only)<br />
[Shop] viewing environment is the demonstration mode to explain main features of this TV.<br />
Select [Home] viewing environment to use in your home environment.<br />
● You can return to viewing environment selection screen at the stage of Shop confirmation screen.<br />
2 Select [Home]<br />
1 Return to viewing environment<br />
selection screen<br />
Shop<br />
You have selected shop mode<br />
Please select your viewing environment.<br />
Home Shop select<br />
set<br />
To change viewing environment later on, you will need to initialise all settings by accessing Shipping<br />
Condition. [Shipping Condition] (p. 57)<br />
Auto Tuning is now complete and your TV is ready for viewing<br />
If tuning has failed, check the connection of the RF cable, and then, follow the on-screen instructions.<br />
Note<br />
● To check the channel list “<strong>Using</strong> TV Guide” (p. 25)<br />
● To edit or hide (skip) channels “Tuning and Editing Channels” (p. 49 - 52)<br />
● To retune all channels [Auto Tuning] in “Tuning and Editing Channels” (p. 51, 52)<br />
● To add the available TV mode later [Add TV Signal] (p. 47)<br />
● To initialise all settings [Shipping Condition] (p. 57)<br />
If you connect the Wireless LAN Adaptor later on, the confirmation screen<br />
will be displayed for the setup.<br />
● To setup the wireless connection (p. 80)<br />
Wireless LAN adaptor<br />
Wireless LAN adaptor connected, do you want to<br />
set it up?<br />
No - Exit<br />
Current network connection : Wireless<br />
Yes<br />
No<br />
19