
You also want an ePaper? Increase the reach of your titles
YUMPU automatically turns print PDFs into web optimized ePapers that Google loves.
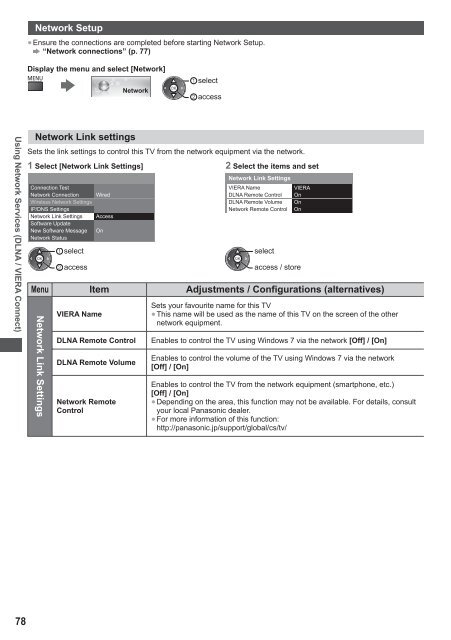
Network Setup<br />
● Ensure the connections are completed before starting Network Setup.<br />
“Network connections” (p. 77)<br />
Display the menu and select [Network]<br />
Network<br />
select<br />
access<br />
<strong>Using</strong> Network Services (DLNA / VIERA Connect)<br />
Network Link settings<br />
Sets the link settings to control this TV from the network equipment via the network.<br />
1 Select [Network Link Settings] 2 Select the items and set<br />
Connection Test<br />
Network Connection Wired<br />
Wireless Network Settings<br />
IP/DNS Settings<br />
Network Link Settings Access<br />
Software Update<br />
New Software Message On<br />
Network Status<br />
select<br />
access<br />
Network Link Settings<br />
VIERA Name<br />
VIERA<br />
DLNA Remote Control On<br />
DLNA Remote Volume On<br />
Network Remote Control On<br />
select<br />
access / store<br />
Menu Item Adjustments / Configurations (alternatives)<br />
Network Link Settings<br />
VIERA Name<br />
Sets your favourite name for this TV<br />
● This name will be used as the name of this TV on the screen of the other<br />
network equipment.<br />
DLNA Remote Control Enables to control the TV using Windows 7 via the network [Off] / [On]<br />
DLNA Remote Volume<br />
Network Remote<br />
Control<br />
Enables to control the volume of the TV using Windows 7 via the network<br />
[Off] / [On]<br />
Enables to control the TV from the network equipment (smartphone, etc.)<br />
[Off] / [On]<br />
● Depending on the area, this function may not be available. For details, consult<br />
your local Panasonic dealer.<br />
● For more information of this function:<br />
http://panasonic.jp/support/global/cs/tv/<br />
78