
Create successful ePaper yourself
Turn your PDF publications into a flip-book with our unique Google optimized e-Paper software.
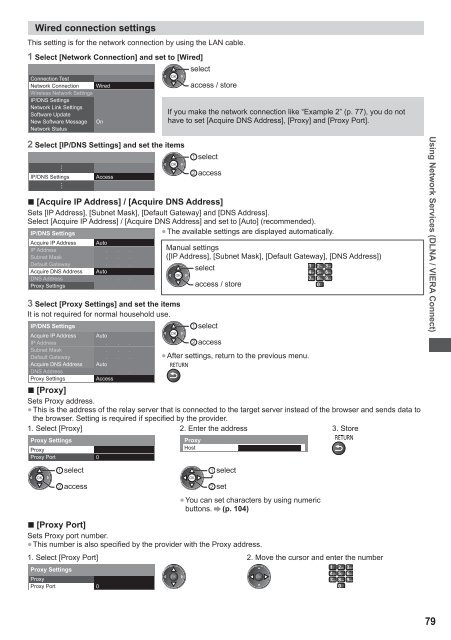
Wired connection settings<br />
This setting is for the network connection by using the LAN cable.<br />
1 Select [Network Connection] and set to [Wired]<br />
Connection Test<br />
Network Connection Wired<br />
Wireless Network Settings<br />
IP/DNS Settings<br />
Network Link Settings<br />
Software Update<br />
New Software Message On<br />
Network Status<br />
select<br />
access / store<br />
If you make the network connection like “Example 2” (p. 77), you do not<br />
have to set [Acquire DNS Address], [Proxy] and [Proxy Port].<br />
2 Select [IP/DNS Settings] and set the items<br />
IP/DNS Settings Access<br />
select<br />
access<br />
■ [Acquire IP Address] / [Acquire DNS Address]<br />
Sets [IP Address], [Subnet Mask], [Default Gateway] and [DNS Address].<br />
Select [Acquire IP Address] / [Acquire DNS Address] and set to [Auto] (recommended).<br />
● The available settings are displayed automatically.<br />
IP/DNS Settings<br />
Acquire IP Address Auto<br />
IP Address<br />
Subnet Mask<br />
Default Gateway<br />
Acquire DNS Address Auto<br />
DNS Address<br />
Proxy Settings<br />
3 Select [Proxy Settings] and set the items<br />
It is not required for normal household use.<br />
IP/DNS Settings<br />
Acquire IP Address<br />
IP Address<br />
Subnet Mask<br />
Default Gateway<br />
Acquire DNS Address<br />
DNS Address<br />
Proxy Settings<br />
Auto<br />
Auto<br />
Access<br />
Manual settings<br />
([IP Address], [Subnet Mask], [Default Gateway], [DNS Address])<br />
select<br />
access / store<br />
select<br />
access<br />
● After settings, return to the previous menu.<br />
■ [Proxy]<br />
Sets Proxy address.<br />
● This is the address of the relay server that is connected to the target server instead of the browser and sends data to<br />
the browser. Setting is required if specified by the provider.<br />
1. Select [Proxy] 2. Enter the address 3. Store<br />
Proxy Settings Proxy<br />
Proxy<br />
Host<br />
Proxy Port<br />
0<br />
select<br />
select<br />
<strong>Using</strong> Network Services (DLNA / VIERA Connect)<br />
access<br />
set<br />
● You can set characters by using numeric<br />
buttons. (p. 104)<br />
■ [Proxy Port]<br />
Sets Proxy port number.<br />
● This number is also specified by the provider with the Proxy address.<br />
1. Select [Proxy Port] 2. Move the cursor and enter the number<br />
Proxy Settings<br />
Proxy<br />
Proxy Port<br />
0<br />
79