3to 11hp 4-cycle l-head engines - Small Engine Suppliers
3to 11hp 4-cycle l-head engines - Small Engine Suppliers
3to 11hp 4-cycle l-head engines - Small Engine Suppliers

You also want an ePaper? Increase the reach of your titles
YUMPU automatically turns print PDFs into web optimized ePapers that Google loves.
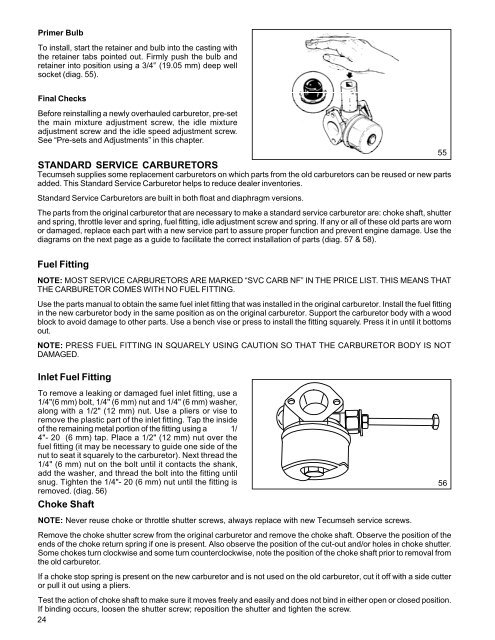
Primer Bulb<br />
To install, start the retainer and bulb into the casting with<br />
the retainer tabs pointed out. Firmly push the bulb and<br />
retainer into position using a 3/4'’ (19.05 mm) deep well<br />
socket (diag. 55).<br />
Final Checks<br />
Before reinstalling a newly overhauled carburetor, pre-set<br />
the main mixture adjustment screw, the idle mixture<br />
adjustment screw and the idle speed adjustment screw.<br />
See “Pre-sets and Adjustments” in this chapter.<br />
STANDARD SERVICE CARBURETORS<br />
Tecumseh supplies some replacement carburetors on which parts from the old carburetors can be reused or new parts<br />
added. This Standard Service Carburetor helps to reduce dealer inventories.<br />
Standard Service Carburetors are built in both float and diaphragm versions.<br />
The parts from the original carburetor that are necessary to make a standard service carburetor are: choke shaft, shutter<br />
and spring, throttle lever and spring, fuel fitting, idle adjustment screw and spring. If any or all of these old parts are worn<br />
or damaged, replace each part with a new service part to assure proper function and prevent engine damage. Use the<br />
diagrams on the next page as a guide to facilitate the correct installation of parts (diag. 57 & 58).<br />
55<br />
Fuel Fitting<br />
NOTE: MOST SERVICE CARBURETORS ARE MARKED “SVC CARB NF” IN THE PRICE LIST. THIS MEANS THAT<br />
THE CARBURETOR COMES WITH NO FUEL FITTING.<br />
Use the parts manual to obtain the same fuel inlet fitting that was installed in the original carburetor. Install the fuel fitting<br />
in the new carburetor body in the same position as on the original carburetor. Support the carburetor body with a wood<br />
block to avoid damage to other parts. Use a bench vise or press to install the fitting squarely. Press it in until it bottoms<br />
out.<br />
NOTE: PRESS FUEL FITTING IN SQUARELY USING CAUTION SO THAT THE CARBURETOR BODY IS NOT<br />
DAMAGED.<br />
Inlet Fuel Fitting<br />
To remove a leaking or damaged fuel inlet fitting, use a<br />
1/4"(6 mm) bolt, 1/4" (6 mm) nut and 1/4" (6 mm) washer,<br />
along with a 1/2" (12 mm) nut. Use a pliers or vise to<br />
remove the plastic part of the inlet fitting. Tap the inside<br />
of the remaining metal portion of the fitting using a 1/<br />
4"- 20 (6 mm) tap. Place a 1/2" (12 mm) nut over the<br />
fuel fitting (it may be necessary to guide one side of the<br />
nut to seat it squarely to the carburetor). Next thread the<br />
1/4" (6 mm) nut on the bolt until it contacts the shank,<br />
add the washer, and thread the bolt into the fitting until<br />
snug. Tighten the 1/4"- 20 (6 mm) nut until the fitting is<br />
removed. (diag. 56)<br />
Choke Shaft<br />
NOTE: Never reuse choke or throttle shutter screws, always replace with new Tecumseh service screws.<br />
Remove the choke shutter screw from the original carburetor and remove the choke shaft. Observe the position of the<br />
ends of the choke return spring if one is present. Also observe the position of the cut-out and/or holes in choke shutter.<br />
Some chokes turn clockwise and some turn counterclockwise, note the position of the choke shaft prior to removal from<br />
the old carburetor.<br />
If a choke stop spring is present on the new carburetor and is not used on the old carburetor, cut it off with a side cutter<br />
or pull it out using a pliers.<br />
Test the action of choke shaft to make sure it moves freely and easily and does not bind in either open or closed position.<br />
If binding occurs, loosen the shutter screw; reposition the shutter and tighten the screw.<br />
24<br />
56