3to 11hp 4-cycle l-head engines - Small Engine Suppliers
3to 11hp 4-cycle l-head engines - Small Engine Suppliers
3to 11hp 4-cycle l-head engines - Small Engine Suppliers

Create successful ePaper yourself
Turn your PDF publications into a flip-book with our unique Google optimized e-Paper software.
GOVERNOR GEAR AND SHAFT SERVICE<br />
After the cylinder cover is removed from the engine, the governor spool, gear, or governor shaft can be removed. On<br />
older style governor assemblies, the retaining ring must be removed to allow the spool or gear to slide off the shaft.<br />
Newer style governor shafts (3 - 6.75 model <strong>engines</strong>) use an upset to hold the governor spool on. If the gear requires<br />
replacement, the governor shaft will have to be removed.<br />
Governor Spool Replacement With Upset Style Governor Shaft<br />
The spool can be replaced without removing the governor<br />
shaft. Grip the original spool in a vise and use a twisting<br />
and pulling motion on the flange until the spool is free.<br />
Install the new spool by starting it on the shaft and then<br />
turning the flange over. This will allow the weights to hang<br />
in the proper position. Place the spool on a solid surface<br />
and push on the flange until the spool seats. The governor<br />
weights must be in position under the spool after<br />
installation. (diag. 9)<br />
Governor Gear or Shaft Replacement, Upset<br />
Style Governor Shaft<br />
1. Grip the original spool in a vise and use a twisting<br />
and pulling motion on the flange until the spool is<br />
free.<br />
2. Clamp the shaft in a vise and pound gently on the<br />
flange with a wooden or plastic mallet to remove the<br />
shaft.<br />
NOTE: DO NOT TWIST THE SHAFT WHEN REMOVING.<br />
THE SHAFT BOSS MAY BECOME ENLARGED,<br />
LEAVING THE NEW GOVERNOR SHAFT LOOSE AND<br />
CAUSING SEVERE DAMAGE.<br />
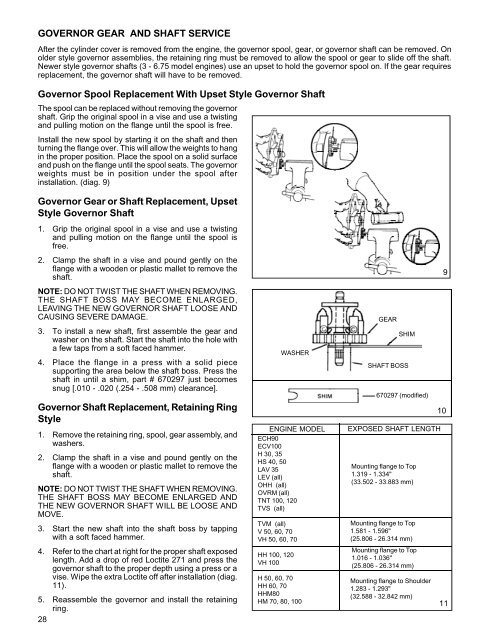
3. To install a new shaft, first assemble the gear and<br />
washer on the shaft. Start the shaft into the hole with<br />
a few taps from a soft faced hammer.<br />
4. Place the flange in a press with a solid piece<br />
supporting the area below the shaft boss. Press the<br />
shaft in until a shim, part # 670297 just becomes<br />
snug [.010 - .020 (.254 - .508 mm) clearance].<br />
Governor Shaft Replacement, Retaining Ring<br />
Style<br />
1. Remove the retaining ring, spool, gear assembly, and<br />
washers.<br />
2. Clamp the shaft in a vise and pound gently on the<br />
flange with a wooden or plastic mallet to remove the<br />
shaft.<br />
NOTE: DO NOT TWIST THE SHAFT WHEN REMOVING.<br />
THE SHAFT BOSS MAY BECOME ENLARGED AND<br />
THE NEW GOVERNOR SHAFT WILL BE LOOSE AND<br />
MOVE.<br />
3. Start the new shaft into the shaft boss by tapping<br />
with a soft faced hammer.<br />
4. Refer to the chart at right for the proper shaft exposed<br />
length. Add a drop of red Loctite 271 and press the<br />
governor shaft to the proper depth using a press or a<br />
vise. Wipe the extra Loctite off after installation (diag.<br />
11).<br />
5. Reassemble the governor and install the retaining<br />
ring.<br />
28<br />
ENGINE MODEL<br />
ECH90<br />
ECV100<br />
H 30, 35<br />
HS 40, 50<br />
LAV 35<br />
LEV (all)<br />
OHH (all)<br />
OVRM (all)<br />
TNT 100, 120<br />
TVS (all)<br />
TVM (all)<br />
V 50, 60, 70<br />
VH 50, 60, 70<br />
HH 100, 120<br />
VH 100<br />
WASHER<br />
GEAR<br />
SHIM<br />
SHAFT BOSS<br />
670297 (modified)<br />
EXPOSED SHAFT LENGTH<br />
Mounting flange to Top<br />
1.319 - 1.334"<br />
(33.502 - 33.883 mm)<br />
Mounting flange to Top<br />
1.581 - 1.596"<br />
(25.806 - 26.314 mm)<br />
Mounting flange to Top<br />
1.016 - 1.036"<br />
(25.806 - 26.314 mm)<br />
H 50, 60, 70<br />
Mounting flange to Shoulder<br />
HH 60, 70<br />
1.283 - 1.293"<br />
HHM80<br />
(32.588 - 32.842 mm)<br />
HM 70, 80, 100 11<br />
9<br />
10