3to 11hp 4-cycle l-head engines - Small Engine Suppliers
3to 11hp 4-cycle l-head engines - Small Engine Suppliers
3to 11hp 4-cycle l-head engines - Small Engine Suppliers

Create successful ePaper yourself
Turn your PDF publications into a flip-book with our unique Google optimized e-Paper software.
Standard rope lengths<br />
54" (16.5 meters) standard stamped steel starter<br />
61" (18.6 meters) vertical pull - horizontal engagement<br />
type<br />
65" (20 meters) vertical pull - vertical engagement<br />
type<br />
85" (26 meters) extended handlebar rope start<br />
(compliance)<br />
Check the old rope for the right length for the application.<br />
Some applications require longer lengths. The rope ends<br />
should be cauterized by burning with a match and wiping<br />
the rope end with a cloth while hot.<br />
Rope replacement can be done without the starter being<br />
disassembled on vertical pull starters that have "V"<br />
notches in the bracket. Use the following procedure for<br />
rope replacement.<br />
1. Remove the starter assembly from the engine.<br />
2. Turn the pulley until the staple in the pulley lines up<br />
with the "V" notch. Pry out the staple with a small<br />
screwdriver and remove the original rope (diag. 3).<br />
3. Turn the pulley counterclockwise to fully wind the<br />
starter return spring until tight. Allow the pulley to<br />
unwind until the hole in the pulley lines up with the<br />
"V" notch.<br />
4. Hold the pulley in this position and feed the new rope<br />
through the hole and tie a left-handed knot on the<br />
rope end. Make sure the rope and knot do not<br />
protrude from the knot cavity and bind the pulley<br />
rotation.<br />
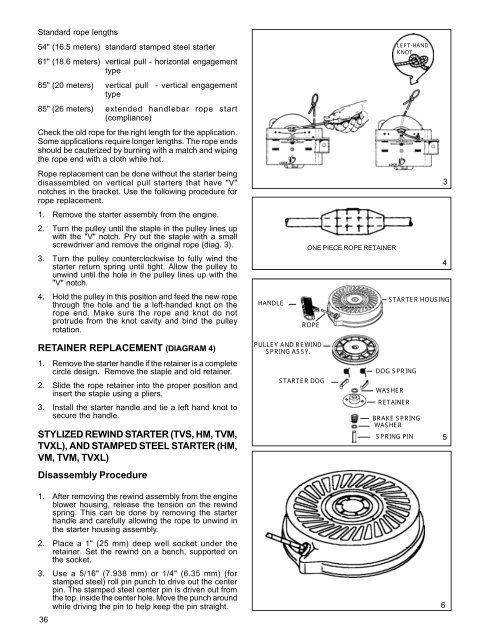
HANDLE<br />
ONE PIECE ROPE RETAINER<br />
ROPE<br />
LEFT-HAND<br />
KNOT<br />
3<br />
4<br />
STARTER HOUSING<br />
RETAINER REPLACEMENT (DIAGRAM 4)<br />
1. Remove the starter handle if the retainer is a complete<br />
circle design. Remove the staple and old retainer.<br />
2. Slide the rope retainer into the proper position and<br />
insert the staple using a pliers.<br />
3. Install the starter handle and tie a left hand knot to<br />
secure the handle.<br />
STYLIZED REWIND STARTER (TVS, HM, TVM,<br />
TVXL), AND STAMPED STEEL STARTER (HM,<br />
VM, TVM, TVXL)<br />
PULLEY AND REWIND<br />
SPRING ASSY.<br />
STARTER DOG<br />
DOG SPRING<br />
WASHER<br />
RETAINER<br />
BRAKE SPRING<br />
WASHER<br />
SPRING PIN<br />
5<br />
Disassembly Procedure<br />
1. After removing the rewind assembly from the engine<br />
blower housing, release the tension on the rewind<br />
spring. This can be done by removing the starter<br />
handle and carefully allowing the rope to unwind in<br />
the starter housing assembly.<br />
2. Place a 1" (25 mm) deep well socket under the<br />
retainer. Set the rewind on a bench, supported on<br />
the socket.<br />
3. Use a 5/16" (7.938 mm) or 1/4" (6.35 mm) (for<br />
stamped steel) roll pin punch to drive out the center<br />
pin. The stamped steel center pin is driven out from<br />
the top, inside the center hole. Move the punch around<br />
while driving the pin to help keep the pin straight.<br />
6<br />
36