3to 11hp 4-cycle l-head engines - Small Engine Suppliers
3to 11hp 4-cycle l-head engines - Small Engine Suppliers
3to 11hp 4-cycle l-head engines - Small Engine Suppliers

Create successful ePaper yourself
Turn your PDF publications into a flip-book with our unique Google optimized e-Paper software.
Assembly<br />
1. If replacing the starter rope, see Step 8.<br />
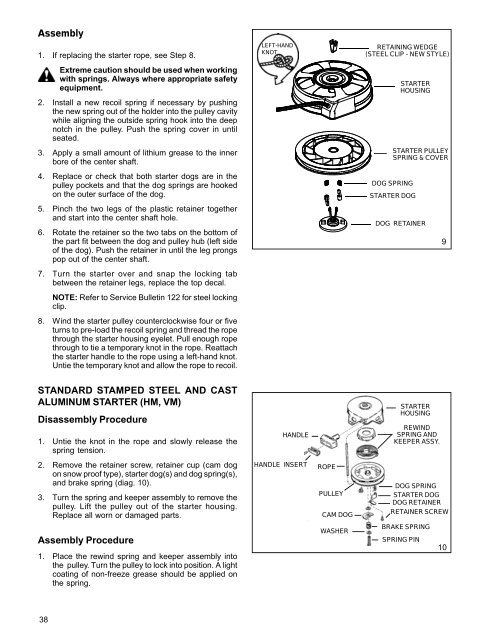
LEFT-HAND<br />
KNOT<br />
RETAINING WEDGE<br />
(STEEL CLIP - NEW STYLE)<br />
Extreme caution should be used when working<br />
with springs. Always where appropriate safety<br />
equipment.<br />
2. Install a new recoil spring if necessary by pushing<br />
the new spring out of the holder into the pulley cavity<br />
while aligning the outside spring hook into the deep<br />
notch in the pulley. Push the spring cover in until<br />
seated.<br />
STARTER<br />
HOUSING<br />
3. Apply a small amount of lithium grease to the inner<br />
bore of the center shaft.<br />
STARTER PULLEY<br />
SPRING & COVER<br />
4. Replace or check that both starter dogs are in the<br />
pulley pockets and that the dog springs are hooked<br />
on the outer surface of the dog.<br />
DOG SPRING<br />
STARTER DOG<br />
5. Pinch the two legs of the plastic retainer together<br />
and start into the center shaft hole.<br />
6. Rotate the retainer so the two tabs on the bottom of<br />
the part fit between the dog and pulley hub (left side<br />
of the dog). Push the retainer in until the leg prongs<br />
pop out of the center shaft.<br />
DOG RETAINER<br />
9<br />
7. Turn the starter over and snap the locking tab<br />
between the retainer legs, replace the top decal.<br />
NOTE: Refer to Service Bulletin 122 for steel locking<br />
clip.<br />
8. Wind the starter pulley counterclockwise four or five<br />
turns to pre-load the recoil spring and thread the rope<br />
through the starter housing eyelet. Pull enough rope<br />
through to tie a temporary knot in the rope. Reattach<br />
the starter handle to the rope using a left-hand knot.<br />
Untie the temporary knot and allow the rope to recoil.<br />
STANDARD STAMPED STEEL AND CAST<br />
ALUMINUM STARTER (HM, VM)<br />
Disassembly Procedure<br />
1. Untie the knot in the rope and slowly release the<br />
spring tension.<br />
HANDLE<br />
STARTER<br />
HOUSING<br />
REWIND<br />
SPRING AND<br />
KEEPER ASSY.<br />
2. Remove the retainer screw, retainer cup (cam dog<br />
on snow proof type), starter dog(s) and dog spring(s),<br />
and brake spring (diag. 10).<br />
3. Turn the spring and keeper assembly to remove the<br />
pulley. Lift the pulley out of the starter housing.<br />
Replace all worn or damaged parts.<br />
HANDLE INSERT<br />
ROPE<br />
PULLEY<br />
CAM DOG<br />
DOG SPRING<br />
STARTER DOG<br />
DOG RETAINER<br />
RETAINER SCREW<br />
Assembly Procedure<br />
1. Place the rewind spring and keeper assembly into<br />
the pulley. Turn the pulley to lock into position. A light<br />
coating of non-freeze grease should be applied on<br />
the spring.<br />
WASHER<br />
BRAKE SPRING<br />
SPRING PIN<br />
10<br />
38