C - Peterbilt Motors Company
C - Peterbilt Motors Company
C - Peterbilt Motors Company

Create successful ePaper yourself
Turn your PDF publications into a flip-book with our unique Google optimized e-Paper software.
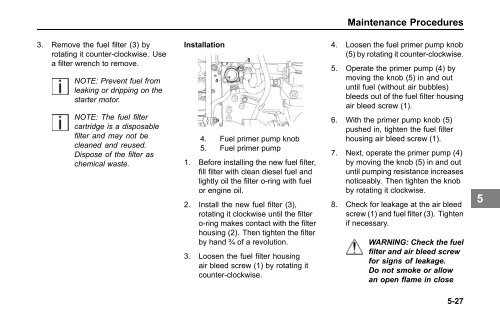
3. Remove the fuel filter (3) by<br />
rotating it counter-clockwise. Use<br />
a filter wrench to remove.<br />
NOTE: Prevent fuel from<br />
leaking or dripping on the<br />
starter motor.<br />
NOTE: The fuel filter<br />
cartridge is a disposable<br />
filter and may not be<br />
cleaned and reused.<br />
Dispose of the filter as<br />
chemical waste.<br />
Installation<br />
4. Fuel primer pump knob<br />
5. Fuel primer pump<br />
1. Before installing the new fuel filter,<br />
fill filter with clean diesel fuel and<br />
lightly oil the filter o-ring with fuel<br />
or engine oil.<br />
2. Install the new fuel filter (3),<br />
rotating it clockwise until the filter<br />
o-ring makes contact with the filter<br />
housing (2). Then tighten the filter<br />
by hand ¾ of a revolution.<br />
3. Loosen the fuel filter housing<br />
air bleed screw (1) by rotating it<br />
counter-clockwise.<br />
Maintenance Procedures<br />
4. Loosen the fuel primer pump knob<br />
(5) by rotating it counter-clockwise.<br />
5. Operate the primer pump (4) by<br />
moving the knob (5) in and out<br />
until fuel (without air bubbles)<br />
bleeds out of the fuel filter housing<br />
air bleed screw (1).<br />
6. With the primer pump knob (5)<br />
pushed in, tighten the fuel filter<br />
housing air bleed screw (1).<br />
7. Next, operate the primer pump (4)<br />
by moving the knob (5) in and out<br />
until pumping resistance increases<br />
noticeably. Then tighten the knob<br />
by rotating it clockwise.<br />
8. Check for leakage at the air bleed<br />
screw (1) and fuel filter (3). Tighten<br />
if necessary.<br />
WARNING: Check the fuel<br />
filter and air bleed screw<br />
for signs of leakage.<br />
Do not smoke or allow<br />
an open flame in close<br />
5-27<br />
5