C - Peterbilt Motors Company
C - Peterbilt Motors Company
C - Peterbilt Motors Company

You also want an ePaper? Increase the reach of your titles
YUMPU automatically turns print PDFs into web optimized ePapers that Google loves.
5<br />
Maintenance Procedures<br />
Removal and Installation—Poly<br />
V-belt, Alternator and<br />
Air-Conditioning Compressor<br />
Drive<br />
Removal<br />
1. Remove the poly V-belt from the<br />
fan and coolant pump drive as<br />
described in “Poly V-belt, Coolant<br />
Pump Drive and Fan Drive”<br />
“Removal”.<br />
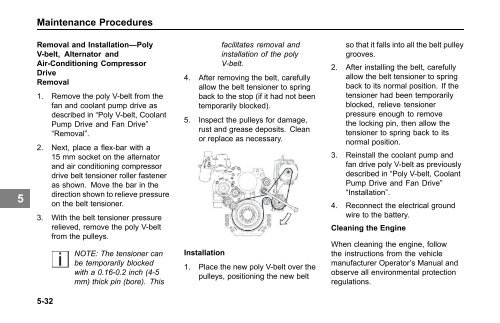
2. Next, place a flex-bar with a<br />
15 mm socket on the alternator<br />
and air conditioning compressor<br />
drive belt tensioner roller fastener<br />
as shown. Move the bar in the<br />
direction shown to relieve pressure<br />
on the belt tensioner.<br />
3. With the belt tensioner pressure<br />
relieved, remove the poly V-belt<br />
from the pulleys.<br />
5-32<br />
NOTE: The tensioner can<br />
be temporarily blocked<br />
with a 0.16-0.2 inch (4-5<br />
mm) thick pin (bore). This<br />
facilitates removal and<br />
installation of the poly<br />
V-belt.<br />
4. After removing the belt, carefully<br />
allow the belt tensioner to spring<br />
back to the stop (if it had not been<br />
temporarily blocked).<br />
5. Inspect the pulleys for damage,<br />
rust and grease deposits. Clean<br />
or replace as necessary.<br />
Installation<br />
1. Place the new poly V-belt over the<br />
pulleys, positioning the new belt<br />
so that it falls into all the belt pulley<br />
grooves.<br />
2. After installing the belt, carefully<br />
allow the belt tensioner to spring<br />
back to its normal position. If the<br />
tensioner had been temporarily<br />
blocked, relieve tensioner<br />
pressure enough to remove<br />
the locking pin, then allow the<br />
tensioner to spring back to its<br />
normal position.<br />
3. Reinstall the coolant pump and<br />
fan drive poly V-belt as previously<br />
described in “Poly V-belt, Coolant<br />
Pump Drive and Fan Drive”<br />
“Installation”.<br />
4. Reconnect the electrical ground<br />
wire to the battery.<br />
Cleaning the Engine<br />
When cleaning the engine, follow<br />
the instructions from the vehicle<br />
manufacturer Operator’s Manual and<br />
observe all environmental protection<br />
regulations.