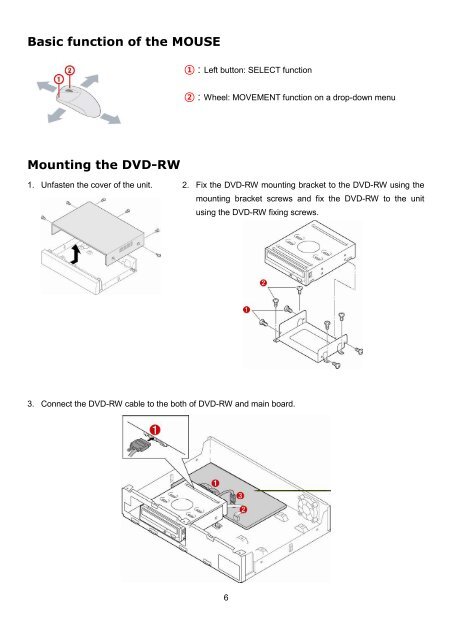
- Page 1 and 2: INSTRUCTION MANUAL (N:M_Ver. 2.1_11
- Page 3 and 4: These precautions must be followed
- Page 5: Product Components The package cont
- Page 9 and 10: Specifications Input Video Output A
- Page 11 and 12: Table of Contents 1. Main Features
- Page 13 and 14: 9-7-6. Security ...................
- Page 15 and 16: Easy software upgrade Instant and
- Page 17 and 18: 13 Press to control Pan/Tilt/Zoom o
- Page 19 and 20: 3 Number: To select channel (1, 2,
- Page 21 and 22: - QUALITY - RECORDING - SENSOR RECO
- Page 23 and 24: - DUAL FRAME RATE - DUAL QUALITY 3-
- Page 25 and 26: Figure 3.3.1. Recording mode setup
- Page 27 and 28: Figure 3.3.2. Schedule recording se
- Page 29 and 30: Item Description ALARM OUT Availabl
- Page 31 and 32: Figure 3.4.4. PTZ Control Setup Scr
- Page 33 and 34: We recommend that you archive any d
- Page 35 and 36: SET DATE&TIME Select the display da
- Page 37 and 38: PRIMARY SNTP SERVER: Input the addr
- Page 39 and 40: USER PASSWORD ADMIN, NETOWRK, USER1
- Page 41 and 42: NETWORK PORT Set a proper port numb
- Page 43 and 44: Table 3.8.2. LAN Item Description I
- Page 45 and 46: Figure 3.8.6. Network setup screen
- Page 47 and 48: Item SAVE SETUP TO A USB Table 3.9.
- Page 49 and 50: Figure 3.10.1. Quick Setup screen I
- Page 51 and 52: Audio button. Click this button to
- Page 53 and 54: When it clicks a Timeline menu, use
- Page 55 and 56: When it clicks an Archive menu, use
- Page 57 and 58:
Figure 5.1. PTZ Control Screen OSD
- Page 59 and 60:
3. Once you select the media, the s
- Page 61 and 62:
7. Upgrading Firmware In order to u
- Page 63 and 64:
8-3. Live monitoring mode and funct
- Page 65 and 66:
3. Set the conditions and click OK
- Page 67 and 68:
4. Press the PLAY button. Then the
- Page 69 and 70:
Setting Event Set the record path a
- Page 71 and 72:
9. Network access using the Exclusi
- Page 73 and 74:
9-4-1. Main user interface 9-4-2. C
- Page 75 and 76:
8-5-2. Main control panel Button LO
- Page 77 and 78:
To change a time line scale from 24
- Page 79 and 80:
9-6-2-2. Archiving Event Log: Event
- Page 81 and 82:
9-6-6. About “About” provides n
- Page 83 and 84:
Resolution: Sets the resolution for
- Page 85 and 86:
9-7-3-3. PTZ Setting the PTZ Contro
- Page 87 and 88:
9-7-5-1. System Setting the System
- Page 89 and 90:
Setting the Send E-Mail: This setti
- Page 91 and 92:
9-7-7.Network Select Network to set
- Page 93 and 94:
o Password: Input network password
- Page 95 and 96:
2. Click CONNECT button, and then s
- Page 97 and 98:
3. Select Disk and set the values.
- Page 99 and 100:
2. Select site to connect from the
- Page 101 and 102:
Notice When it does a backup with N
- Page 103 and 104:
Server address: Input IP address of
- Page 105 and 106:
Open your web browser. Enter the ro
- Page 107 and 108:
Internet (ADSL) Connection using DD
- Page 109 and 110:
C. How to access DVR with iPhone 1.