

Wire Harness Installation Instructions For Installing - Painless Wiring
Wire Harness Installation Instructions For Installing - Painless Wiring
Wire Harness Installation Instructions For Installing - Painless Wiring

You also want an ePaper? Increase the reach of your titles
YUMPU automatically turns print PDFs into web optimized ePapers that Google loves.
7.0 GM - SPECIFIC CIRCUIT CONNECTIONS<br />
Note:<br />
Your alternator may not appear exactly as represented in the Figures. The circuits are wired the<br />
Way, however.<br />
7.1 Early GM Alternator (before 1969) - External Regulator. See Figure 7-1.<br />
7.1.2 With a short 16-gauge jumper wire, connect Voltage Regulator terminals 3 & 4 together. Connect<br />
ENGINE SECTION wire #914 (wht) to Voltage Regulator terminal 3 or 4.<br />
7.1.3 Connect ENGINE SECTION wire #915 (red) to the Alternator Output lug (Bat).<br />
7.1.4 Connect a 14-gauge wire from Voltage Regulator terminal 2 to Alternator terminal R. Connect a 14-<br />
gauge wire from Voltage Regulator terminal F to Alternator terminal F.<br />
7.1.5 Connect a 16-gauge ground wire from the Alternator Ground lug (G) to chassis ground.<br />
Figure 7-1 Early GM Alternator - External Regulator<br />
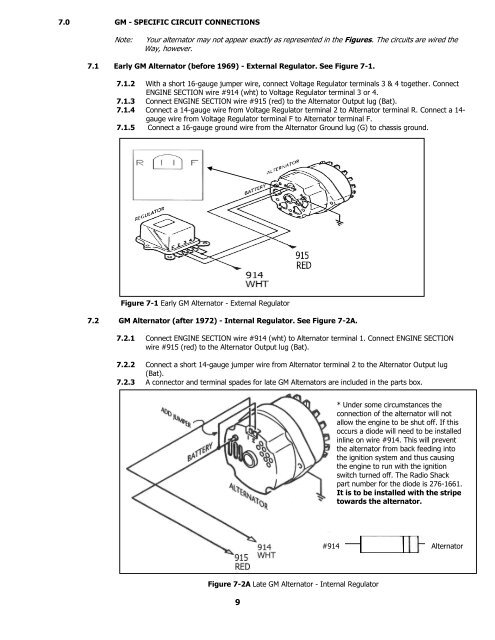
7.2 GM Alternator (after 1972) - Internal Regulator. See Figure 7-2A.<br />
7.2.1 Connect ENGINE SECTION wire #914 (wht) to Alternator terminal 1. Connect ENGINE SECTION<br />
wire #915 (red) to the Alternator Output lug (Bat).<br />
7.2.2 Connect a short 14-gauge jumper wire from Alternator terminal 2 to the Alternator Output lug<br />
(Bat).<br />
7.2.3 A connector and terminal spades for late GM Alternators are included in the parts box.<br />
* Under some circumstances the<br />
connection of the alternator will not<br />
allow the engine to be shut off. If this<br />
occurs a diode will need to be installed<br />
inline on wire #914. This will prevent<br />
the alternator from back feeding into<br />
the ignition system and thus causing<br />
the engine to run with the ignition<br />
switch turned off. The Radio Shack<br />
part number for the diode is 276-1661.<br />
It is to be installed with the stripe<br />
towards the alternator.<br />
#914 Alternator<br />
Figure 7-2A Late GM Alternator - Internal Regulator<br />
9


