

Wire Harness Installation Instructions For Installing - Painless Wiring
Wire Harness Installation Instructions For Installing - Painless Wiring
Wire Harness Installation Instructions For Installing - Painless Wiring

You also want an ePaper? Increase the reach of your titles
YUMPU automatically turns print PDFs into web optimized ePapers that Google loves.
10.2 Generator to Alternator Conversion<br />
10.2.1 You may be able to convert your generator charging system to use an alternator and external<br />
regulator without altering or re-routing existing wires.<br />
10.2.2 Install the new alternator and replace the existing generator voltage regulator with the new,<br />
alternator compatible one.<br />
10.2.3 Connect the existing wiring according to either Section 7.0, 8.0 or 9.2, as appropriate.<br />
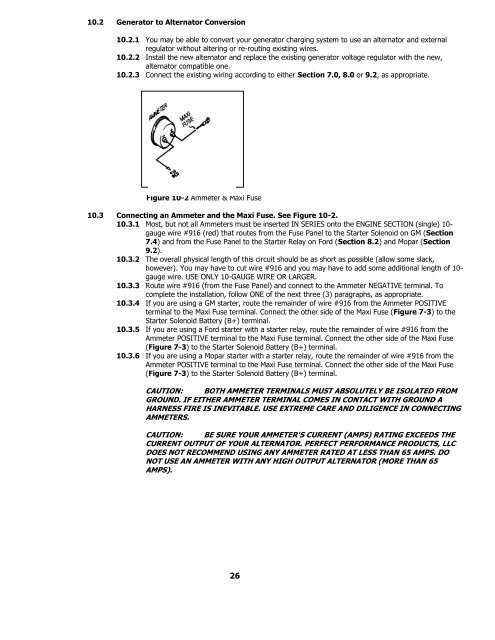
Figure 10-2 Ammeter & Maxi Fuse<br />
10.3 Connecting an Ammeter and the Maxi Fuse. See Figure 10-2.<br />
10.3.1 Most, but not all Ammeters must be inserted IN SERIES onto the ENGINE SECTION (single) 10-<br />
gauge wire #916 (red) that routes from the Fuse Panel to the Starter Solenoid on GM (Section<br />
7.4) and from the Fuse Panel to the Starter Relay on <strong>For</strong>d (Section 8.2) and Mopar (Section<br />
9.2).<br />
10.3.2 The overall physical length of this circuit should be as short as possible (allow some slack,<br />
however). You may have to cut wire #916 and you may have to add some additional length of 10-<br />
gauge wire. USE ONLY 10-GAUGE WIRE OR LARGER.<br />
10.3.3 Route wire #916 (from the Fuse Panel) and connect to the Ammeter NEGATIVE terminal. To<br />
complete the installation, follow ONE of the next three (3) paragraphs, as appropriate.<br />
10.3.4 If you are using a GM starter, route the remainder of wire #916 from the Ammeter POSITIVE<br />
terminal to the Maxi Fuse terminal. Connect the other side of the Maxi Fuse (Figure 7-3) to the<br />
Starter Solenoid Battery (B+) terminal.<br />
10.3.5 If you are using a <strong>For</strong>d starter with a starter relay, route the remainder of wire #916 from the<br />
Ammeter POSITIVE terminal to the Maxi Fuse terminal. Connect the other side of the Maxi Fuse<br />
(Figure 7-3) to the Starter Solenoid Battery (B+) terminal.<br />
10.3.6 If you are using a Mopar starter with a starter relay, route the remainder of wire #916 from the<br />
Ammeter POSITIVE terminal to the Maxi Fuse terminal. Connect the other side of the Maxi Fuse<br />
(Figure 7-3) to the Starter Solenoid Battery (B+) terminal.<br />
CAUTION: BOTH AMMETER TERMINALS MUST ABSOLUTELY BE ISOLATED FROM<br />
GROUND. IF EITHER AMMETER TERMINAL COMES IN CONTACT WITH GROUND A<br />
HARNESS FIRE IS INEVITABLE. USE EXTREME CARE AND DILIGENCE IN CONNECTING<br />
AMMETERS.<br />
CAUTION: BE SURE YOUR AMMETER'S CURRENT (AMPS) RATING EXCEEDS THE<br />
CURRENT OUTPUT OF YOUR ALTERNATOR. PERFECT PERFORMANCE PRODUCTS, LLC<br />
DOES NOT RECOMMEND USING ANY AMMETER RATED AT LESS THAN 65 AMPS. DO<br />
NOT USE AN AMMETER WITH ANY HIGH OUTPUT ALTERNATOR (MORE THAN 65<br />
AMPS).<br />
26


