Industrial seal self study guide - SKF.com
Industrial seal self study guide - SKF.com
Industrial seal self study guide - SKF.com
You also want an ePaper? Increase the reach of your titles
YUMPU automatically turns print PDFs into web optimized ePapers that Google loves.
Installation (cont.)<br />
8. Check <strong>seal</strong> direction. Make sure the new <strong>seal</strong> faces in the same<br />
direction as the original one. Generally, the lip faces the lubricant<br />
or fluid being retained.<br />
9. Use the correct installation tool. Press-fitting tools should have an<br />
outside diameter approximately .010” (.254mm) smaller than the<br />
bore size. For best results, the center of the tool should be open<br />
so that pressure is applied only at the outer edge.<br />
10. Pre-lubricate the <strong>seal</strong>ing element. Before installation, wipe the<br />
<strong>seal</strong>ing element and shaft with the lubricant being retained.<br />
Rubber O.D. <strong>seal</strong>s must be <strong>com</strong>pletely lubricated.<br />
11. Never hammer directly on the surface of the <strong>seal</strong>. Use proper<br />
driving force such as a soft face tool, arbor press or soft workpiece<br />
(wood). To avoid cocking the <strong>seal</strong>, apply force evenly around the<br />
outer edge.<br />
12. Position the <strong>seal</strong> properly in the housing and inspect for alignment<br />
and installation damage.<br />
Post-Installation Tips<br />
When painting, be sure to mask the <strong>seal</strong>. Avoid getting paint on the lip,<br />
or the shaft where the lip rides. Also, mask the vents so they will not<br />
be<strong>com</strong>e clogged.<br />
If paint is to be baked or the mechanism otherwise subjected to heat,<br />
the <strong>seal</strong>s should not be heated to temperatures higher than their<br />
materials can tolerate.<br />
In cleaning or testing, do not subject <strong>seal</strong>s to any fluids or pressures<br />
that could damage them. Check the Compound Selection Chart in<br />
the <strong>SKF</strong> Handbook of Seals when in doubt. Improper installation<br />
procedures will result in early <strong>seal</strong> failure. Three of the most <strong>com</strong>mon<br />
installation errors are detailed below.<br />
Common Installation Errors Damage from<br />
Shaft Burr<br />
Symptoms<br />
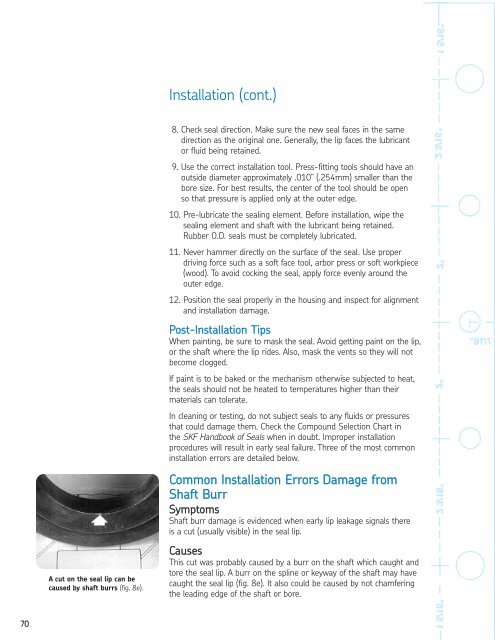
Shaft burr damage is evidenced when early lip leakage signals there<br />
is a cut (usually visible) in the <strong>seal</strong> lip.<br />
A cut on the <strong>seal</strong> lip can be<br />
caused by shaft burrs (fig. 8e).<br />
Causes<br />
This cut was probably caused by a burr on the shaft which caught and<br />
tore the <strong>seal</strong> lip. A burr on the spline or keyway of the shaft may have<br />
caught the <strong>seal</strong> lip (fig. 8e). It also could be caused by not chamfering<br />
the leading edge of the shaft or bore.<br />
70


