HP ProBook 4540s Notebook PC Reference Guide - static ...
HP ProBook 4540s Notebook PC Reference Guide - static ...
HP ProBook 4540s Notebook PC Reference Guide - static ...

You also want an ePaper? Increase the reach of your titles
YUMPU automatically turns print PDFs into web optimized ePapers that Google loves.
<strong>HP</strong> <strong>Notebook</strong><br />
<strong>Reference</strong> <strong>Guide</strong>
© Copyright 2012 Hewlett-Packard<br />
Development Company, L.P.<br />
AMD is a trademark of Advanced Micro<br />
Devices, Inc. Bluetooth is a trademark<br />
owned by its proprietor and used by<br />
Hewlett-Packard Company under license.<br />
Intel and Centrino are trademarks of Intel<br />
Corporation in the U.S. and other countries.<br />
Java is a U.S. trademark of Sun<br />
Microsystems, Inc. Microsoft and Windows<br />
are U.S. registered trademarks of Microsoft<br />
Corporation.<br />
Product notice<br />
This reference guide describes features<br />
that are common to most models. Some<br />
features may not be available on your<br />
computer.<br />
To obtain the latest information in this<br />
guide, contact support. For U.S. support, go<br />
to http://www.hp.com/go/contact<strong>HP</strong>. For<br />
worldwide support, go to<br />
http://welcome.hp.com/country/us/en/<br />
wwcontact_us.html.<br />
The information contained herein is subject<br />
to change without notice. The only<br />
warranties for <strong>HP</strong> products and services are<br />
set forth in the express warranty statements<br />
accompanying such products and services.<br />
Nothing herein should be construed as<br />
constituting an additional warranty. <strong>HP</strong> shall<br />
not be liable for technical or editorial errors<br />
or omissions contained herein.<br />
First Edition: January 2012<br />
Document Part Number: 682530-001
Safety warning notice<br />
WARNING! To reduce the possibility of heat-related injuries or of overheating the computer, do not<br />
place the computer directly on your lap or obstruct the computer air vents. Use the computer only on<br />
a hard, flat surface. Do not allow another hard surface, such as an adjoining optional printer, or a soft<br />
surface, such as pillows or rugs or clothing, to block airflow. Also, do not allow the AC adapter to<br />
contact the skin or a soft surface, such as pillows or rugs or clothing, during operation. The computer<br />
and the AC adapter comply with the user-accessible surface temperature limits defined by the<br />
International Standard for Safety of Information Technology Equipment (IEC 60950).<br />
iii
iv Safety warning notice
Table of contents<br />
1 Introduction ..................................................................................................................................................... 1<br />
Finding more information about your new computer ............................................................................ 1<br />
2 Networking (select models only) ................................................................................................................... 2<br />
Creating a wireless connection ............................................................................................................ 2<br />
Identifying wireless and network status icons ...................................................................... 2<br />
Turning wireless devices on or off ....................................................................................... 4<br />
Using <strong>HP</strong> Connection Manager (select models only) .......................................................... 4<br />
Using operating system controls .......................................................................................... 4<br />
Using a WLAN ...................................................................................................................................... 5<br />
Connecting to an existing WLAN ......................................................................................... 5<br />
Setting up a new WLAN ....................................................................................................... 6<br />
Protecting your WLAN ......................................................................................................... 6<br />
Roaming to another network ................................................................................................ 7<br />
Using <strong>HP</strong> Mobile Broadband (select models only) ............................................................................... 7<br />
Inserting a SIM ..................................................................................................................... 8<br />
Removing a SIM .................................................................................................................. 8<br />
Using GPS (select models only) ........................................................................................................... 9<br />
Using Bluetooth wireless devices ......................................................................................................... 9<br />
Bluetooth and Internet Connection Sharing (ICS) ............................................................... 9<br />
Connecting to a wired network ............................................................................................................. 9<br />
Using a modem (select models only) ................................................................................... 9<br />
Connecting a modem cable .............................................................................. 10<br />
Connecting a country- or region-specific modem cable adapter ....................... 11<br />
Selecting a location setting ............................................................................... 11<br />
Viewing the current location selection .............................................. 11<br />
Adding new locations when traveling ............................................... 12<br />
Connecting to a local area network (LAN) (select models only) ........................................ 13<br />
3 Multimedia ..................................................................................................................................................... 14<br />
Using the media activity controls ........................................................................................................ 14<br />
v
Audio .................................................................................................................................................. 14<br />
Adjusting the volume ......................................................................................................... 15<br />
Checking audio functions on the computer ........................................................................ 15<br />
Webcam (select models only) ............................................................................................................ 15<br />
Video .................................................................................................................................................. 16<br />
VGA ................................................................................................................................... 16<br />
DisplayPort ........................................................................................................................ 17<br />
HDMI .................................................................................................................................. 18<br />
Configuring audio for HDMI ............................................................................... 18<br />
Intel Wireless Display (select models only) ....................................................... 19<br />
4 Power management ...................................................................................................................................... 20<br />
Shutting down the computer ............................................................................................................... 20<br />
Setting power options ......................................................................................................................... 21<br />
Using power-saving states ................................................................................................. 21<br />
Initiating and exiting Sleep ................................................................................ 21<br />
Initiating and exiting Hibernation ....................................................................... 21<br />
Using the power meter ....................................................................................................... 22<br />
Using power plans ............................................................................................................. 22<br />
Viewing the current power plan ......................................................................... 22<br />
Selecting a different power plan ........................................................................ 22<br />
Customizing power plans .................................................................................. 22<br />
Setting password protection on wakeup ............................................................................ 23<br />
Using <strong>HP</strong> Power Assistant (select models only) ................................................................................ 24<br />
Using battery power ........................................................................................................................... 24<br />
Finding additional battery information ................................................................................ 24<br />
Using Battery Check .......................................................................................................... 25<br />
Displaying the remaining battery charge ........................................................................... 25<br />
Maximizing battery discharge time .................................................................................... 25<br />
Managing low battery levels .............................................................................................. 25<br />
Identifying low battery levels ............................................................................. 25<br />
Resolving a low battery level ............................................................................. 26<br />
Resolving a low battery level when external power is available ....... 26<br />
Resolving a low battery level when no power source is available .... 26<br />
Resolving a low battery level when the computer cannot exit<br />
Hibernation ....................................................................................... 26<br />
Conserving battery power .................................................................................................. 26<br />
Storing a user-replaceable battery (select models only) .................................................... 26<br />
Disposing of a user-replaceable battery (select models only) ........................................... 27<br />
Replacing a user-replaceable battery (select models only) ............................................... 27<br />
Using external AC power .................................................................................................................... 27<br />
vi
Testing an AC adapter ....................................................................................................... 28<br />
Switchable graphics/dual graphics (select models only) .................................................................... 29<br />
Using switchable graphics (select models only) ................................................................ 29<br />
Using dual graphics (select models only) .......................................................................... 29<br />
5 External cards and devices .......................................................................................................................... 31<br />
Using Media Card Reader cards (select models only) ....................................................................... 31<br />
Inserting a digital card ........................................................................................................ 31<br />
Removing a digital card ..................................................................................................... 32<br />
Using ExpressCards (select models only) .......................................................................................... 32<br />
Configuring an ExpressCard .............................................................................................. 32<br />
Inserting an ExpressCard .................................................................................................. 33<br />
Removing an ExpressCard ................................................................................................ 34<br />
Using smart cards (select models only) ............................................................................................. 34<br />
Inserting a smart card ........................................................................................................ 35<br />
Removing a smart card ...................................................................................................... 35<br />
Using a USB device ........................................................................................................................... 35<br />
Connecting a USB device .................................................................................................. 36<br />
Removing a USB device .................................................................................................... 36<br />
Using 1394 devices (select models only) ........................................................................................... 36<br />
Connecting a 1394 device ................................................................................................. 37<br />
Removing a 1394 device ................................................................................................... 37<br />
Using an eSATA device (select models only) .................................................................................... 37<br />
Connecting an eSATA device ............................................................................................ 38<br />
Removing an eSATA device .............................................................................................. 38<br />
Using a serial device (select models only) ......................................................................................... 39<br />
Using optional external devices .......................................................................................................... 39<br />
Using optional external drives ............................................................................................ 39<br />
Using the expansion port (select models only) .................................................................. 40<br />
Using the docking connector (select models only) ............................................................ 40<br />
6 Drives ............................................................................................................................................................. 42<br />
Handling drives ................................................................................................................................... 42<br />
Using hard drives ............................................................................................................................... 43<br />
Improving hard drive performance ..................................................................................... 43<br />
Using Disk Defragmenter .................................................................................. 43<br />
Using Disk Cleanup ........................................................................................... 43<br />
Using <strong>HP</strong> 3D DriveGuard (select models only) .................................................................. 44<br />
Identifying <strong>HP</strong> 3D DriveGuard status ................................................................ 44<br />
Managing power with a parked hard drive ........................................................ 44<br />
Using <strong>HP</strong> 3D DriveGuard software ................................................................... 45<br />
vii
Using optical drives (select models only) ........................................................................................... 45<br />
Identifying the installed optical drive .................................................................................. 45<br />
Inserting an optical disc ..................................................................................................... 45<br />
Tray-load ........................................................................................................... 45<br />
Slot-load ............................................................................................................ 46<br />
Removing an optical disc ................................................................................................... 46<br />
Tray-load ........................................................................................................... 46<br />
When the disc tray opens normally .................................................. 47<br />
When the disc tray fails to open normally ......................................... 47<br />
Slot-load ............................................................................................................ 48<br />
Sharing optical drives ........................................................................................................ 49<br />
Using RAID (select models only) ........................................................................................................ 49<br />
7 Security .......................................................................................................................................................... 50<br />
Protecting the computer ..................................................................................................................... 50<br />
Using passwords ................................................................................................................................ 51<br />
Setting passwords in Windows .......................................................................................... 52<br />
Setting passwords in Computer Setup .............................................................................. 53<br />
Managing a BIOS administrator password ........................................................................ 53<br />
Entering a BIOS administrator password .......................................................... 54<br />
Managing a DriveLock password ....................................................................................... 55<br />
Using Computer Setup Automatic DriveLock ..................................................................................... 55<br />
Entering an Automatic DriveLock password ...................................................................... 55<br />
Removing Automatic DriveLock protection ........................................................................ 56<br />
Using the fingerprint reader (select models only) ............................................................................... 57<br />
Using Internet security software ......................................................................................................... 58<br />
Using antivirus software ..................................................................................................... 58<br />
Using firewall software ....................................................................................................... 58<br />
Installing critical security updates ....................................................................................................... 58<br />
Using <strong>HP</strong> ProtectTools Security Manager (select models only) ......................................................... 59<br />
Installing an optional security cable .................................................................................................... 59<br />
8 Maintenance .................................................................................................................................................. 60<br />
Cleaning your computer ..................................................................................................................... 60<br />
Cleaning products .............................................................................................................. 60<br />
Cleaning procedures .......................................................................................................... 60<br />
Cleaning the display .......................................................................................... 60<br />
Cleaning the sides and cover ............................................................................ 61<br />
Updating programs and drivers .......................................................................................................... 62<br />
Using SoftPaq Download Manager .................................................................................................... 63<br />
Using <strong>HP</strong> Software Setup utility ......................................................................................... 64<br />
viii
9 Computer Setup (BIOS) and Advanced System Diagnostics ................................................................... 65<br />
Using Computer Setup ....................................................................................................................... 65<br />
Starting Computer Setup ................................................................................................... 65<br />
Navigating and selecting in Computer Setup ..................................................................... 65<br />
Restoring factory settings in Computer Setup ................................................................... 66<br />
Updating the BIOS ............................................................................................................. 67<br />
Downloading SoftPaqs to update the BIOS ...................................................... 67<br />
Creating a bootable USB flash drive using a SoftPaq ....................................... 67<br />
BIOS management using system diagnostics ................................................... 67<br />
Using f10 setup to update the BIOS .................................................................. 68<br />
Determining the BIOS version ........................................................................... 68<br />
Downloading a BIOS update ............................................................................. 69<br />
BIOS Setup Menu .............................................................................................................. 69<br />
Main menu ........................................................................................................ 70<br />
Security menu ................................................................................................... 70<br />
Diagnostics menu .............................................................................................. 70<br />
Using Advanced System Diagnostics ................................................................................................. 70<br />
10 MultiBoot ..................................................................................................................................................... 72<br />
About the boot device order ............................................................................................................... 72<br />
Enabling boot devices in Computer Setup ......................................................................................... 73<br />
Considering boot order changes ........................................................................................................ 73<br />
Choosing MultiBoot preferences ........................................................................................................ 74<br />
Setting a new boot order in Computer Setup ..................................................................... 74<br />
Dynamically choosing a boot device using the f9 prompt .................................................. 75<br />
Setting a MultiBoot Express prompt .................................................................................. 75<br />
Entering MultiBoot Express preferences ........................................................................... 75<br />
Appendix A Traveling with the computer ...................................................................................................... 76<br />
Appendix B Troubleshooting resources ....................................................................................................... 78<br />
Appendix C Electro<strong>static</strong> discharge .............................................................................................................. 79<br />
Index ................................................................................................................................................................... 80<br />
ix
1 Introduction<br />
This guide contains general information about <strong>HP</strong> notebook computers.<br />
NOTE:<br />
Some of the features described in this guide may not be available on your computer.<br />
Finding more information about your new computer<br />
The following user guides and reference material are provided with your computer, either in print, on<br />
the computer hard drive, or on an optical disc:<br />
●<br />
Setup Instructions poster—<strong>Guide</strong>s you through setting up your computer and turning it on. The<br />
poster is included in the box with the computer.<br />
NOTE:<br />
See the poster for the location of your user guides and reference material.<br />
●<br />
Getting Started—Contains information about your computer, including product-specific features,<br />
backup and recovery, maintenance, and specifications. To access the Getting Started guide on<br />
your computer, select Start > Help and Support > User <strong>Guide</strong>s.<br />
To access this guide on the Web, go to the <strong>HP</strong> Business Support Center at http://www.hp.com/<br />
go/bsc.<br />
●<br />
●<br />
●<br />
Help and Support—Contains information about the operating system, drivers, troubleshooting<br />
tools, and support. To access Help and Support, select Start > Help and Support. For U.S.<br />
support, go to http://www.hp.com/go/contact<strong>HP</strong>. For worldwide support, go to<br />
http://welcome.hp.com/country/us/en/wwcontact_us.html.<br />
Safety & Comfort <strong>Guide</strong>—Describes proper workstation setup and proper posture, health, and<br />
work habits for computer users. It also provides important electrical and mechanical safety<br />
information. To access this guide, select Start > Help and Support > User <strong>Guide</strong>s. This guide<br />
is also available on the Web at http://www.hp.com/ergo.<br />
Regulatory, Safety and Environmental Notices—Contains safety and regulatory information, and<br />
battery disposal information. To access the notices, select Start > Help and Support > User<br />
<strong>Guide</strong>s.<br />
Finding more information about your new computer 1
2 Networking (select models only)<br />
Your computer supports two types of Internet access:<br />
● Wireless—See Creating a wireless connection on page 2.<br />
● Wired—See Connecting to a wired network on page 9.<br />
NOTE:<br />
You must set up Internet service before you can connect to the Internet.<br />
Creating a wireless connection<br />
Your computer may be equipped with one or more of the following wireless devices:<br />
●<br />
●<br />
●<br />
Wireless local area network (WLAN) device<br />
<strong>HP</strong> Mobile Broadband Module (wireless wide area network (WWAN) device)<br />
Bluetooth® device<br />
For more information on wireless technology, see the information and website links provided in Help<br />
and Support.<br />
Identifying wireless and network status icons<br />
Icon Name Description<br />
Wireless (connected)<br />
Indicates that one or more wireless devices are on.<br />
Wireless (disconnected)<br />
Indicates that all wireless devices are off.<br />
<strong>HP</strong> Connection Manager<br />
(select models only)<br />
Wired network (connected)<br />
Opens <strong>HP</strong> Connection Manager, which enables you to create and manage<br />
WWAN connections (select models only), and monitor the status of WLAN<br />
and Bluetooth connections.<br />
Indicates that one or more network devices are connected to the network.<br />
Wired network (disabled/<br />
disconnected)<br />
Indicates that all network devices are disabled in Windows® Control<br />
Panel.<br />
2 Chapter 2 Networking (select models only)
Icon Name Description<br />
Network (connected)<br />
Indicates that one or more network devices are connected to a network.<br />
Network (disconnected)<br />
Indicates that network devices are not connected to a network.<br />
Network (disabled/<br />
disconnected)<br />
Indicates that no wireless connections are available.<br />
Creating a wireless connection 3
Turning wireless devices on or off<br />
You can use the wireless button or <strong>HP</strong> Connection Manager (select models only) to turn on and turn<br />
off wireless devices.<br />
NOTE: A computer may have a wireless button, a wireless switch, or a wireless key on the<br />
keyboard. The term wireless button is used throughout this guide to refer to all types of wireless<br />
controls. See the Getting Started guide for information on identifying the type and location of the<br />
wireless button on your computer.<br />
To turn off wireless devices using <strong>HP</strong> Connection Manager:<br />
▲<br />
Right-click the <strong>HP</strong> Connection Manager icon in the notification area, at the far right of the<br />
taskbar, and then click the power button next to the desired device.<br />
– or –<br />
Select Start > All Programs > Productivity and Tools > <strong>HP</strong> Connection Manager, and then<br />
click the power button next to the desired device.<br />
Using <strong>HP</strong> Connection Manager (select models only)<br />
<strong>HP</strong> Connection Manager provides a central location for managing your wireless devices, an interface<br />
for connecting to the Internet using <strong>HP</strong> Mobile Broadband, and an interface for sending and receiving<br />
SMS (text) messages. <strong>HP</strong> Connection Manager allows you to manage the following devices:<br />
●<br />
●<br />
●<br />
Wireless local area network (WLAN)/Wi-Fi<br />
Wireless wide area network (WWAN)/<strong>HP</strong> Mobile Broadband<br />
Bluetooth®<br />
<strong>HP</strong> Connection Manager provides information and notifications on connection status, power status,<br />
SIM details, and SMS messages. Status information and notifications are provided in the notification<br />
area, at the far right of the taskbar.<br />
To open <strong>HP</strong> Connection Manager:<br />
▲<br />
Click the <strong>HP</strong> Connection Manager icon in the taskbar.<br />
– or –<br />
Select Start > All Programs > Productivity and Tools > <strong>HP</strong> Connection Manager.<br />
For more information, see the <strong>HP</strong> Connection Manager software Help.<br />
Using operating system controls<br />
The Network and Sharing Center allows you to set up a connection or network, connect to a network,<br />
manage wireless networks, and diagnose and repair network problems.<br />
To use operating system controls:<br />
▲<br />
Select Start > Control Panel > Network and Internet > Network and Sharing Center.<br />
For more information, select Start > Help and Support.<br />
4 Chapter 2 Networking (select models only)
Using a WLAN<br />
A wireless connection connects the computer to Wi-Fi networks, or WLANs. A WLAN is composed of<br />
other computers and accessories that are linked by a wireless router or a wireless access point.<br />
Connecting to an existing WLAN<br />
1. Be sure that the WLAN device is on. (See Turning wireless devices on or off on page 4.)<br />
2. Click the network icon in the notification area, at the far right of the taskbar.<br />
3. Select your WLAN from the list.<br />
NOTE:<br />
If no WLANs are listed, you may be out of range of a wireless router or access point.<br />
NOTE: If you do not see the WLAN you want to connect to, click Open Network and Sharing<br />
Center, and then click Set up a new connection or network. A list of options is displayed. You<br />
can choose to manually search for and connect to a network, or you can create a new network<br />
connection.<br />
4. Click Connect.<br />
If the network is a security-enabled WLAN, you are prompted to enter a network security code.<br />
Type the code, and then click OK to complete the connection.<br />
After the connection is made, you can place the mouse pointer over the network icon in the<br />
notification area, at the far right of the taskbar, to verify the name and status of the connection.<br />
NOTE: The functional range (how far your wireless signals travel) depends on WLAN<br />
implementation, router manufacturer, and interference from other electronic devices or structural<br />
barriers such as walls and floors.<br />
Using a WLAN 5
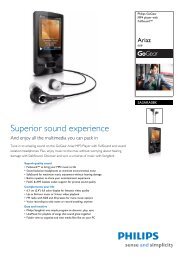
Setting up a new WLAN<br />
Required equipment:<br />
●<br />
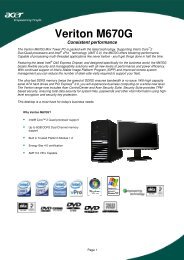
A broadband modem (either DSL or cable) (purchased separately) (1) and high-speed Internet<br />
service purchased from an Internet service provider (ISP)<br />
● A wireless router (purchased separately) (2)<br />
NOTE: Some cable modems include a built-in router. Check with your ISP to see if you need a<br />
separate router.<br />
● The wireless computer (3)<br />
The illustration shows an example of a wireless network installation that is connected to the Internet.<br />
NOTE: When setting up a wireless connection, be sure that your computer and wireless router are<br />
synchronized. To synchronize your computer and wireless router, turn your computer and wireless<br />
router off and then back on.<br />
As your network grows, additional wireless and wired computers can be connected to the network to<br />
access the Internet.<br />
For help in setting up your WLAN, see the information provided by your router manufacturer or your<br />
ISP.<br />
Protecting your WLAN<br />
When you set up a WLAN or access an existing WLAN, always enable security features to protect<br />
your network from unauthorized access. WLANs in public areas (hotspots) like coffee shops and<br />
airports may not provide any security. If you are concerned about the security of your computer in a<br />
hotspot, limit your network activities to e-mail that is not confidential and basic Internet surfing.<br />
Wireless radio signals travel outside the network, so other WLAN devices can pick up unprotected<br />
signals. You can take the following precautions to protect your WLAN:<br />
●<br />
●<br />
Firewall—A firewall checks both data and requests for data that are sent to your network, and<br />
discards any suspicious items. Firewalls are available in both software and hardware. Some<br />
networks use a combination of both types.<br />
Wireless encryption—Your computer supports three encryption protocols:<br />
◦ Wi-Fi Protected Access (WPA)<br />
◦ Wi-Fi Protected Access II (WPA2)<br />
◦ Wired Equivalent Privacy (WEP)<br />
6 Chapter 2 Networking (select models only)
NOTE: <strong>HP</strong> recommends that you select WPA2, which is the most advanced of the three encryption<br />
protocols. The use of WEP encryption is not recommended, because it can be overcome with little<br />
effort.<br />
●<br />
Wi-Fi Protected Access (WPA) and Wi-Fi Protected Access II (WPA2) use security standards to<br />
encrypt and decrypt data transmitted over the network. Both WPA and WPA2 dynamically<br />
generate a new key for every packet, and they also generate a different set of keys for each<br />
computer on the network. To accomplish this:<br />
◦ WPA uses Advanced Encryption Standard (AES) and Temporal Key Integrity Protocol<br />
(TKIP).<br />
◦ WPA2 uses Cipher Block Chaining Message Authentication Code Protocol (CCMP), which<br />
is a new AES protocol.<br />
●<br />
Wired Equivalent Privacy (WEP) encrypts data with a WEP key before it is transmitted. Without<br />
the correct key, others will not be able to use the WLAN.<br />
Roaming to another network<br />
When you move your computer within range of another WLAN, Windows attempts to connect to that<br />
network. If the attempt is successful, your computer is automatically connected to the new network. If<br />
Windows does not recognize the new network, follow the same procedure you used initially to<br />
connect to your WLAN.<br />
Using <strong>HP</strong> Mobile Broadband (select models only)<br />
<strong>HP</strong> Mobile Broadband enables your computer to use wireless wide area networks (WWANs) to<br />
access the Internet from more places and over larger areas than it can by using WLANs. Using <strong>HP</strong><br />
Mobile Broadband requires a network service provider, which in most cases is a mobile phone<br />
network provider.<br />
When used with mobile network provider service, <strong>HP</strong> Mobile Broadband gives you the freedom to<br />
stay connected to the Internet, send e-mail, or connect to your corporate network whether you are on<br />
the road or outside the range of Wi-Fi hotspots.<br />
NOTE: You may need the <strong>HP</strong> Mobile Broadband Module serial number to activate mobile<br />
broadband service. See the Getting Started guide for the location of the service label.<br />
Some mobile network service providers require the use of a subscriber identity module (SIM). A SIM<br />
contains basic information about you or your computer, such as a personal identification number<br />
(PIN), as well as network information. Some computers include a preinstalled SIM. If the SIM is not<br />
preinstalled, it may be included with the <strong>HP</strong> Mobile Broadband information provided with your<br />
computer, or it may be provided separately by the mobile network service provider.<br />
For information on inserting and removing the SIM, see Inserting a SIM on page 8 and Removing<br />
a SIM on page 8.<br />
For additional information on <strong>HP</strong> Mobile Broadband and how to activate service with a preferred<br />
mobile network service provider, see the <strong>HP</strong> Mobile Broadband information if it is included with your<br />
computer. For additional information, see the <strong>HP</strong> website at http://www.hp.com/go/mobilebroadband<br />
(select regions/countries only).<br />
Using <strong>HP</strong> Mobile Broadband (select models only) 7
Inserting a SIM<br />
NOTE:<br />
To identify the SIM slot location, see the Getting Started guide.<br />
1. Shut down the computer. If you are not sure whether the computer is off or in Hibernation, turn<br />
the computer on by pressing the power button. Then shut down the computer through the<br />
operating system.<br />
2. Close the display.<br />
3. Disconnect all external devices connected to the computer.<br />
4. Unplug the power cord from the AC outlet.<br />
5. Remove the battery if the computer contains a user-replaceable battery.<br />
6. Insert the SIM into the SIM slot, and gently press the SIM into the slot until it is firmly seated.<br />
CAUTION: When inserting a SIM, position the card to match the icon next to the SIM slot on<br />
the computer. If a SIM is inserted incorrectly, it could damage the SIM and the SIM connector.<br />
To reduce the risk of damage to the connector, use minimal force when inserting a SIM.<br />
7. Replace the battery.<br />
NOTE:<br />
<strong>HP</strong> Mobile Broadband is disabled if the battery is not replaced.<br />
8. Reconnect external power and external devices.<br />
9. Turn on the computer.<br />
Removing a SIM<br />
NOTE:<br />
To identify the SIM slot location, see the Getting Started guide.<br />
1. Shut down the computer. If you are not sure whether the computer is off or in Hibernation, turn<br />
the computer on by pressing the power button. Then shut down the computer through the<br />
operating system.<br />
2. Close the display.<br />
3. Disconnect all external devices connected to the computer.<br />
4. Unplug the power cord from the AC outlet.<br />
5. Remove the battery if the computer contains a user-replaceable battery.<br />
6. Press in on the SIM, and then remove it from the slot.<br />
7. Replace the battery.<br />
8. Reconnect external power and external devices.<br />
9. Turn on the computer.<br />
8 Chapter 2 Networking (select models only)
Using GPS (select models only)<br />
Your computer may be equipped with a Global Positioning System (GPS) device. GPS satellites<br />
deliver location, speed, and direction information to GPS-equipped systems.<br />
For more information, see the <strong>HP</strong> GPS and Location software Help.<br />
Using Bluetooth wireless devices<br />
A Bluetooth device provides short-range wireless communications that replace the physical cable<br />
connections that traditionally link electronic devices such as the following:<br />
●<br />
●<br />
●<br />
●<br />
Computers<br />
Phones<br />
Imaging devices (cameras and printers)<br />
Audio devices<br />
Bluetooth devices provide peer-to-peer capability that allows you to set up a personal area network<br />
(PAN) of Bluetooth devices. For information on configuring and using Bluetooth devices, see the<br />
Bluetooth software Help.<br />
Bluetooth and Internet Connection Sharing (ICS)<br />
<strong>HP</strong> does not recommend setting up one computer with Bluetooth as a host and using it as a gateway<br />
through which other computers may connect to the Internet. When two or more computers are<br />
connected using Bluetooth, and Internet Connection Sharing (ICS) is enabled on one of the<br />
computers, the other computers may not be able to connect to the Internet using the Bluetooth<br />
network.<br />
The strength of Bluetooth is in synchronizing information transfers between your computer and<br />
wireless devices including cellular phones, printers, cameras, and PDAs. The inability to consistently<br />
connect two or more computers to share the Internet through Bluetooth is a limitation of Bluetooth<br />
and the Windows operating system.<br />
Connecting to a wired network<br />
Using a modem (select models only)<br />
A modem must be connected to an analog telephone line using a 6-pin, RJ-11 modem cable<br />
(purchased separately). In some countries or regions, a specific modem cable adapter is also<br />
required. Jacks for digital PBX systems may resemble analog telephone jacks, but they are not<br />
compatible with the modem.<br />
WARNING! To reduce the risk of electric shock, fire, or damage to the equipment, do not plug a<br />
modem or telephone cable into the RJ-45 (network) jack.<br />
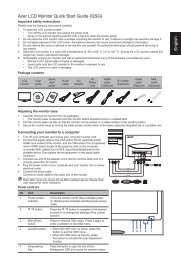
If the modem cable contains noise suppression circuitry (1), which prevents interference from TV and<br />
radio reception, orient the circuitry end of the cable (2) toward the computer.<br />
Using GPS (select models only) 9
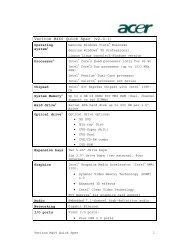
Connecting a modem cable<br />
1. Plug the modem cable into the modem jack (1) on the computer.<br />
2. Plug the modem cable into the RJ-11 telephone wall jack (2) or a route (not illustrated).<br />
10 Chapter 2 Networking (select models only)
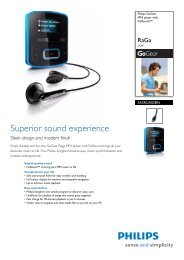
Connecting a country- or region-specific modem cable adapter<br />
Telephone jacks vary by country or region. To use the modem and the modem cable outside the<br />
country or region in which you purchased the computer, you must obtain a country- or region-specific<br />
modem cable adapter.<br />
To connect the modem to an analog telephone line that does not have an RJ-11 telephone jack,<br />
follow these steps:<br />
1. Plug the modem cable into the modem jack (1) on the computer.<br />
2. Plug the modem cable into the modem cable adapter (2).<br />
3. Plug the modem cable adapter (3) into the telephone wall jack.<br />
Selecting a location setting<br />
Viewing the current location selection<br />
1. Select Start > Control Panel.<br />
2. Click Clock, Language, and Region.<br />
3. Click Region and Language.<br />
4. Click the Location tab to display your location.<br />
Connecting to a wired network 11
Adding new locations when traveling<br />
On a new computer, the only location setting available to the modem is a location setting for the<br />
country or region in which you purchased the computer. As you travel to different countries or<br />
regions, set the internal modem to a location setting that meets the operating standards of the country<br />
or region in which you are using the modem.<br />
As you add new location settings, they are saved by the computer so that you can switch among<br />
settings at any time. You can add multiple location settings for any country or region.<br />
CAUTION: To reduce the risk of losing your home country or region settings, do not delete your<br />
current modem country or region settings. To enable modem use in other countries or regions while<br />
preserving your home country or region configuration, add a new configuration for each location in<br />
which you will use the modem.<br />
CAUTION: To reduce the risk of configuring the modem in a way that violates the<br />
telecommunications regulations and laws of the country or region you are visiting, select the country<br />
or region in which the computer is located. The modem may not function properly if the correct<br />
country or region selection is not made.<br />
1. Select Start > Devices and Printers.<br />
2. Right-click the device that represents your computer, and click Modem settings.<br />
NOTE: You must set up an initial (current) location area code before you can view the Dialing<br />
Rules tab. If you do not have a location already set up, you are prompted to enter the location<br />
when you click Modem settings.<br />
3. Click the Dialing Rules tab.<br />
4. Click New. The New Location window opens.<br />
5. In the Location name box, type a name (such as home or work) for the new location setting.<br />
6. Select a country or region from the Country/region list. (If you select a country or region that is<br />
not supported by the modem, the country/region selection for USA or UK is displayed.)<br />
7. Enter the area code, a carrier code (if necessary), and the number for an outside line (if<br />
necessary).<br />
8. Next to Dial using, click Tone or Pulse.<br />
9. Click OK to save your new location setting.<br />
10. Do one of the following:<br />
●<br />
●<br />
To set your new location setting as the current location, click OK.<br />
To select another location setting as the current location setting, select your preference<br />
from the settings in the Location list, and then click OK.<br />
NOTE: You can use the preceding procedure to add location settings for places within your<br />
own country or region as well as in other countries or regions. For example, you could add a<br />
setting named Work that includes dialing rules for accessing an outside line.<br />
12 Chapter 2 Networking (select models only)
Connecting to a local area network (LAN) (select models only)<br />
Connecting to a LAN requires an 8-pin, RJ-45 network cable (purchased separately). If the network<br />
cable contains noise suppression circuitry (1), which prevents interference from TV and radio<br />
reception, orient the circuitry end of the cable (2) toward the computer.<br />
To connect the network cable:<br />
1. Plug the network cable into the network jack (1) on the computer.<br />
2. Plug the other end of the network cable into a network wall jack (2) or a router (not illustrated).<br />
WARNING! To reduce the risk of electric shock, fire, or damage to the equipment, do not plug a<br />
modem cable or telephone cable into an RJ-45 (network) jack.<br />
Connecting to a wired network 13
3 Multimedia<br />
Your computer may include the following multimedia components:<br />
●<br />
●<br />
●<br />
●<br />
●<br />
Integrated speaker(s)<br />
Integrated microphone(s)<br />
Integrated webcam<br />
Preinstalled multimedia software<br />
Multimedia buttons or keys<br />
Using the media activity controls<br />
Depending on your computer model, you may have the following media activity controls that allow<br />
you to play, pause, fast forward, or rewind a media file:<br />
●<br />
●<br />
●<br />
Media buttons<br />
Media hotkeys (specific keys pressed in combination with the fn key)<br />
Media keys<br />
Audio<br />
See the Getting Started guide for information about your computer's media activity controls.<br />
Your computer provides a variety of audio-related functions:<br />
●<br />
●<br />
●<br />
●<br />
●<br />
●<br />
●<br />
Play music.<br />
Record sound.<br />
Download music from the Internet.<br />
Create multimedia presentations.<br />
Transmit sound and images with instant messaging programs.<br />
Stream radio programs.<br />
Create (burn) audio CDs using the installed optical drive (select models only) or an optional<br />
external optical drive (purchased separately).<br />
14 Chapter 3 Multimedia
Adjusting the volume<br />
Depending on your computer model, you can adjust the volume using the following:<br />
●<br />
●<br />
●<br />
Volume buttons<br />
Volume hotkeys (specific keys pressed in combination with the fn key)<br />
Volume keys<br />
WARNING! To reduce the risk of personal injury, adjust the volume before putting on headphones,<br />
earbuds, or a headset. For additional safety information, see the Regulatory, Safety and<br />
Environmental Notices.<br />
NOTE:<br />
NOTE:<br />
has.<br />
Volume can also be controlled through the operating system and some programs.<br />
See the Getting Started guide for information on what type of volume controls your computer<br />
Checking audio functions on the computer<br />
NOTE: For best results when recording, speak directly into the microphone and record sound in a<br />
setting free of background noise.<br />
To check the audio functions on your computer, follow these steps:<br />
1. Select Start > Control Panel > Hardware and Sound > Sound.<br />
2. When the Sound window opens, click the Sounds tab. Under Program Events, select any<br />
sound event, such as a beep or alarm, and click the Test button.<br />
You should hear sound through the speakers or through connected headphones.<br />
To check the recording functions on your computer, follow these steps:<br />
1. Select Start > All Programs > Accessories > Sound Recorder.<br />
2. Click Start Recording and speak into the microphone. Save the file to your desktop.<br />
3. Open a multimedia program and play back the sound.<br />
To confirm or change the audio settings on your computer, select Start > Control Panel > Hardware<br />
and Sound > Sound.<br />
To check the recording functions on your computer, follow these steps:<br />
1. Select Start > All Programs > Accessories > Sound Recorder.<br />
2. Click Start Recording and speak into the microphone. Save the file to your desktop.<br />
3. Open a multimedia program and play back the sound.<br />
To confirm or change the audio settings on your computer, select Start > Control Panel > Audio.<br />
Webcam (select models only)<br />
Some computers include an integrated webcam. With the preinstalled software, you can use the<br />
webcam to take a photo or record a video. You can preview and save the photo or video recording.<br />
Webcam (select models only) 15
The webcam software enables you to experiment with the following features:<br />
●<br />
●<br />
●<br />
Capturing and sharing video<br />
Streaming video with instant message software<br />
Taking still photos<br />
Video<br />
Administrators can set the security level for Face Recognition in the Security Manager Setup Wizard<br />
or <strong>HP</strong> ProtectTools Administrative Console. For more information, see the <strong>HP</strong> ProtectTools Getting<br />
Started guide or the Face Recognition software Help.<br />
For information on how to access the webcam, see the Getting Started guide. For information on<br />
using the webcam, select Start > Help and Support.<br />
Your computer may have one or more of the following external video ports:<br />
●<br />
●<br />
●<br />
VGA<br />
HDMI (High Definition Multimedia Interface)<br />
DisplayPort<br />
NOTE:<br />
See the Getting Started guide for information about your computer's video ports.<br />
VGA<br />
The external monitor port, or VGA port, is an analog display interface that connects an external VGA<br />
display device such as an external VGA monitor or a VGA projector to the computer.<br />
▲<br />
To connect a VGA display device, connect the device cable to the external monitor port.<br />
NOTE: For product-specific instructions on switching the screen image, see your Getting<br />
Started guide.<br />
16 Chapter 3 Multimedia
DisplayPort<br />
The DisplayPort connects the computer to an optional video or audio device, such as a high-definition<br />
television, or to any compatible digital or audio component. The DisplayPort delivers higher<br />
performance than the VGA external monitor port and improves digital connectivity.<br />
NOTE: To transmit video and/or audio signals through the DisplayPort, you need a DisplayPort<br />
cable (purchased separately).<br />
One DisplayPort device can be connected to the DisplayPort port on the computer. The information<br />
displayed on the computer screen can be simultaneously displayed on the DisplayPort device.<br />
To connect a video or audio device to the DisplayPort:<br />
1. Connect one end of the DisplayPort cable to the DisplayPort port on the computer.<br />
2. Connect the other end of the cable to the video device, and then see the device manufacturer’s<br />
instructions for additional information.<br />
NOTE: To remove the device cable, press down on the connector latch to disconnect it from the<br />
computer.<br />
NOTE:<br />
guide.<br />
For product-specific instructions on switching the screen image, see your Getting Started<br />
Video 17
HDMI<br />
The HDMI port connects the computer to an optional video or audio device, such as a high-definition<br />
television, or to any compatible digital or audio component.<br />
NOTE: To transmit video and/or audio signals through the HDMI port, you need an HDMI cable<br />
(purchased separately).<br />
One HDMI device can be connected to the HDMI port on the computer. The information displayed on<br />
the computer screen can be simultaneously displayed on the HDMI device.<br />
To connect a video or audio device to the HDMI port:<br />
1. Connect one end of the HDMI cable to the HDMI port on the computer.<br />
2. Connect the other end of the cable to the video device, and then see the device manufacturer’s<br />
instructions for additional information.<br />
NOTE:<br />
guide.<br />
For product-specific instructions on switching the screen image, see your Getting Started<br />
Configuring audio for HDMI<br />
To configure HDMI audio, first connect an audio or video device, such as a high-definition TV, to the<br />
HDMI port on your computer. Then configure the default audio playback device as follows:<br />
1. Right-click the Speakers icon in the notification area, at the far right of the taskbar, and then<br />
click Playback devices.<br />
2. On the Playback tab, click either Digital Output or Digital Output Device (HDMI).<br />
3. Click Set Default, and then click OK.<br />
To return audio to the computer speakers, follow these steps:<br />
1. Right-click the Speakers icon in the notification area, at the far right of the taskbar, and then<br />
click Playback devices.<br />
2. On the Playback tab, click Speakers.<br />
3. Click Set Default, and then click OK.<br />
18 Chapter 3 Multimedia
Intel Wireless Display (select models only)<br />
Intel® Wireless Display allows you to share your computer content wirelessly on your TV. To<br />
experience wireless display, a wireless TV adapter (purchased separately) is required. DVDs that<br />
have output protection may not play on Intel Wireless Display. (However, DVDs that do not have<br />
output protect will play.) Blu-ray discs, which have output protection, will not play on Intel Wireless<br />
Display. For details about using the wireless TV adapter, see the manufacturer's instructions.<br />
NOTE:<br />
Be sure that wireless is enabled on your computer before using the wireless display.<br />
Video 19
4 Power management<br />
NOTE: A computer may have a power button or a power switch. The term power button is used<br />
throughout this guide to refer to both types of power controls.<br />
Shutting down the computer<br />
CAUTION:<br />
Unsaved information is lost when the computer shuts down.<br />
The shutdown command closes all open programs, including the operating system, and then turns off<br />
the display and computer.<br />
Shut down the computer under any of the following conditions:<br />
●<br />
●<br />
●<br />
When you need to replace the battery or access components inside the computer<br />
When you are connecting an external hardware device that does not connect to a Universal<br />
Serial Bus (USB) port<br />
When the computer will be unused and disconnected from external power for an extended<br />
period<br />
Although you can shut down the computer with the power button, the recommended procedure is to<br />
use the Windows shutdown command:<br />
NOTE: If the computer is in the Sleep state or in Hibernation, you must first exit Sleep or<br />
Hibernation before shutdown is possible.<br />
1. Save your work and close all open programs.<br />
2. Select Start > Shut down.<br />
If the computer is unresponsive and you are unable to use the preceding shutdown procedure, try the<br />
following emergency procedures in the sequence provided:<br />
●<br />
●<br />
●<br />
●<br />
Press ctrl+alt+delete, and then click the Power button on the screen.<br />
Press and hold the power button on the computer for at least 5 seconds.<br />
Disconnect the computer from external power.<br />
On models with a user-replaceable battery, remove the battery.<br />
20 Chapter 4 Power management
Setting power options<br />
Using power-saving states<br />
The computer has two power-saving states that are enabled at the factory: Sleep and Hibernation.<br />
When Sleep is initiated, the power lights blink and the screen clears. Your work is saved to memory,<br />
letting you exit Sleep faster than exiting Hibernation. If the computer is in the Sleep state for an<br />
extended period or if the battery reaches a critical battery level while in the Sleep state, the computer<br />
initiates Hibernation.<br />
When Hibernation is initiated, your work is saved to a hibernation file on the hard drive and the<br />
computer turns off.<br />
CAUTION: To reduce the risk of possible audio and video degradation, loss of audio or video<br />
playback functionality, or loss of information, do not initiate Sleep or Hibernation while reading from or<br />
writing to a disc or an external media card.<br />
NOTE: You cannot initiate any type of networking connection or perform any computer functions<br />
while the computer is in the Sleep state or in Hibernation.<br />
Initiating and exiting Sleep<br />
The system is set at the factory to initiate Sleep after a period of inactivity when running on battery<br />
power or on external power.<br />
Power settings and timeouts can be changed using Power Options in Windows Control Panel.<br />
With the computer on, you can initiate Sleep in any of the following ways:<br />
●<br />
●<br />
●<br />
Briefly press the power button.<br />
Close the display.<br />
Click Start, click the arrow next to the Shut down button, and then click Sleep.<br />
To exit Sleep:<br />
●<br />
●<br />
●<br />
●<br />
Briefly press the power button.<br />
If the display is closed, open the display.<br />
Press a key on the keyboard.<br />
Tap or swipe the TouchPad.<br />
When the computer exits Sleep, the power lights turn on and your work returns to the screen as it<br />
was before you stopped working.<br />
NOTE: If you have set a password to be required on wakeup, you must enter your Windows<br />
password before your work will return to the screen.<br />
Initiating and exiting Hibernation<br />
The system is set at the factory to initiate Hibernation after a period of inactivity when running on<br />
battery power or on external power, or when the battery reaches a critical battery level.<br />
Power settings and timeouts can be changed in Windows Control Panel.<br />
Setting power options 21
To initiate Hibernation:<br />
▲<br />
Click Start, click the arrow next to the Shut down button, and then click Hibernate.<br />
To exit Hibernation:<br />
▲<br />
Briefly press the power button.<br />
The power lights turn on and your work returns to the screen where you stopped working.<br />
NOTE: If you have set a password to be required on wakeup, you must enter your Windows<br />
password before your work will return to the screen.<br />
Using the power meter<br />
The power meter is located in the notification area, at the far right of the taskbar. The power meter<br />
allows you to quickly access power settings and view the remaining battery charge.<br />
●<br />
●<br />
To display the percentage of remaining battery charge and the current power plan, move the<br />
pointer over the power meter icon.<br />
To access Power Options, or to change the power plan, click the power meter icon and select an<br />
item from the list.<br />
Different power meter icons indicate whether the computer is running on battery or external power.<br />
The icon also displays a message if the battery has reached a low or critical battery level.<br />
Using power plans<br />
A power plan is a collection of system settings that manages how the computer uses power. Power<br />
plans can help you conserve power or maximize performance.<br />
Viewing the current power plan<br />
Use any of the following methods:<br />
●<br />
●<br />
Click the power meter icon in the notification area, at the far right of the taskbar.<br />
Select Start > Control Panel > System and Security > Power Options.<br />
Selecting a different power plan<br />
Use any of the following methods:<br />
●<br />
●<br />
Click the power meter icon in the notification area, and then select a power plan from the list.<br />
Select Start > Control Panel > System and Security > Power Options, and then select an<br />
item from the list.<br />
Customizing power plans<br />
1. Click the power meter icon in the notification area, and then click More power options.<br />
– or –<br />
Select Start > Control Panel > System and Security > Power Options.<br />
2. Select a power plan, and then click Change plan settings.<br />
22 Chapter 4 Power management
3. Change the settings as needed.<br />
4. To change additional settings, click Change advanced power settings and make your<br />
changes.<br />
Setting password protection on wakeup<br />
To set the computer to prompt for a password when the computer exits Sleep or Hibernation, follow<br />
these steps:<br />
1. Select Start > Control Panel > System and Security > Power Options.<br />
2. In the left pane, click Require a password on wakeup.<br />
3. Click Change Settings that are currently unavailable.<br />
4. Click Require a password (recommended).<br />
NOTE: If you need to create a user account password or change your current user account<br />
password, click Create or change your user account password, and then follow the onscreen<br />
instructions. If you do not need to create or change a user account password, go to step<br />
5.<br />
5. Click Save changes.<br />
Setting power options 23
Using <strong>HP</strong> Power Assistant (select models only)<br />
<strong>HP</strong> Power Assistant allows you to configure system settings to optimize your computer's power<br />
consumption and battery charge. <strong>HP</strong> Power Assistant provides tools and information to help you<br />
make informed decisions on power management:<br />
●<br />
●<br />
●<br />
Power consumption predictions in hypothetical system configurations<br />
Predefined power profiles<br />
Usage details and graphs showing power consumption trends over time<br />
To start <strong>HP</strong> Power Assistant when Windows is running:<br />
▲<br />
Select Start > All Programs > Productivity and Tools > <strong>HP</strong> Power Assistant.<br />
– or –<br />
Press fn+f6 (select models only) or fn+f8 (select models only).<br />
For more information about using, configuring, and managing <strong>HP</strong> Power Assistant, see the <strong>HP</strong> Power<br />
Assistant software Help.<br />
Using battery power<br />
WARNING! To reduce potential safety issues, use only the battery provided with the computer, a<br />
replacement battery provided by <strong>HP</strong>, or a compatible battery purchased from <strong>HP</strong>.<br />
The computer runs on battery power whenever it is not plugged into external AC power. Computer<br />
battery life varies, depending on power management settings, running programs, display brightness,<br />
external devices connected to the computer, and other factors. Keeping the battery in the computer<br />
whenever the computer is plugged into AC power charges the battery and also protects your work in<br />
case of a power outage. If the computer contains a charged battery and is running on external AC<br />
power, the computer automatically switches to battery power if the AC adapter is disconnected from<br />
the computer or an AC power loss occurs.<br />
NOTE: When you disconnect AC power, the display brightness is automatically decreased to save<br />
battery life. For information on increasing or decreasing display brightness, see the Getting Started<br />
guide. Select computer models can switch between graphic modes to increase battery life. For more<br />
information, see Switchable graphics/dual graphics (select models only) on page 29.<br />
Finding additional battery information<br />
Help and Support provides the following tools and information about the battery:<br />
●<br />
●<br />
●<br />
Battery Check tool to test battery performance<br />
Information on calibration, power management, and proper care and storage to maximize battery<br />
life<br />
Information on battery types, specifications, life cycles, and capacity<br />
To access battery information:<br />
▲<br />
Select Start > Help and Support > Learn > Power Plans: Frequently Asked Questions.<br />
24 Chapter 4 Power management
Using Battery Check<br />
Help and Support provides information on the status of the battery installed in the computer.<br />
To run Battery Check:<br />
1. Connect the AC adapter to the computer.<br />
NOTE:<br />
The computer must be connected to external power for Battery Check to work properly.<br />
2. Select Start > Help and Support > Troubleshoot > Power, Thermal and Mechanical.<br />
3. Click the Power tab, and then click Battery Check.<br />
Battery Check examines the battery and its cells to see if they are functioning properly, and then<br />
reports the results of the examination.<br />
Displaying the remaining battery charge<br />
▲<br />
Move the pointer over the power meter icon in the notification area, at the far right of the taskbar.<br />
Maximizing battery discharge time<br />
Battery discharge time varies depending on the features you use while on battery power. Maximum<br />
discharge time gradually decreases as the battery storage capacity naturally degrades.<br />
Tips for maximizing battery discharge time:<br />
●<br />
●<br />
●<br />
●<br />
Lower the brightness on the display.<br />
Remove the battery from the computer when it is not being used or charged, if the computer<br />
contains a user-replaceable battery<br />
Store the user-replaceable battery in a cool, dry location.<br />
Select the Power saver setting in Power Options.<br />
Managing low battery levels<br />
The information in this section describes the alerts and system responses set at the factory. Some<br />
low-battery alerts and system responses can be changed using Power Options in Windows Control<br />
Panel. Preferences set using Power Options do not affect lights.<br />
Identifying low battery levels<br />
When a battery that is the sole power source for the computer reaches a low or critical battery level,<br />
the following behavior occurs:<br />
●<br />
The battery light (select models only) indicates a low or critical battery level.<br />
NOTE:<br />
For additional information about the battery light, see the Getting Started guide.<br />
– or –<br />
●<br />
The power meter icon in the notification area shows a low or critical battery notification.<br />
Using battery power 25
NOTE: For additional information about the power meter, see Using the power meter<br />
on page 22.<br />
The computer takes the following actions for a critical battery level:<br />
●<br />
●<br />
If Hibernation is enabled and the computer is on or in the Sleep state, the computer initiates<br />
Hibernation.<br />
If Hibernation is disabled and the computer is on or in the Sleep state, the computer remains<br />
briefly in the Sleep state, and then shuts down and loses any unsaved information.<br />
Resolving a low battery level<br />
Resolving a low battery level when external power is available<br />
▲<br />
Connect one of the following devices:<br />
●<br />
●<br />
●<br />
AC adapter<br />
Optional docking or expansion device<br />
Optional power adapter purchased as an accessory from <strong>HP</strong><br />
Resolving a low battery level when no power source is available<br />
●<br />
●<br />
Initiate Hibernation.<br />
Save your work and shut down the computer.<br />
Resolving a low battery level when the computer cannot exit Hibernation<br />
When the computer lacks sufficient power to exit Hibernation, follow these steps:<br />
1. Replace the discharged user-replaceable battery with a charged battery, or connect the AC<br />
adapter to the computer and to external power.<br />
2. Exit Hibernation by pressing the power button.<br />
Conserving battery power<br />
●<br />
●<br />
●<br />
●<br />
●<br />
●<br />
Select low power-use settings through Power Options in Windows Control Panel.<br />
Turn off wireless and LAN connections and exit modem applications when you are not using<br />
them.<br />
Disconnect unused external devices that are not plugged into an external power source.<br />
Stop, disable, or remove any external media cards that you are not using.<br />
Decrease screen brightness.<br />
Before you leave your work, initiate Sleep or Hibernation, or shut down the computer.<br />
Storing a user-replaceable battery (select models only)<br />
CAUTION: To reduce the risk of damage to a battery, do not expose it to high temperatures for<br />
extended periods of time.<br />
26 Chapter 4 Power management
If a computer will be unused and unplugged from external power for more than 2 weeks, remove the<br />
user-replaceable battery and store it separately.<br />
To prolong the charge of a stored battery, place it in a cool, dry place.<br />
NOTE: A stored battery should be checked every 6 months. If the capacity is less than 50 percent,<br />
recharge the battery before returning it to storage.<br />
Calibrate a battery before using it if it has been stored for one month or more.<br />
Disposing of a user-replaceable battery (select models only)<br />
WARNING! To reduce the risk of fire or burns, do not disassemble, crush, or puncture; do not short<br />
external contacts; do not dispose of in fire or water.<br />
See the Regulatory, Safety and Environmental Notices for proper battery disposal.<br />
Replacing a user-replaceable battery (select models only)<br />
Battery Check in Help and Support notifies you to replace the battery when an internal cell is not<br />
charging properly or when the battery storage capacity has reached a weak condition. If the battery is<br />
possibly covered by an <strong>HP</strong> warranty, instructions include a warranty ID. A message refers you to the<br />
<strong>HP</strong> website for more information about ordering a replacement battery.<br />
Using external AC power<br />
WARNING!<br />
Do not charge the computer battery while you are onboard aircraft.<br />
WARNING! To reduce potential safety issues, use only the AC adapter provided with the computer,<br />
a replacement AC adapter provided by <strong>HP</strong>, or a compatible AC adapter purchased from <strong>HP</strong>.<br />
NOTE: For information on connecting to AC power, see the Setup Instructions poster provided in<br />
the computer box.<br />
External AC power is supplied through an approved AC adapter or an optional docking or expansion<br />
device.<br />
Connect the computer to external AC power under any of the following conditions:<br />
●<br />
●<br />
●<br />
●<br />
●<br />
When charging or calibrating a battery<br />
When installing or modifying system software<br />
When writing information to a CD, a DVD, or a BD (select models only)<br />
When running Disk Defragmenter<br />
When performing a backup or recovery<br />
When you connect the computer to external AC power, the following events occur:<br />
●<br />
●<br />
The battery begins to charge.<br />
If the computer is turned on, the power meter icon in the notification area changes appearance.<br />
Using external AC power 27
When you disconnect external AC power, the following events occur:<br />
●<br />
●<br />
The computer switches to battery power.<br />
The display brightness is automatically decreased to save battery life.<br />
Testing an AC adapter<br />
Test the AC adapter if the computer exhibits any of the following symptoms when it is connected to<br />
AC power:<br />
●<br />
●<br />
●<br />
The computer does not turn on.<br />
The display does not turn on.<br />
The power lights are off.<br />
To test the AC adapter:<br />
NOTE:<br />
The following instructions apply to computers with user-replaceable batteries.<br />
1. Shut down the computer.<br />
2. Remove the battery from the computer.<br />
3. Connect the AC adapter to the computer, and then plug it into an AC outlet.<br />
4. Turn on the computer.<br />
●<br />
●<br />
If the power lights turn on, the AC adapter is working properly.<br />
If the power lights remain off, the AC adapter is not functioning and should be replaced.<br />
Contact support for information on obtaining a replacement AC power adapter.<br />
28 Chapter 4 Power management
Switchable graphics/dual graphics (select models only)<br />
Select computers are equipped with either switchable graphics or dual graphics.<br />
●<br />
●<br />
Switchable graphics—Supported by both AMD and Intel. If your computer has AMD dynamic<br />
switchable graphics, it supports only switchable graphics.<br />
Dual graphics—Supported only by AMD. If your computer has AMD Radeon dual graphics, it<br />
supports only dual graphics.<br />
NOTE: Dual graphics can be enabled only by full-screen applications that use DirectX version<br />
10 or 11.<br />
NOTE: To determine whether your computer supports switchable graphics or dual graphics, see<br />
your notebook graphics processor configuration. Intel HR Central Processing Units (CPUs) and AMD<br />
Trinity series Accelerated Processing Units (APUs) support switchable graphics. AMD Trinity series<br />
A6, A8, and A10 APUs support dual graphics. AMD Trinity series A4 APUs do not support dual<br />
graphics.<br />
Both switchable graphics and dual graphics offer two modes for processing graphics:<br />
●<br />
●<br />
Performance mode—Runs application with optimal performance.<br />
Power Saving mode—Conserves battery life.<br />
To manage your AMD graphics settings:<br />
1. Open the Catalyst Control Center by right-clicking on the desktop, and then select Configure<br />
Switchable Graphics.<br />
2. Click the Power tab, and then select Switchable Graphics.<br />
Using switchable graphics (select models only)<br />
Switchable graphics allow you to switch between Performance mode and Power Saving mode.<br />
Switchable graphics are available only with Windows 7 Professional, Windows 7 Home Premium, and<br />
Windows 7 Home Basic operating systems.<br />
To manage your switchable graphics settings:<br />
1. Right-click on the desktop, and then select Configure Switchable Graphics.<br />
2. Click the Power tab, and then select Switchable Graphics.<br />
Switchable graphics assigns individual applications to either Performance mode or Power Saving<br />
mode, based on power requirements. You can also manually modify the settings for an individual<br />
application by locating the application under Recent Applications drop-down menu, or by clicking<br />
Browse, located below Other Applications. You can switch between Performance mode and Power<br />
Saving mode.<br />
NOTE:<br />
For more information, see the switchable graphics software Help.<br />
Using dual graphics (select models only)<br />
If your system is equipped with dual graphics (two or more added Graphics Processing Units<br />
(GPUs)), you can enable AMD Radeon Dual Graphics to increase application power and performance<br />
Switchable graphics/dual graphics (select models only) 29
for full-screen applications that use DirectX version 10 or 11. For more information about DirectX, see<br />
http://www.microsoft.com/directx.<br />
NOTE: Dual graphics systems only support automatic selection based on power requirements<br />
(Dynamic scheme), and automatically assign Performance mode or Power Saving mode for individual<br />
applications. However, you can manually modify the settings for a particular application.<br />
To enable or disable AMD Radeon Dual Graphics, select or deselect the check box in the AMD<br />
Radeon Dual Graphics section, which is located in the Performance tab in the Catalyst Control<br />
Center.<br />
NOTE:<br />
For more information, see the AMD software Help.<br />
30 Chapter 4 Power management
5 External cards and devices<br />
Using Media Card Reader cards (select models only)<br />
Optional digital cards provide secure data storage and convenient data sharing. These cards are<br />
often used with digital media–equipped cameras and PDAs as well as with other computers.<br />
To determine the digital card formats that are supported on your computer, see the Getting Started<br />
guide.<br />
Inserting a digital card<br />
CAUTION: To reduce the risk of damage to the digital card connectors, use minimal force to insert<br />
a digital card.<br />
1. Hold the card label-side up, with the connectors facing the computer.<br />
2. Insert the card into the Media Card Reader, and then press in on the card until it is firmly seated.<br />
You will hear a sound when the device has been detected, and a menu of options may be<br />
displayed.<br />
Using Media Card Reader cards (select models only) 31
Removing a digital card<br />
CAUTION: To reduce the risk of loss of data or an unresponsive system, use the following<br />
procedure to safely remove the digital card.<br />
1. Save your information and close all programs associated with the digital card.<br />
2. Click the remove hardware icon in the notification area, at the far right of the taskbar. Then<br />
follow the on-screen instructions.<br />
3. Press in on the card (1), and then remove it from the slot (2).<br />
NOTE:<br />
If the card does not eject, pull the card out of the slot.<br />
Using ExpressCards (select models only)<br />
An ExpressCard is a high-performance <strong>PC</strong> Card that is inserted into the ExpressCard slot.<br />
Like standard <strong>PC</strong> Cards, ExpressCards are designed to conform to the standard specifications of the<br />
Personal Computer Memory Card International Association (<strong>PC</strong>MCIA).<br />
Configuring an ExpressCard<br />
Install only the software required for the card. If you are instructed by the ExpressCard manufacturer<br />
to install device drivers:<br />
●<br />
●<br />
Install only the device drivers for your operating system.<br />
Do not install additional software, such as card services, socket services, or enablers, that are<br />
supplied by the ExpressCard manufacturer.<br />
32 Chapter 5 External cards and devices
Inserting an ExpressCard<br />
CAUTION: To prevent damage to the computer and external media cards, do not insert a <strong>PC</strong> Card<br />
into an ExpressCard slot.<br />
CAUTION:<br />
To reduce the risk of damage to the connectors:<br />
Use minimal force when inserting an ExpressCard.<br />
Do not move or transport the computer when an ExpressCard is in use.<br />
NOTE:<br />
The following illustration may look slightly different than your device.<br />
The ExpressCard slot may contain a protective insert. To remove the insert:<br />
1. Press in on the insert (1) to unlock it.<br />
2. Pull the insert out of the slot (2).<br />
To insert an ExpressCard:<br />
1. Hold the card label-side up, with the connectors facing the computer.<br />
2. Insert the card into the ExpressCard slot, and then press in on the card until it is firmly seated.<br />
You will hear a sound when the card has been detected, and a menu of options may be<br />
displayed.<br />
NOTE: The first time you connect an ExpressCard, a message in the notification area lets you<br />
know that the card is recognized by the computer.<br />
NOTE:<br />
To conserve power, stop or remove an ExpressCard when it is not in use.<br />
Using ExpressCards (select models only) 33
Removing an ExpressCard<br />
CAUTION: To reduce the risk of loss of data or an unresponsive system, use the following<br />
procedure to safely remove the ExpressCard.<br />
1. Save your information and close all programs associated with the ExpressCard.<br />
2. Click the remove hardware icon in the notification area, at the far right of the taskbar, and then<br />
follow the on-screen instructions.<br />
3. Release and remove the ExpressCard:<br />
a. Gently press in on the ExpressCard (1) to unlock it.<br />
b. Pull the ExpressCard out of the slot (2).<br />
Using smart cards (select models only)<br />
NOTE:<br />
Cards.<br />
The term smart card is used throughout this chapter to refer to both smart cards and Java<br />
A smart card is a credit card-sized accessory that carries a microchip containing memory and a<br />
microprocessor. Like personal computers, smart cards have an operating system to manage input<br />
and output, and they include security features to protect against tampering. Industry-standard smart<br />
cards are used with the smart card reader (select models only).<br />
A PIN is needed to gain access to the contents of the microchip. For more information about smart<br />
card security features, see Help and Support.<br />
34 Chapter 5 External cards and devices
Inserting a smart card<br />
1. Hold the card label-side up, and gently slide the card into the smart card reader until the card is<br />
seated.<br />
2. Follow the on-screen instructions for logging on to the computer using the smart card PIN.<br />
Removing a smart card<br />
▲<br />
Grasp the edge of the smart card, and then pull it out of the smart card reader.<br />
Using a USB device<br />
Universal Serial Bus (USB) is a hardware interface that can be used to connect an optional external<br />
device, such as a USB keyboard, mouse, drive, printer, scanner, or hub.<br />
Some USB devices may require additional support software, which is usually included with the<br />
device. For more information about device-specific software, see the manufacturer's instructions.<br />
These instructions may be provided with the software, on disc, or on the manufacturer’s website.<br />
The computer has at least 1 USB port that supports USB 1.0, 1.1, 2.0, or 3.0 devices. Your computer<br />
may also have a USB charging port that provides power to an external device. An optional docking<br />
device or USB hub provides additional USB ports that can be used with the computer.<br />
Using a USB device 35
Connecting a USB device<br />
CAUTION:<br />
device.<br />
To reduce the risk of damage to a USB connector, use minimal force to connect the<br />
▲<br />
Connect the USB cable for the device to the USB port.<br />
NOTE:<br />
The following illustration may look slightly different than your computer.<br />
You will hear a sound when the device has been detected.<br />
NOTE: The first time you connect a USB device, a message in the notification area lets you know<br />
that the device is recognized by the computer.<br />
Removing a USB device<br />
CAUTION: To reduce the risk of damage to a USB connector, do not pull on the cable to remove<br />
the USB device.<br />
CAUTION: To reduce the risk of loss of information or an unresponsive system, use the following<br />
procedure to safely remove the USB device.<br />
1. To remove a USB device, save your information and close all programs associated with the<br />
device.<br />
2. Click the remove hardware icon in the notification area, at the far right of the taskbar, and then<br />
follow the on-screen instructions.<br />
3. Remove the device.<br />
Using 1394 devices (select models only)<br />
IEEE 1394 is a hardware interface that connects a high-speed multimedia or data storage device to<br />
the computer. Scanners, digital cameras, and digital camcorders often require a 1394 connection.<br />
Some 1394 devices may require additional support software, which is usually included with the<br />
device. For more information about device-specific software, see the manufacturer's instructions.<br />
The 1394 port also supports IEEE 1394a devices.<br />
36 Chapter 5 External cards and devices
Connecting a 1394 device<br />
CAUTION:<br />
device.<br />
To reduce the risk of damage to a 1394 port connector, use minimal force to connect the<br />
▲ To connect a 1394 device to the computer, connect the 1394 cable for the device to the 1394<br />
port.<br />
You will hear a sound when the device has been detected.<br />
Removing a 1394 device<br />
CAUTION: To reduce the risk of loss of information or an unresponsive system, stop the 1394<br />
device before removing it.<br />
CAUTION: To reduce the risk of damage to a 1394 connector, do not pull on the cable to remove<br />
the 1394 device.<br />
1. To remove a 1394 device, save your information and close all programs associated with the<br />
device.<br />
2. Click the remove hardware icon in the notification area, at the far right of the taskbar, and then<br />
follow the on-screen instructions.<br />
3. Remove the device.<br />
Using an eSATA device (select models only)<br />
An eSATA port connects an optional high-performance eSATA component, such as an eSATA<br />
external hard drive.<br />
Some eSATA devices may require additional support software, which is usually included with the<br />
device. For more information about device-specific software, see the manufacturer's instructions.<br />
NOTE:<br />
The eSATA port also supports an optional USB device.<br />
Using an eSATA device (select models only) 37
Connecting an eSATA device<br />
CAUTION:<br />
the device.<br />
To reduce the risk of damage to an eSATA port connector, use minimal force to connect<br />
▲<br />
To connect an eSATA device to the computer, connect the eSATA cable for the device to the<br />
eSATA port.<br />
You will hear a sound when the device has been detected.<br />
Removing an eSATA device<br />
CAUTION: To reduce the risk of damage to an eSATA connector, do not pull on the cable to<br />
remove the eSATA device.<br />
CAUTION: To reduce the risk of loss of information or an unresponsive system, use the following<br />
procedure to safely remove the device.<br />
1. To remove an eSATA device, save your information and close all programs associated with the<br />
device.<br />
2. Click the remove hardware icon in the notification area, at the far right of the taskbar, and then<br />
follow the on-screen instructions.<br />
3. Remove the device.<br />
38 Chapter 5 External cards and devices
Using a serial device (select models only)<br />
Select computer models include a serial port that connects optional devices such as a serial modem,<br />
mouse, or printer.<br />
Some serial devices may require additional support software, which is usually included with the<br />
device. For more information about device-specific software, see the manufacturer's instructions.<br />
▲<br />
To connect a serial device, connect the device cable to the serial port on the computer.<br />
Using optional external devices<br />
NOTE: For more information about required software and drivers, or to learn which computer port to<br />
use, see the manufacturer's instructions.<br />
To connect an external device to the computer:<br />
CAUTION: To reduce the risk of damage to the equipment when connecting a powered device, be<br />
sure that the device is turned off and the AC power cord is unplugged.<br />
1. Connect the device to the computer.<br />
2. If you are connecting a powered device, plug the device power cord into a grounded AC outlet.<br />
3. Turn on the device.<br />
To disconnect an unpowered external device, turn off the device, and then disconnect it from the<br />
computer. To disconnect a powered external device, turn off the device, disconnect it from the<br />
computer, and then unplug the AC power cord.<br />
Using optional external drives<br />
Removable external drives expand your options for storing and accessing information. A USB drive<br />
can be added by connecting the drive to a USB port on the computer.<br />
NOTE: <strong>HP</strong> external USB optical drives should be connected to the powered USB port on the<br />
computer.<br />
Using a serial device (select models only) 39
USB drives include the following types:<br />
●<br />
●<br />
●<br />
●<br />
1.44-megabyte diskette drive<br />
Hard drive module<br />
External optical drive (CD, DVD, and Blu-ray)<br />
MultiBay device<br />
Using the expansion port (select models only)<br />
The expansion port connects the computer to an optional docking or expansion device, so that<br />
additional ports and connectors can be used with the computer.<br />
Using the docking connector (select models only)<br />
The docking connector connects the computer to an optional docking device. An optional docking<br />
device provides additional ports and connectors that can be used with the computer.<br />
NOTE:<br />
The following image may look slightly different than your computer or docking device.<br />
40 Chapter 5 External cards and devices
Using optional external devices 41
6 Drives<br />
Handling drives<br />
CAUTION: Drives are fragile computer components that must be handled with care. See the<br />
following cautions before handling drives. Additional cautions are included with the procedures to<br />
which they apply.<br />
Observe these precautions:<br />
●<br />
●<br />
●<br />
●<br />
●<br />
●<br />
●<br />
●<br />
●<br />
●<br />
●<br />
●<br />
●<br />
Before you move a computer that is connected to an external hard drive, initiate Sleep and allow<br />
the screen to clear, or properly disconnect the external hard drive.<br />
Before handling a drive, discharge <strong>static</strong> electricity by touching the unpainted metal surface of<br />
the drive.<br />
Do not touch the connector pins on a removable drive or on the computer.<br />
Handle a drive carefully; do not drop a drive or place items on it.<br />
Before removing or inserting a drive, shut down the computer. If you are unsure whether the<br />
computer is off, in the Sleep state, or in Hibernation, turn the computer on, and then shut it down<br />
through the operating system.<br />
Do not use excessive force when inserting a drive into a drive bay.<br />
Do not type on the keyboard or move the computer while an optical drive is writing to a disc. The<br />
write process is sensitive to vibration.<br />
When the battery is the only source of power, be sure that the battery is sufficiently charged<br />
before writing to media.<br />
Avoid exposing a drive to temperature or humidity extremes.<br />
Avoid exposing a drive to liquids. Do not spray the drive with cleaning products.<br />
Remove media from a drive before removing the drive from the drive bay, or traveling with,<br />
shipping, or storing a drive.<br />
If a drive must be mailed, place the drive in a bubble-pack mailer or other suitable protective<br />
packaging and label the package “FRAGILE.”<br />
Avoid exposing a drive to magnetic fields. Security devices with magnetic fields include airport<br />
walk-through devices and security wands. Airport conveyer belts and similar security devices<br />
that check carry-on baggage use X-rays instead of magnetism and do not damage drives.<br />
42 Chapter 6 Drives
Using hard drives<br />
Improving hard drive performance<br />
Using Disk Defragmenter<br />
As you use the computer, files on the hard drive become fragmented. Disk Defragmenter<br />
consolidates the fragmented files and folders on the hard drive so that the system can run more<br />
efficiently.<br />
NOTE:<br />
It is not necessary to run Disk Defragmenter on solid-state drives.<br />
After you start Disk Defragmenter, it works without supervision. Depending on the size of your hard<br />
drive and the number of fragmented files, Disk Defragmenter may take more than an hour to<br />
complete. You may want to set it to run during the night or at another time when you do not need<br />
access to your computer.<br />
<strong>HP</strong> recommends defragmenting your hard drive at least once a month. You may set Disk<br />
Defragmenter to run on a monthly schedule, but you can defragment your computer manually at any<br />
time.<br />
To run Disk Defragmenter:<br />
1. Connect the computer to AC power.<br />
2. Select Start > All Programs > Accessories > System Tools > Disk Defragmenter.<br />
3. Click Defragment disk.<br />
NOTE: Windows includes the User Account Control feature to improve the security of your<br />
computer. You may be prompted for your permission or password for tasks such as installing<br />
software, running utilities, or changing Windows settings. See Help and Support for more<br />
information.<br />
For additional information, access the Disk Defragmenter software Help.<br />
Using Disk Cleanup<br />
Disk Cleanup searches the hard drive for unnecessary files that you can safely delete to free up disk<br />
space and help the computer to run more efficiently.<br />
To run Disk Cleanup:<br />
1. Select Start > All Programs > Accessories > System Tools > Disk Cleanup.<br />
2. Follow the on-screen instructions.<br />
Using hard drives 43
Using <strong>HP</strong> 3D DriveGuard (select models only)<br />
<strong>HP</strong> 3D DriveGuard protects the hard drive by parking the drive and halting data requests under either<br />
of the following conditions:<br />
●<br />
●<br />
You drop the computer.<br />
You move the computer with the display closed while the computer is running on battery power.<br />
A short time after the end of one of these events, <strong>HP</strong> 3D DriveGuard returns the hard drive to normal<br />
operation.<br />
NOTE:<br />
Because solid-state drives (SSD) lack moving parts, <strong>HP</strong> 3D DriveGuard is unnecessary.<br />
NOTE: Hard drives in the primary hard drive bay or in the secondary hard drive bay are protected<br />
by <strong>HP</strong> 3D DriveGuard. Hard drives installed in optional docking devices or connected to USB ports<br />
are not protected by <strong>HP</strong> 3D DriveGuard.<br />
For more information, see the <strong>HP</strong> 3D DriveGuard software Help.<br />
Identifying <strong>HP</strong> 3D DriveGuard status<br />
The hard drive light on the computer changes color to show that a drive in the primary hard drive bay<br />
or a drive in the secondary hard drive bay (select models only) is parked. To determine whether<br />
drives are currently protected or whether a drive is parked, use the icon in the notification area, at the<br />
far right of the taskbar:<br />
●<br />
●<br />
●<br />
If the software is enabled, a green check mark is superimposed over the hard drive icon.<br />
If the software is disabled, a red X is superimposed over the hard drive icon.<br />
If the drives are parked, a yellow moon is superimposed over the hard drive icon.<br />
If the icon in the notification area is not enabled, follow these steps to enable it:<br />
1. Select Start > Control Panel > Hardware and Sound > <strong>HP</strong> 3D DriveGuard.<br />
NOTE:<br />
If prompted by User Account Control, click Yes.<br />
2. On the Icon in system tray row, click Show.<br />
3. Click OK.<br />
Managing power with a parked hard drive<br />
If <strong>HP</strong> 3D DriveGuard has parked the drive, the computer will behave in the following ways:<br />
●<br />
●<br />
The computer will not shut down.<br />
The computer will not initiate Sleep or Hibernation, except as described in the following note.<br />
NOTE: If the computer is running on battery power and reaches a critical battery level, <strong>HP</strong> 3D<br />
DriveGuard allows the computer to initiate Hibernation.<br />
●<br />
The computer will not activate battery alarms set on the Alarms tab in Power Options.<br />
Before you move the computer, <strong>HP</strong> recommends that you either shut it down or initiate Sleep or<br />
Hibernation.<br />
44 Chapter 6 Drives
Using <strong>HP</strong> 3D DriveGuard software<br />
The <strong>HP</strong> 3D DriveGuard software enables you to perform the following tasks:<br />
●<br />
Enable and disable <strong>HP</strong> 3D DriveGuard.<br />
NOTE: Depending on your user privileges, you may be unable to enable or disable <strong>HP</strong> 3D<br />
DriveGuard. Privileges for non-administrator users can be changed by members of an<br />
administrator group.<br />
●<br />
Determine whether a drive in the system is supported.<br />
To open the software and change settings, follow these steps:<br />
1. Double-click the icon in the notification area, at the far right of the taskbar.<br />
– or –<br />
Right-click the icon in the notification area, and then select Settings.<br />
2. Click the appropriate button to change settings.<br />
3. Click OK.<br />
Using optical drives (select models only)<br />
Optical drives include the following:<br />
●<br />
●<br />
●<br />
CD<br />
DVD<br />
Blu-ray (BD)<br />
Identifying the installed optical drive<br />
▲<br />
Select Start > Computer.<br />
A list of all the devices installed in your computer, including your optical drive, is displayed.<br />
Inserting an optical disc<br />
Tray-load<br />
1. Turn on the computer.<br />
2. Press the release button (1) on the drive bezel to release the disc tray.<br />
3. Pull out the tray (2).<br />
4. Hold the disc by the edges to avoid touching the flat surfaces and position the disc label-side up<br />
over the tray spindle.<br />
NOTE:<br />
If the tray is not fully accessible, tilt the disc carefully to position it over the spindle.<br />
Using optical drives (select models only) 45
5. Gently press the disc (3) down onto the tray spindle until the disc snaps into place.<br />
6. Close the disc tray.<br />
NOTE: After you insert a disc, a short pause is normal. If you have not selected a media player, an<br />
AutoPlay dialog box opens. It prompts you to select how you want to use the media content.<br />
Slot-load<br />
CAUTION: Do not insert 8-cm optical discs into a slot-load optical drive. It may cause damage to<br />
the optical drive.<br />
1. Turn on the computer.<br />
2. Hold the disc by the edges to avoid touching the flat surfaces and position the disc label-side up.<br />
3. Gently slide the disc into the slot-load optical drive.<br />
Removing an optical disc<br />
Tray-load<br />
There are 2 ways to remove a disc, depending on whether the disc tray opens normally or not.<br />
46 Chapter 6 Drives
When the disc tray opens normally<br />
1. Press the release button (1) on the drive bezel to release the disc tray, and then gently pull out<br />
the tray (2) until it stops.<br />
2. Remove the disc (3) from the tray by gently pressing down on the spindle while lifting the outer<br />
edges of the disc. Hold the disc by the edges and avoid touching the flat surfaces.<br />
NOTE:<br />
If the tray is not fully accessible, tilt the disc carefully as you remove it.<br />
3. Close the disc tray and place the disc in a protective case.<br />
When the disc tray fails to open normally<br />
1. Insert the end of a paper clip (1) into the release access in the front bezel of the drive.<br />
2. Press in gently on the paper clip until the tray is released, and then pull out the tray (2) until it<br />
stops.<br />
Using optical drives (select models only) 47
3. Remove the disc (3) from the tray by gently pressing down on the spindle while lifting the outer<br />
edges of the disc. Hold the disc by the edges and avoid touching the flat surfaces.<br />
NOTE:<br />
If the tray is not fully accessible, tilt the disc carefully as you remove it.<br />
4. Close the disc tray and place the disc in a protective case.<br />
Slot-load<br />
1. Press the release button (1) next to the drive.<br />
2. Remove the disc (2) by holding it by the edges and avoid touching the flat surfaces.<br />
3. Place the disc in a protective case.<br />
48 Chapter 6 Drives
Sharing optical drives<br />
Although your computer may not have an integrated optical drive, you can access software and data,<br />
and install applications, by sharing an optical drive connected to another computer in your network.<br />
Sharing drives is a feature of the Windows operating system that allows a drive on one computer to<br />
be accessible to other computers on the same network.<br />
NOTE: You must have a network set up in order to share an optical drive; see Networking (select<br />
models only) on page 2 for additional information on setting up a network.<br />
NOTE: Some discs, such as DVD movies and game discs, may be copy-protected and therefore<br />
unusable through DVD or CD drive sharing.<br />
To share an optical drive:<br />
1. From the computer with the optical drive you are sharing, select Start > Computer.<br />
2. Right-click the optical drive you want to share, and click Properties.<br />
3. Click the Sharing tab, and then click Advanced Sharing.<br />
4. Select the Share this folder check box.<br />
5. Type a name for the optical drive in the Share name text box.<br />
6. Click Apply, and then click OK.<br />
7. To view the shared optical drive, select Start > Control Panel > Network and Internet ><br />
Network and Sharing Center.<br />
Using RAID (select models only)<br />
Redundant Arrays of Independent Disks (RAID) technology allows a computer to use two or more<br />
hard disks at the same time. RAID treats multiple drives as one contiguous drive, either through<br />
hardware or software settings. If multiple disks are set up to work together in this fashion, they are<br />
referred to as a RAID array.<br />
For additional information about RAID, see the RAID User <strong>Guide</strong> located in Help and Support or see<br />
the <strong>HP</strong> website at http://www.hp.com/support.<br />
Using RAID (select models only) 49
7 Security<br />
Protecting the computer<br />
Computer security is essential for protecting the confidentiality, integrity, and availability of your<br />
information. Standard security features provided by the Windows operating system, the non-Windows<br />
Computer Setup utility (BIOS), and other third-party software can protect your personal settings and<br />
data from a variety of risks, such as viruses, worms, and other types of malicious code.<br />
NOTE: Security solutions are designed to act as deterrents. These deterrents may not prevent a<br />
product from being mishandled or stolen.<br />
NOTE: Before you send your computer for service, back up and delete confidential files, and<br />
remove all password settings.<br />
NOTE:<br />
Some features listed in this chapter may not be available on your computer.<br />
NOTE: Your computer supports Computrace, which is an online security-based tracking and<br />
recovery service available in select regions. If the computer is stolen, Computrace can track the<br />
computer if the unauthorized user accesses the Internet. You must purchase the software and<br />
subscribe to the service in order to use Computrace. For information about ordering the Computrace<br />
software, go to the <strong>HP</strong> website at http://www.hpshopping.com.<br />
If the computer is equipped with the following hardware and software, you can set the security level to<br />
balance the ease of use and the difficulty of breaching the security of the computer:<br />
●<br />
●<br />
If a webcam is installed or connected to the computer, and if the Face Recognition program is<br />
installed.<br />
If a fingerprint reader is installed or connected to the computer, and if <strong>HP</strong> Security Manager<br />
software is installed.<br />
For more information, see the <strong>HP</strong> ProtectTools Getting Started guide or the <strong>HP</strong> ProtectTools Security<br />
Manager software Help.<br />
Computer risk<br />
Unauthorized use of the computer<br />
Unauthorized access to Computer Setup (f10)<br />
Unauthorized access to the contents of a hard drive<br />
Unauthorized startup from an optical drive, diskette drive, or<br />
internal network adapter<br />
Security feature<br />
<strong>HP</strong> ProtectTools Security Manager (select models only), in<br />
combination with a password, smart card, contactless card,<br />
registered face scenes, registered fingerprints, or other<br />
authentication credential.<br />
BIOS administrator password in Computer Setup*<br />
DriveLock password in Computer Setup*<br />
Boot options feature in Computer Setup*<br />
50 Chapter 7 Security
Computer risk<br />
Unauthorized access to a Windows user account<br />
Security feature<br />
Windows user password<br />
Unauthorized access to data ● Firewall software<br />
●<br />
●<br />
Windows updates<br />
Drive Encryption for <strong>HP</strong> ProtectTools<br />
Unauthorized access to Computer Setup settings and other<br />
system identification information<br />
Unauthorized removal of the computer<br />
BIOS administrator password in Computer Setup*<br />
Security cable slot (used with an optional security cable)<br />
*Computer Setup is a preinstalled, ROM-based utility that can be used even when the operating system is not working or will<br />
not load. You can use either a pointing device (TouchPad, pointing stick, or USB mouse) or the keyboard to navigate and<br />
make selections in Computer Setup.<br />
Using passwords<br />
A password is a group of characters that you choose to secure your computer information. Several<br />
types of passwords can be set, depending on how you want to control access to your information.<br />
Passwords can be set in Windows or in the non-Windows Computer Setup utility that is preinstalled<br />
on the computer.<br />
●<br />
●<br />
●<br />
●<br />
●<br />
Setup and DriveLock passwords are set in Computer Setup and are managed by the system<br />
BIOS.<br />
The embedded security password, which is an <strong>HP</strong> ProtectTools Security Manager password,<br />
can be enabled in Computer Setup to provide BIOS password protection in addition to its normal<br />
<strong>HP</strong> ProtectTools functions. The embedded security password is used with the optional<br />
embedded security chip.<br />
Windows passwords are set only in the Windows operating system.<br />
You can use <strong>HP</strong> SpareKey to save your password on a USB drive. The password is encrypted,<br />
and if you forget the BIOS administrator password set in Computer Setup, you must answer<br />
security questions to reveal the password.<br />
The embedded security password, which can be enabled in Computer Setup, is used with the<br />
optional embedded security chip and <strong>HP</strong> ProtectTools Security Manager software.<br />
You can use the same password for a Computer Setup feature and for a Windows security feature.<br />
You can also use the same password for more than one Computer Setup feature.<br />
Use the following tips for creating and saving passwords:<br />
●<br />
●<br />
●<br />
When creating passwords, follow requirements set by the program.<br />
Write down your passwords and store them in a secure place away from the computer.<br />
Do not store passwords in a file on the computer.<br />
The following tables list commonly used passwords and describe their functions.<br />
Using passwords 51
Setting passwords in Windows<br />
Password<br />
Administrator password*<br />
Function<br />
Protects access to a Windows administrator-level account.<br />
NOTE: This password cannot be used to access Computer<br />
Setup contents.<br />
User password*<br />
Protects access to a Windows user account.<br />
*For information about setting a Windows administrator password or a Windows user password, select Start > Help and<br />
Support.<br />
52 Chapter 7 Security
Setting passwords in Computer Setup<br />
Password<br />
BIOS administrator password*<br />
DriveLock master password*<br />
DriveLock user password*<br />
TPM embedded security password (select models only)<br />
Function<br />
Protects access to Computer Setup.<br />
Protects access to the internal hard drive that is protected by<br />
DriveLock. It is also used to remove DriveLock protection.<br />
This password is set under DriveLock Passwords during the<br />
enable process.<br />
Protects access to the internal hard drive that is protected by<br />
DriveLock, and is set under DriveLock Passwords during the<br />
enable process.<br />
The embedded security password, which is an <strong>HP</strong><br />
ProtectTools Security Manager password, can be enabled in<br />
Computer Setup to provide BIOS password protection in<br />
addition to its normal <strong>HP</strong> ProtectTools functions. The<br />
embedded security password is used with the optional<br />
integrated Trusted Platform Module (TPM) embedded<br />
security chip that enhances and enables other <strong>HP</strong><br />
ProtectTools Security Manager security features.<br />
*For details about each of these passwords, see the following topics.<br />
This password requires the optional embedded security chip<br />
to support this security feature.<br />
Managing a BIOS administrator password<br />
To set, change, or delete this password, follow these steps:<br />
Setting a new BIOS administrator password<br />
1. Turn on or restart the computer, and then press esc while the “Press the ESC key for Startup<br />
Menu” message is displayed at the bottom of the screen.<br />
2. Press f10 to enter Computer Setup.<br />
3. Use a pointing device or the arrow keys to select Security > Setup BIOS Administrator<br />
Password, and then press enter.<br />
4. When prompted, type a password.<br />
5. When prompted, type the new password again to confirm.<br />
6. To save your changes and exit Computer Setup, click the Save icon in the lower-left corner of<br />
the screen, and then follow the on-screen instructions.<br />
– or –<br />
Use the arrow keys to select File > Save Changes and Exit, and then press enter.<br />
Your changes go into effect when the computer restarts.<br />
Using passwords 53
Changing a BIOS administrator password<br />
1. Turn on or restart the computer, and then press esc while the “Press the ESC key for Startup<br />
Menu” message is displayed at the bottom of the screen.<br />
2. Press f10 to enter Computer Setup.<br />
3. Use a pointing device or the arrow keys to select Security > Change Password, and then press<br />
enter.<br />
4. When prompted, type your current password.<br />
5. When prompted, type your new password again to confirm.<br />
6. To save your changes and exit Computer Setup, click the Save icon in the lower-left corner of<br />
the screen, and then follow the on-screen instructions.<br />
– or –<br />
Use the arrow keys to select File > Save Changes and Exit, and then press enter.<br />
Your changes go into effect when the computer restarts.<br />
Deleting a BIOS administrator password<br />
1. Turn on or restart the computer, and then press esc while the “Press the ESC key for Startup<br />
Menu” message is displayed at the bottom of the screen.<br />
2. Press f10 to enter Computer Setup.<br />
3. Use a pointing device or the arrow keys to select Security > Change Password, and then press<br />
enter.<br />
4. When prompted, type your current password.<br />
5. When prompted for the new password, leave the field empty, and then press enter.<br />
6. Read the warning. To continue, select YES.<br />
7. When prompted to type your new password again, leave the field empty, and then press enter.<br />
8. To save your changes and exit Computer Setup, click the Save icon in the lower-left corner of<br />
the screen, and then follow the on-screen instructions.<br />
– or –<br />
Use the arrow keys to select File > Save Changes and Exit, and then press enter.<br />
Your changes go into effect when the computer restarts.<br />
Entering a BIOS administrator password<br />
At the BIOS administrator password prompt, type your password (using the same kind of keys you<br />
used to set the password), and then press enter. After 3 unsuccessful attempts to enter the BIOS<br />
administrator password, you must restart the computer and try again.<br />
54 Chapter 7 Security
Managing a DriveLock password<br />
To set, change, or delete a DriveLock password in Computer Setup, follow these steps:<br />
1. Turn on the computer, and then press esc while the “Press the ESC key for Startup Menu”<br />
message is displayed at the bottom of the screen.<br />
2. Press f10 to enter Computer Setup.<br />
3. Use a pointing device or the arrow keys to select Security > DriveLock Password, and then<br />
press follow the on-screen instructions.<br />
4. To confirm DriveLock protection on the drive you have selected, type DriveLock in the<br />
confirmation field, and then press enter.<br />
NOTE:<br />
The DriveLock confirmation is case sensitive.<br />
Your changes go into effect when the computer restarts.<br />
Using Computer Setup Automatic DriveLock<br />
In a multiple-user environment, you can set an Automatic DriveLock password. When the Automatic<br />
DriveLock password is enabled, a random user password and a DriveLock master password will be<br />
created for you. When any user passes the password credential, the same random user and<br />
DriveLock master password will be used to unlock the drive.<br />
NOTE: You must have a BIOS administrator password before you can access the Automatic<br />
DriveLock features.<br />
Entering an Automatic DriveLock password<br />
To enable an Automatic DriveLock password in Computer Setup, follow these steps:<br />
1. Turn on or restart the computer, and then press esc while the “Press the ESC key for Startup<br />
Menu” message is displayed at the bottom of the screen.<br />
2. Press f10 to enter Computer Setup.<br />
3. Use a pointing device or the arrow keys to select Security > Automatic DriveLock, and then<br />
press enter.<br />
4. Use a pointing device or the arrow keys to select an internal hard drive, and then press enter.<br />
5. Read the warning. To continue, select YES.<br />
6. To save your changes and exit Computer Setup, click the Save icon in the lower-left corner of<br />
the screen, and then follow the on-screen instructions.<br />
– or –<br />
Use the arrow keys to select File > Save Changes and Exit, and then press enter.<br />
Using Computer Setup Automatic DriveLock 55
Removing Automatic DriveLock protection<br />
To remove DriveLock protection in Computer Setup, follow these steps:<br />
1. Turn on or restart the computer, and then press esc while the “Press the ESC key for Startup<br />
Menu” message is displayed at the bottom of the screen.<br />
2. Press f10 to enter Computer Setup.<br />
3. Use a pointing device or the arrow keys to select Security > Automatic DriveLock, and then<br />
press enter.<br />
4. Use a pointing device or the arrow keys to select an internal hard drive, and then press enter.<br />
5. Use a pointing device or the arrow keys to select Disable protection.<br />
6. To save your changes and exit Computer Setup, click the Save icon in the lower-left corner of<br />
the screen, and then follow the on-screen instructions.<br />
– or –<br />
Use the arrow keys to select File > Save Changes and Exit, and then press enter.<br />
56 Chapter 7 Security
Using the fingerprint reader (select models only)<br />
Integrated fingerprint readers are available on select computer models. In order to use the fingerprint<br />
reader, you must set up a user account with a Windows password on the computer. This account<br />
allows you to log on to your computer with a swipe of a designated finger. You may also use the<br />
fingerprint reader to fill in password fields on Web sites and other programs that require a logon. See<br />
the <strong>HP</strong> ProtectTools software Help for instructions.<br />
After you create your fingerprint identity, you can set up a Single Sign On service that allows you to<br />
use your fingerprint reader to create credentials for any application that requires a user name and<br />
password.<br />
For the location of the fingerprint reader on your computer, see “Getting to Know Your Computer”.<br />
Using the fingerprint reader (select models only) 57
Using Internet security software<br />
When you use the computer to access email, a network, or the Internet, you potentially expose the<br />
computer to computer viruses, spyware, and other malicious attacks that can disable the operating<br />
system, programs, or utilities, or cause them to function abnormally.<br />
Using antivirus software<br />
Antivirus software can detect most viruses, destroy them, and, in most cases, repair any damage they<br />
have caused. To provide ongoing protection against newly discovered viruses, antivirus software<br />
must be kept up to date.<br />
An antivirus program such as Microsoft Security Essentials® may be preinstalled on your computer.<br />
This software runs quietly and efficiently in the background so you don't have to worry about<br />
interruptions or reminders to upgrade your software. As new threats are posed, your antivirus<br />
software will automatically be updated. You will only be alerted if specific actions are required.<br />
For more information about computer viruses, type viruses in the Search box in Help and Support.<br />
Using firewall software<br />
Firewalls are designed to prevent unauthorized access to a system or network. A firewall can be a<br />
software program you install on your computer and/or network, or it can be a solution made up of<br />
both hardware and software.<br />
There are two types of firewalls to consider:<br />
●<br />
●<br />
Host-based firewalls—Software that protects only the computer it is installed on.<br />
Network-based firewalls—Installed between your DSL or cable modem and your home network<br />
to protect all the computers on the network.<br />
When a firewall is installed on a system, all data sent to and from the system is monitored and<br />
compared with a set of user-defined security criteria. Any data that does not meet those criteria is<br />
blocked.<br />
Your computer or networking equipment may already have a firewall installed. If not, firewall software<br />
solutions are available.<br />
NOTE: Under some circumstances a firewall can block access to Internet games, interfere with<br />
printer or file sharing on a network, or block authorized e-mail attachments. To temporarily resolve the<br />
problem, disable the firewall, perform the task that you want to perform, and then reenable the<br />
firewall. To permanently resolve the problem, reconfigure the firewall.<br />
Installing critical security updates<br />
CAUTION: Microsoft® sends out alerts regarding critical updates. To protect the computer from<br />
security breaches and computer viruses, install all critical updates from Microsoft as soon as you<br />
receive an alert.<br />
58 Chapter 7 Security
Updates to the operating system and other software may have become available after the computer<br />
left the factory. To be sure that all available updates are installed on the computer, observe these<br />
guidelines:<br />
●<br />
●<br />
●<br />
Run Windows Update as soon as possible after you set up your computer.<br />
Run Windows Update monthly thereafter.<br />
Obtain updates to Windows and other Microsoft programs, as they are released, from the<br />
Microsoft website and through the updates link in Help and Support.<br />
Using <strong>HP</strong> ProtectTools Security Manager (select models<br />
only)<br />
<strong>HP</strong> ProtectTools Security Manager software is preinstalled on select computer models. This software<br />
can be accessed through Windows Control Panel. It provides security features that help protect<br />
against unauthorized access to the computer, networks, and critical data. For more information, see<br />
the <strong>HP</strong> ProtectTools software Help.<br />
Installing an optional security cable<br />
NOTE: A security cable is designed to act as a deterrent, but it may not prevent the computer from<br />
being mishandled or stolen.<br />
NOTE: The security cable slot on your computer may look slightly different from the illustration in<br />
this section. See the Getting Started guide for the location of the security cable slot on your computer.<br />
1. Loop the security cable around a secured object.<br />
2. Insert the key (1) into the cable lock (2).<br />
3. Insert the cable lock into the security cable slot on the computer (3), and then lock the cable lock<br />
with the key.<br />
Using <strong>HP</strong> ProtectTools Security Manager (select models only) 59
8 Maintenance<br />
Cleaning your computer<br />
Cleaning products<br />
Use the following products to safely clean and disinfect your computer:<br />
●<br />
●<br />
●<br />
●<br />
●<br />
Dimethyl benzyl ammonium chloride 0.3 percent maximum concentration (For example:<br />
germicidal disposable wipes. These wipes come in a variety of brand names.)<br />
Alcohol-free glass cleaning fluid<br />
Water with mild soap solution<br />
Dry microfiber cleaning cloth or a chamois (<strong>static</strong>-free cloth without oil)<br />
Static-free cloth wipes<br />
CAUTION:<br />
Avoid the following cleaning products:<br />
Strong solvents, such as alcohol, acetone, ammonium chloride, methylene chloride, and<br />
hydrocarbons, which can permanently damage the surface of the computer.<br />
Fibrous materials, such as paper towels, which can scratch the computer. Over time, dirt particles<br />
and cleaning agents can get trapped in the scratches.<br />
Cleaning procedures<br />
Follow the procedures in this section to safely clean your computer.<br />
WARNING! To prevent electric shock or damage to components, do not attempt to clean your<br />
computer while it is turned on:<br />
Turn off the computer.<br />
Disconnect external power.<br />
Disconnect all powered external devices.<br />
CAUTION: Do not spray cleaning agents or liquids directly on any computer surface. Liquids<br />
dripped on the surface can permanently damage internal components.<br />
Cleaning the display<br />
Gently wipe the display using a soft, lint-free cloth moistened with an alcohol-free glass cleaner. Be<br />
sure that the display is dry before closing the display.<br />
60 Chapter 8 Maintenance
Cleaning the sides and cover<br />
To clean and disinfect the sides and cover, use a soft microfiber cloth or chamois moistened with one<br />
of the cleaning solutions listed previously or use an acceptable germicidal disposable wipe.<br />
CAUTION: When cleaning the TouchPad and keyboard, do not let liquids drip between the keys.<br />
This can permanently damage internal components.<br />
NOTE:<br />
debris.<br />
When cleaning the cover of the computer, use a circular motion to aid in removing dirt and<br />
●<br />
●<br />
To clean and disinfect the TouchPad and keyboard, use a soft microfiber cloth or chamois<br />
moistened with one of the cleaning solutions listed previously or use an acceptable germicidal<br />
disposable wipe.<br />
To prevent keys from sticking and to remove dust, lint, and particles from the keyboard, use a<br />
can of compressed air with a straw extension.<br />
WARNING! To reduce the risk of electric shock or damage to internal components, do not use<br />
a vacuum cleaner attachment to clean the keyboard. A vacuum cleaner can deposit household<br />
debris on the keyboard surface.<br />
Cleaning your computer 61
Updating programs and drivers<br />
<strong>HP</strong> recommends that you update your programs and drivers on a regular basis with the latest<br />
versions. For U.S. support, go to http://www.hp.com/go/contact<strong>HP</strong>. For worldwide support, go to<br />
http://welcome.hp.com/country/us/en/wwcontact_us.html.<br />
62 Chapter 8 Maintenance
Using SoftPaq Download Manager<br />
<strong>HP</strong> SoftPaq Download Manager (SDM) is a tool that provides quick access to SoftPaq information for<br />
<strong>HP</strong> business computers without requiring the SoftPaq number. Using this tool, you can easily search<br />
for SoftPaqs, and then download and unpack them.<br />
SoftPaq Download Manager works by reading and downloading, from the <strong>HP</strong> FTP site, a published<br />
database file containing computer model and SoftPaq information. SoftPaq Download Manager<br />
allows you to specify one or more computer models to determine which SoftPaqs are available for<br />
download.<br />
SoftPaq Download Manager checks the <strong>HP</strong> FTP site for updates to the database and software. If<br />
updates are found, they are downloaded and applied automatically.<br />
SoftPaq Download Manager is available on the <strong>HP</strong> website. To use SoftPaq Download Manager to<br />
download SoftPaqs, you must first download and install the program. Go to the <strong>HP</strong> website at<br />
http://www.hp.com/go/sdm, and follow the instructions to download and install SoftPaq Download<br />
Manager.<br />
To download SoftPaqs:<br />
1. Open your Web browser. For U.S. support, go to http://www.hp.com/go/contact<strong>HP</strong>. For<br />
worldwide support, go to http://welcome.hp.com/country/us/en/wwcontact_us.html.<br />
2. Select Start > All Programs > <strong>HP</strong> Help and Support > <strong>HP</strong> Software Setup.<br />
3. Click the Check for Software Updates button.<br />
4. When SoftPaq Download Manager opens for the first time, a window is displayed asking if you<br />
want to show only software for the computer you are using or to show the software for all<br />
supported models. Select Show software for all supported models. If you have used <strong>HP</strong><br />
SoftPaq Download Manager previously, go to step 3.<br />
a. Select your operating system and language filters in the Configuration Options window. The<br />
filters limit the number of options that are listed in the Product Catalog pane. For example, if<br />
only Windows 7 Professional is selected in the operating system filter, the only operating<br />
system that is displayed in the Product Catalog is Windows 7 Professional.<br />
b. To add other operating systems, change the filter settings in the Configuration Options<br />
window. See the <strong>HP</strong> SoftPaq Download Manager software Help for more information.<br />
5. In the left pane, click the plus sign (+) to expand the model list, and then select the model or<br />
models of the products you want to update.<br />
6. Click Find Available SoftPaqs to download a list of available SoftPaqs for the selected<br />
computer.<br />
7. Select from the list of available SoftPaqs, and then click Download Only if you have many<br />
SoftPaqs to download, because the SoftPaq selection and Internet connection speed determine<br />
how long the download process will take.<br />
If you want to download only one or two SoftPaqs and have a high-speed Internet connection,<br />
click Download & Unpack.<br />
8. Right-click Install SoftPaq in the SoftPaq Download Manager software to install the selected<br />
SoftPaqs on the computer.<br />
Using SoftPaq Download Manager 63
Using <strong>HP</strong> Software Setup utility<br />
<strong>HP</strong> Software Setup utility is a tool that provides quick access to applications that are not already<br />
installed on the computer. <strong>HP</strong> Software Setup utility allows you to install hardware-enabling drivers<br />
and optional software applications. This tool can also be used to download any application updates<br />
using SoftPaq Download Manager.<br />
To access <strong>HP</strong> Software Setup utility, select Start > All Programs > <strong>HP</strong> Help and Support > <strong>HP</strong><br />
Software Setup.<br />
64 Chapter 8 Maintenance
9 Computer Setup (BIOS) and Advanced<br />
System Diagnostics<br />
Using Computer Setup<br />
Computer Setup, or Basic Input/Output System (BIOS), controls communication between all the input<br />
and output devices on the system (such as disk drives, display, keyboard, mouse, and printer).<br />
Computer Setup includes settings for the types of devices installed, the startup sequence of the<br />
computer, and the amount of system and extended memory.<br />
NOTE: Use extreme care when making changes in Computer Setup. Errors can prevent the<br />
computer from operating properly.<br />
Starting Computer Setup<br />
NOTE: An external keyboard or mouse connected to a USB port can be used with Computer Setup<br />
only if USB legacy support is enabled.<br />
To start Computer Setup, follow these steps:<br />
1. Turn on or restart the computer, and then press esc while the “Press the ESC key for Startup<br />
Menu” message is displayed at the bottom of the screen.<br />
2. Press f10 to enter Computer Setup.<br />
Navigating and selecting in Computer Setup<br />
To navigate and select in Computer Setup, follow these steps:<br />
1. Turn on or restart the computer, and then press esc while the “Press the ESC key for Startup<br />
Menu” message is displayed at the bottom of the screen.<br />
●<br />
●<br />
●<br />
To select a menu or a menu item, use the tab key and the keyboard arrow keys and then<br />
press enter, or use a pointing device to click the item.<br />
To scroll up and down, click the up arrow or the down arrow in the upper-right corner of the<br />
screen, or use the up arrow key or the down arrow key.<br />
To close open dialog boxes and return to the main Computer Setup screen, press esc, and<br />
then follow the on-screen instructions.<br />
NOTE: You can use either a pointing device (TouchPad, pointing stick, or USB mouse) or the<br />
keyboard to navigate and make selections in Computer Setup.<br />
2. Press f10 to enter Computer Setup.<br />
Using Computer Setup 65
To exit Computer Setup menus, choose one of the following methods:<br />
●<br />
To exit Computer Setup menus without saving your changes:<br />
Click the Exit icon in the lower-left corner of the screen, and then follow the on-screen<br />
instructions.<br />
– or –<br />
Use the tab key and the arrow keys to select File > Ignore Changes and Exit, and then press<br />
enter.<br />
●<br />
To save your changes and exit Computer Setup menus:<br />
Click the Save icon in the lower-left corner of the screen, and then follow the on-screen<br />
instructions.<br />
– or –<br />
Use the tab key and the arrow keys to select File > Save Changes and Exit, and then press<br />
enter.<br />
Your changes go into effect when the computer restarts.<br />
Restoring factory settings in Computer Setup<br />
NOTE:<br />
Restoring defaults will not change the hard drive mode.<br />
To return all settings in Computer Setup to the values that were set at the factory, follow these steps:<br />
1. Turn on or restart the computer, and then press esc while the “Press the ESC key for Startup<br />
Menu” message is displayed at the bottom of the screen.<br />
2. Press f10 to enter Computer Setup.<br />
3. Use a pointing device or the arrow keys to select File > Restore Defaults.<br />
4. Follow the on-screen instructions.<br />
5. To save your changes and exit, click the Save icon in the lower-left corner of the screen, and<br />
then follow the on-screen instructions.<br />
– or –<br />
Use the arrow keys to select File > Save Changes and Exit, and then press enter.<br />
Your changes go into effect when the computer restarts.<br />
NOTE: Your password settings and security settings are not changed when you restore the factory<br />
settings.<br />
66 Chapter 9 Computer Setup (BIOS) and Advanced System Diagnostics
Updating the BIOS<br />
The next sections describe different ways of updating the BIOS.<br />
Downloading SoftPaqs to update the BIOS<br />
Most BIOS updates on the <strong>HP</strong> website are packaged in compressed files called SoftPaqs.<br />
To install BIOS updates from the <strong>HP</strong> website, follow the steps below:<br />
1. Download the SoftPaq from the <strong>HP</strong> website.<br />
2. Click Run, and then follow the on-screen instructions to update the BIOS.<br />
NOTE: Some download packages contain a file named Readme.txt, which contains information<br />
regarding installing and troubleshooting the file.<br />
Creating a bootable USB flash drive using a SoftPaq<br />
1. Download the SoftPaq from the <strong>HP</strong> website.<br />
2. Click Run, and then click Create Bootable USB key.<br />
3. Insert the USB flash drive for formatting, according to the on-screen instructions.<br />
4. Turn the computer off and on.<br />
5. The eROMpaq program runs. Click Update, and follow the on-screen instructions.<br />
BIOS management using system diagnostics<br />
1. Download the SoftPaq from the <strong>HP</strong> website.<br />
NOTE:<br />
drive).<br />
Verify that the UEFI system diagnostics is installed on your computer (or USB flash<br />
2. Click Run, and then click Cancel at the Update/USB bootable dialog box.<br />
3. Navigate to the folder located in c:\swsetup that corresponds to your SoftPaq number.<br />
4. Locate the .bin file in the ROMpaq folder (for example, 68CDD.bin) and then copy it to the<br />
Hewlett-Packard\BIOS\New\ folder in either the <strong>HP</strong>_Tools partition of the hard drive, or the USB<br />
flash drive.<br />
5. Locate the .sig file in the ROM.cab file and rename it with the same prefix as the .bin file (for<br />
example, 68CDD.sig). Copy the renamed file to the Hewlett-Packard\BIOS\New\ folder in either<br />
the <strong>HP</strong>_Tools partition of the hard drive, or the USB flash drive.<br />
6. Restart the computer, and then press esc while the “Press the ESC key for Startup Menu”<br />
message is displayed at the bottom of the screen.<br />
7. Press f2 to enter Computer Setup.<br />
8. Click BIOS Management from the menu and then select Update BIOS.<br />
Using Computer Setup 67
Using f10 setup to update the BIOS<br />
1. Download the SoftPaq from the <strong>HP</strong> website.<br />
NOTE:<br />
drive).<br />
Verify that the UEFI system diagnostics is installed on your computer (or USB flash<br />
2. Click Run, and then click Cancel at the Update/USB bootable dialog box.<br />
3. Navigate to the folder located in c:\swsetup that corresponds to your SoftPaq number.<br />
4. Locate the .bin file in the ROMpaq folder (for example, 68CDD.bin) and then copy it to the<br />
Hewlett-Packard\BIOS\New\ folder in either the <strong>HP</strong>_Tools partition of the hard drive, or the USB<br />
flash drive.<br />
5. Locate the .sig file in the ROM.cab file and rename it with the same prefix as the .bin file (for<br />
example, 68CDD.sig). Copy the renamed file to the Hewlett-Packard\BIOS\New\ folder in either<br />
the <strong>HP</strong>_Tools partition of the hard drive, or the USB flash drive.<br />
6. Restart the computer, and then press esc while the “Press the ESC key for Startup Menu”<br />
message is displayed at the bottom of the screen.<br />
7. Press f10 to enter Computer Setup.<br />
8. Click Update System BIOS, and then click Accept to update the BIOS.<br />
Determining the BIOS version<br />
To determine whether available BIOS updates contain later BIOS versions than those currently<br />
installed on the computer, you need to know the version of the system BIOS currently installed.<br />
BIOS version information (also known as ROM date and System BIOS) can be displayed by pressing<br />
fn+esc (if you are already in Windows) or by using Computer Setup.<br />
1. Start Computer Setup.<br />
2. Use a pointing device or the arrow keys to select File > System Information.<br />
3. To exit Computer Setup without saving your changes, click the Exit icon in the lower-left corner<br />
of the screen, and then follow the on-screen instructions.<br />
– or –<br />
Use the tab key and the arrow keys to select File > Ignore Changes and Exit, and then press<br />
enter.<br />
68 Chapter 9 Computer Setup (BIOS) and Advanced System Diagnostics
Downloading a BIOS update<br />
CAUTION: To reduce the risk of damage to the computer or an unsuccessful installation, download<br />
and install a BIOS update only when the computer is connected to reliable external power using the<br />
AC adapter. Do not download or install a BIOS update while the computer is running on battery<br />
power, docked in an optional docking device, or connected to an optional power source. During the<br />
download and installation, follow these instructions:<br />
Do not disconnect power from the computer by unplugging the power cord from the AC outlet.<br />
Do not shut down the computer or initiate Sleep or Hibernation.<br />
Do not insert, remove, connect, or disconnect any device, cable, or cord.<br />
1. Select Start > Help and Support > Maintain.<br />
2. Follow the on-screen instructions to identify your computer and access the BIOS update you<br />
want to download.<br />
3. At the download area, follow these steps:<br />
a. Identify the BIOS update that is later than the BIOS version currently installed on your<br />
computer. Make a note of the date, name, or other identifier. You may need this information<br />
to locate the update later, after it has been downloaded to your hard drive.<br />
b. Follow the on-screen instructions to download your selection to the hard drive.<br />
Make a note of the path to the location on your hard drive where the BIOS update is<br />
downloaded. You will need to access this path when you are ready to install the update.<br />
NOTE: If you connect your computer to a network, consult the network administrator before<br />
installing any software updates, especially system BIOS updates.<br />
BIOS installation procedures vary. Follow any instructions that are displayed on the screen after the<br />
download is complete. If no instructions are displayed, follow these steps:<br />
1. Open Windows Explorer by selecting Start > Computer.<br />
2. Double-click your hard drive designation. The hard drive designation is typically Local Disk (C:).<br />
3. Using the hard drive path you recorded earlier, open the folder on your hard drive that contains<br />
the update.<br />
4. Double-click the file that has an .exe extension (for example, filename.exe).<br />
The BIOS installation begins.<br />
5. Complete the installation by following the on-screen instructions.<br />
NOTE: After a message on the screen reports a successful installation, you can delete the<br />
downloaded file from your hard drive.<br />
BIOS Setup Menu<br />
The tables in this section provide an overview of the BIOS Setup menu options.<br />
Using Computer Setup 69
Main menu<br />
Select<br />
To do this<br />
System information ● View and change the system time and date.<br />
●<br />
●<br />
View identification information about your computer.<br />
View specification information about the processor,<br />
memory size, and system BIOS.<br />
Security menu<br />
Select<br />
Administrator password<br />
Power-on password<br />
TPM Status<br />
TPM Operation<br />
To do this<br />
Control access to Setup Utility.<br />
Control access to your computer.<br />
Disable and enable (select models only).<br />
Select no operation and TPM status (select models only).<br />
Diagnostics menu<br />
Select<br />
Primary Hard Disk Self Test<br />
Memory Test<br />
To do this<br />
Run a quick or comprehensive self-test on the hard drive.<br />
Run a diagnostic test on the system memory.<br />
Using Advanced System Diagnostics<br />
Advanced System Diagnostics allows you to run diagnostic tests to determine if the computer<br />
hardware is functioning properly. The following diagnostic tests are available in Advanced System<br />
Diagnostics:<br />
●<br />
●<br />
●<br />
●<br />
Start-up test—This test analyzes the main computer components that are required to start the<br />
computer.<br />
Run-in test—This test repeats the start-up test and checks for intermittent problems that the<br />
start-up test does not detect.<br />
System Tune-Up—This group of additional tests checks your computer to make sure that the<br />
main components are functioning correctly. System Tune-Up runs longer and more<br />
comprehensive tests on memory modules, hard drive SMART attributes, the hard drive surface,<br />
the battery (and battery calibration), video memory, and the WLAN module status.<br />
Hard disk test—This test analyzes the physical condition of the hard drive, and then checks all<br />
data in every sector of the hard drive. If the test detects a damaged sector, it attempts to move<br />
the data to a good sector.<br />
70 Chapter 9 Computer Setup (BIOS) and Advanced System Diagnostics
●<br />
●<br />
Memory test—This test analyzes the physical condition of the memory modules. If it reports an<br />
error, replace the memory modules immediately.<br />
Battery test—This test analyzes the condition of the battery and calibrates the battery if<br />
necessary. If the battery fails the test, contact support to report the issue and purchase a<br />
replacement battery.<br />
You can view system information and error logs in the Advanced System Diagnostics window.<br />
To start Advanced System Diagnostics:<br />
1. Turn on or restart the computer. While the “Press the ESC key for Startup Menu” message is<br />
displayed in the lower-left corner of the screen, press esc. When the Startup Menu is displayed,<br />
press f2.<br />
2. Click the diagnostic test you want to run, and then follow the on-screen instructions.<br />
NOTE:<br />
If you need to stop a diagnostics test while it is running, press esc.<br />
Using Advanced System Diagnostics 71
10 MultiBoot<br />
About the boot device order<br />
As the computer starts, the system attempts to boot from enabled boot devices. The MultiBoot utility,<br />
which is enabled at the factory, controls the order in which the system selects a boot device. Boot<br />
devices can include optical drives, diskette drives, a network interface card (NIC), hard drives, and<br />
USB devices. Boot devices contain bootable media or files that the computer needs to start and<br />
operate properly.<br />
NOTE: Some boot devices must be enabled in Computer Setup before they can be included in the<br />
boot order.<br />
The factory setting is for the computer to select the boot device by searching enabled boot devices<br />
and drive bay locations in the following order:<br />
NOTE: Some of the boot devices and drive bay locations listed may not be supported on your<br />
computer.<br />
●<br />
●<br />
●<br />
●<br />
●<br />
●<br />
●<br />
●<br />
●<br />
●<br />
<strong>Notebook</strong> upgrade bay<br />
Optical drive<br />
<strong>Notebook</strong> hard drive<br />
USB diskette drive<br />
USB CD-ROM<br />
USB hard drive<br />
<strong>Notebook</strong> Ethernet<br />
Secure Digital (SD) Memory Card<br />
Docking station upgrade bay<br />
External SATA drive<br />
You can change the order in which the computer searches for a boot device by changing the boot<br />
order in Computer Setup. You can also press esc while the “Press the ESC key for Startup Menu”<br />
message is displayed at the bottom of the screen, and then press f9. Pressing f9 displays a menu<br />
that shows the current boot devices and allows you to select a boot device. Or, you can use MultiBoot<br />
Express to set the computer to prompt you for a boot location each time the computer turns on or<br />
restarts.<br />
72 Chapter 10 MultiBoot
Enabling boot devices in Computer Setup<br />
The computer will boot to a USB device or a NIC device only if the device has first been enabled in<br />
Computer Setup.<br />
To start Computer Setup and enable a USB device or a NIC device as a boot device, follow these<br />
steps:<br />
1. Turn on or restart the computer, and then press esc while the “Press the ESC key for Startup<br />
Menu” message is displayed at the bottom of the screen.<br />
2. Press f10 to enter Computer Setup.<br />
3. To enable bootable media in USB drives or in drives inserted into an optional docking device<br />
(select models only), use a pointing device or the arrow keys to select System Configuration ><br />
Device Configurations. Confirm USB legacy support is selected.<br />
NOTE: The USB Port option must be enabled in order to use USB legacy support. It is enabled<br />
at the factory. If the port becomes disabled, reenable it by selecting System Configuration ><br />
Port Options, and then selecting USB Port.<br />
– or –<br />
To enable a NIC device, select System Configuration > Boot Options, and then select PXE<br />
Internal NIC boot.<br />
4. To save your changes and exit Computer Setup, click the Save icon in the lower-left corner of<br />
the screen, and then follow the on-screen instructions.<br />
– or –<br />
Use the arrow keys to select File > Save Changes and Exit, and then press enter.<br />
Your changes go into effect when the computer restarts.<br />
NOTE: To connect a NIC to a Preboot eXecution Environment (PXE) or Remote Program Load<br />
(RPL) server without using MultiBoot, press esc while the “Press the ESC key for Startup Menu”<br />
message is displayed at the bottom of the screen, and then quickly press f12.<br />
Considering boot order changes<br />
Before changing the boot order, note the following considerations:<br />
●<br />
●<br />
When the computer restarts after the boot order has been changed, the computer attempts to<br />
start using the new boot order.<br />
If there is more than one type of boot device, the computer attempts to boot using the first device<br />
of each type of boot device (except for optical devices). For example, if the computer is<br />
connected to an optional docking device (select models only) that contains a hard drive, this<br />
hard drive will be shown in the boot order as a USB hard drive. If the system attempts to boot<br />
from this USB hard drive and fails, it will not attempt to boot to the hard drive in the hard drive<br />
bay. Instead, it will try to boot to the next type of device in the boot order. However, if there are<br />
two optical devices, and the first optical device does not boot (either because it does not contain<br />
media or the media is not a boot disc), the system will try to boot to the second optical device.<br />
Enabling boot devices in Computer Setup 73
●<br />
●<br />
●<br />
Changing the boot order also changes the logical drive designations. For example, if you start up<br />
from a CD-ROM drive with a disc formatted as drive C, that CD-ROM drive becomes drive C and<br />
the hard drive in the hard drive bay becomes drive D.<br />
The computer will boot from a NIC device only if the device has been enabled in the Built-In<br />
Device Options menu of Computer Setup and if booting from the device has been enabled in the<br />
Boot Options menu of Computer Setup. Booting from a NIC does not affect logical drive<br />
designations because no drive letter is associated with the NIC.<br />
Drives in an optional docking device (select models only) are treated like external USB devices<br />
in the boot order.<br />
Choosing MultiBoot preferences<br />
You can use MultiBoot in the following ways:<br />
●<br />
●<br />
●<br />
To set a new boot order that the computer uses each time it is turned on, by changing the boot<br />
order in Computer Setup.<br />
To dynamically choose the boot device, by pressing esc while the “Press the ESC key for<br />
Startup Menu” message is displayed at the bottom of the screen, and then pressing f9 to enter<br />
the Boot Device Options menu.<br />
To use MultiBoot Express to set variable boot orders. This feature prompts you for a boot device<br />
each time the computer is turned on or restarted.<br />
Setting a new boot order in Computer Setup<br />
To start Computer Setup and set a boot device order that the computer uses each time it is turned on<br />
or restarted, follow these steps:<br />
1. Turn on or restart the computer, and then press esc while the “Press the ESC key for Startup<br />
Menu” message is displayed at the bottom of the screen.<br />
2. Press f10 to enter Computer Setup.<br />
3. Use a pointing device or the arrow keys to select the Legacy Boot Order list, and then press<br />
enter.<br />
4. To move the device up in the boot order, use a pointing device to click the up arrow, or press the<br />
+ key.<br />
– or –<br />
To move the device down in the boot order, use a pointing device to click the down arrow, or<br />
press the - key.<br />
5. To save your changes and exit Computer Setup, click the Save icon in the lower-left corner of<br />
the screen, and then follow the on-screen instructions.<br />
– or –<br />
Use the arrow keys to select File > Save Changes and Exit, and then press enter.<br />
Your changes go into effect when the computer restarts.<br />
74 Chapter 10 MultiBoot
Dynamically choosing a boot device using the f9 prompt<br />
To dynamically choose a boot device for the current startup sequence, follow these steps:<br />
1. Open the Select Boot Device menu by turning on or restarting the computer, and then pressing<br />
esc while the “Press the ESC key for Startup Menu” message is displayed at the bottom of the<br />
screen.<br />
2. Press f9.<br />
3. Use a pointing device or the arrow keys to select a boot device, and then press enter.<br />
Your changes go into effect immediately.<br />
Setting a MultiBoot Express prompt<br />
To start Computer Setup and set the computer to display the MultiBoot startup location menu each<br />
time the computer is started or restarted, follow these steps:<br />
1. Turn on or restart the computer, and then press esc while the “Press the ESC key for Startup<br />
Menu” message is displayed at the bottom of the screen.<br />
2. Press f10 to enter Computer Setup.<br />
3. Use a pointing device or the arrow keys to select System Configuration > Boot Options, and<br />
then press enter.<br />
4. In the Multiboot Express Popup Delay (Sec) field, enter the length of time in seconds that you<br />
want the computer to display the startup location menu before it defaults to the current MultiBoot<br />
setting. (When 0 is selected, the Express Boot startup location menu is not displayed.)<br />
5. To save your changes and exit Computer Setup, click the Save icon in the lower-left corner of<br />
the screen, and then follow the on-screen instructions.<br />
– or –<br />
Use the arrow keys to select File > Save Changes and Exit, and then press enter.<br />
Your changes go into effect when the computer restarts.<br />
Entering MultiBoot Express preferences<br />
When the Express Boot menu is displayed during startup, you have the following choices:<br />
●<br />
●<br />
●<br />
To specify a boot device from the Express Boot menu, select your preference within the allotted<br />
time, and then press enter.<br />
To prevent the computer from defaulting to the current MultiBoot setting, press any key before<br />
the allotted time expires. The computer will not start until you select a boot device and press<br />
enter.<br />
To allow the computer to start according to the current MultiBoot settings, wait for the allotted<br />
time to expire.<br />
Choosing MultiBoot preferences 75
A<br />
Traveling with the computer<br />
If you have to travel with or ship your computer, here are some tips to keep in mind to keep your<br />
equipment safe.<br />
●<br />
Prepare the computer for traveling or shipping:<br />
◦ Back up your information to an external drive.<br />
◦ Remove all discs and all external media cards, such as digital cards from the computer.<br />
CAUTION: To reduce the risk of damage to the computer, damage to a drive, or loss of<br />
information, remove the media from a drive before shipping, storing, or traveling with a<br />
drive.<br />
◦ Turn off and then disconnect all external devices.<br />
◦ Remove any media from the drive before removing the drive from a drive bay.<br />
CAUTION: Perform this action before shipping, storing, or traveling with a drive. This will<br />
help reduce the risk of damage to the computer, damage to a drive, or loss of information.<br />
◦ Shut down the computer.<br />
●<br />
●<br />
Take along a backup of your information. Keep the backup separate from the computer.<br />
When traveling by air, carry the computer as hand luggage; do not check it in with the rest of<br />
your bags.<br />
CAUTION: Avoid exposing a drive to magnetic fields. Security devices with magnetic fields<br />
include airport walk-through devices and security wands. Airport conveyer belts and similar<br />
security devices that check carry-on baggage use X-rays instead of magnetism and do not<br />
damage drives.<br />
●<br />
●<br />
If you plan to use the computer during a flight, listen for the in-flight announcement that tells you<br />
when you are allowed to use your computer. In-flight computer use is at the discretion of the<br />
airline.<br />
If the computer will be unused and disconnected from external power for more than 2 weeks,<br />
remove the battery and store it separately if the computer contains a user-replaceable battery.<br />
76 Appendix A Traveling with the computer
●<br />
●<br />
If you are shipping the computer or a drive, use suitable protective packaging and label the<br />
package “FRAGILE.”<br />
If you are traveling internationally, follow these suggestions:<br />
◦ Check the computer-related customs regulations for each country or region on your<br />
itinerary.<br />
◦ Check the power cord and adapter requirements for each location in which you plan to use<br />
the computer. Voltage, frequency, and plug configurations vary.<br />
WARNING! To reduce the risk of electric shock, fire, or damage to the equipment, do not<br />
attempt to power the computer with a voltage converter kit sold for appliances.<br />
77
B<br />
Troubleshooting resources<br />
●<br />
Access website links and additional information about the computer through Help and Support.<br />
Select Start > Help and Support.<br />
NOTE: Some checkup and repair tools require an Internet connection. <strong>HP</strong> also provides<br />
additional tools that do not require an Internet connection.<br />
●<br />
Contact support. For U.S. support, go to http://www.hp.com/go/contact<strong>HP</strong>. For worldwide<br />
support, go to http://welcome.hp.com/country/us/en/wwcontact_us.html.<br />
Choose from the following types of support:<br />
◦ Chat online with an <strong>HP</strong> technician.<br />
NOTE:<br />
When chat is not available in a particular language, it is available in English.<br />
◦ E-mail support.<br />
◦ Find support telephone numbers.<br />
◦ Locate an <strong>HP</strong> service center.<br />
78 Appendix B Troubleshooting resources
C<br />
Electro<strong>static</strong> discharge<br />
Electro<strong>static</strong> discharge is the release of <strong>static</strong> electricity when two objects come into contact—for<br />
example, the shock you receive when you walk across the carpet and touch a metal door knob.<br />
A discharge of <strong>static</strong> electricity from fingers or other electro<strong>static</strong> conductors may damage electronic<br />
components. To prevent damage to the computer, damage to a drive, or loss of information, observe<br />
these precautions:<br />
●<br />
●<br />
●<br />
●<br />
●<br />
●<br />
If removal or installation instructions direct you to unplug the computer, unplug it after being<br />
properly grounded and before removing a cover.<br />
Keep components in their electro<strong>static</strong>-safe containers until you are ready to install them.<br />
Avoid touching pins, leads, and circuitry. Handle electronic components as little as possible.<br />
Use nonmagnetic tools.<br />
Before handling components, discharge <strong>static</strong> electricity by touching an unpainted metal surface<br />
of the component.<br />
If you remove a component, place it in an electro<strong>static</strong>-safe container.<br />
If you need more information about <strong>static</strong> electricity or assistance with component removal or<br />
installation, contact support.<br />
79
Index<br />
Symbols/Numerics<br />
1394 cable, connecting 37<br />
1394 devices<br />
connecting 37<br />
defined 36<br />
removing 37<br />
A<br />
AC adapter, testing 28<br />
administrator password 52<br />
advanced system diagnostics 70<br />
airport security devices 42<br />
antivirus software 58<br />
audio functions, checking 15<br />
Automatic DriveLock password<br />
entering 55<br />
removing 56<br />
B<br />
battery<br />
conserving power 26<br />
discharging 25<br />
displaying remaining charge<br />
25<br />
disposing 27<br />
low battery levels 25<br />
replacing 27<br />
storing 26<br />
Battery Check 25<br />
battery information, finding 24<br />
battery power 24<br />
battery temperature 26<br />
BIOS<br />
determining version 68<br />
downloading an update 69<br />
updating 67<br />
Bluetooth device 2, 9<br />
boot devices, enabling 73<br />
buttons<br />
media 14<br />
power 20<br />
volume 15<br />
C<br />
cables<br />
1394 37<br />
eSATA 38<br />
USB 36<br />
caring for your computer 60<br />
changing boot order 74<br />
checking audio functions 15<br />
cleaning your computer 60<br />
Computer Setup<br />
BIOS administrator password<br />
53<br />
DriveLock password 55<br />
enabling bootable devices 73<br />
navigating and selecting 65<br />
restoring factory settings 66<br />
setting boot order 74<br />
setting MultiBoot Express<br />
prompt 75<br />
computer, traveling 26, 76<br />
configuring<br />
audio for HDMI 18<br />
ExpressCards 32<br />
connecting to<br />
existing wireless network 5<br />
wired network 9<br />
Connection Manager 4<br />
connector, docking 40<br />
conservation, power 26<br />
creating a wireless connection 2<br />
critical battery level 21, 26<br />
critical updates, software 58<br />
D<br />
digital card<br />
inserting 31<br />
removing 32<br />
supported formats 31<br />
Disk Cleanup software 43<br />
Disk Defragmenter software 43<br />
docking connector 40<br />
drive media 21<br />
DriveLock password<br />
description 55<br />
drives<br />
boot order 72<br />
external 39<br />
handling 42<br />
hard 39<br />
optical 40<br />
using 43<br />
dual graphics 29<br />
E<br />
electro<strong>static</strong> discharge 79<br />
eSATA cable, connecting 38<br />
eSATA devices<br />
connecting 38<br />
defined 37<br />
removing 38<br />
existing wireless network,<br />
connecting to 5<br />
expansion port 40<br />
ExpressCard<br />
configuring 32<br />
defined 32<br />
inserting 33<br />
removing 34<br />
removing insert 33<br />
external AC power, using 27<br />
external devices 39<br />
external drive 39<br />
80 Index
external monitor port 16<br />
F<br />
Face Recognition 15<br />
face recognition 50<br />
finding more information 1<br />
fingerprint reader 57<br />
firewall software 6, 58<br />
G<br />
GPS 9<br />
graphics modes, switching 29<br />
H<br />
hard drive<br />
external 39<br />
<strong>HP</strong> 3D DriveGuard 44<br />
hard drive light 44<br />
HDMI port, connecting 18<br />
HDMI, configuring audio 18<br />
Hibernation<br />
exiting 21<br />
initiated during critical battery<br />
level 26<br />
initiating 21<br />
high-definition devices,<br />
connecting 18, 19<br />
hotkeys, media 14<br />
<strong>HP</strong> 3D DriveGuard 44<br />
<strong>HP</strong> Connection Manager 4<br />
<strong>HP</strong> Mobile Broadband Module 7,<br />
8<br />
<strong>HP</strong> Power Assistant 24<br />
<strong>HP</strong> ProtectTools Security<br />
Manager 59<br />
<strong>HP</strong> USB Ethernet Adapter,<br />
connecting 13<br />
hubs 35<br />
I<br />
icons<br />
network 2<br />
wireless 2<br />
Intel Wireless Display 19<br />
Internet connection setup 6<br />
J<br />
Java Card<br />
defined 34<br />
inserting 35<br />
removing 35<br />
K<br />
keys<br />
media 14<br />
volume 15<br />
L<br />
legacy support, USB 65<br />
lights, hard drive 44<br />
local area network (LAN)<br />
cable required 13<br />
connecting cable 13<br />
logical drive designations 74<br />
low battery level 25<br />
M<br />
maintenance<br />
Disk Cleanup 43<br />
Disk Defragmenter 43<br />
media activity controls 14<br />
media hotkeys 14<br />
modems<br />
connecting a modem cable 10<br />
connecting a modem cable<br />
adapter 11<br />
selecting a location setting 11<br />
MultiBoot Express 72, 75<br />
N<br />
network cable, connecting 13<br />
network icon 2<br />
Network Service Boot 73<br />
NIC boot device 72, 73<br />
O<br />
operating system controls 4<br />
optical disc<br />
inserting 45<br />
removing 46<br />
optical drive 40<br />
optional external devices, using<br />
39<br />
P<br />
passwords<br />
administrator 52<br />
BIOS administrator 53<br />
DriveLock 55<br />
user 52<br />
ports<br />
expansion 40<br />
external monitor 16<br />
HDMI 18<br />
Intel Wireless Display 19<br />
VGA 16<br />
power<br />
battery 24<br />
conserving 26<br />
options 21<br />
power button 20<br />
power meter 22<br />
power plans<br />
customizing 22<br />
selecting 22<br />
viewing current 22<br />
power switch 20<br />
power-saving states 21<br />
protecting your wireless network<br />
6<br />
PXE server 73<br />
R<br />
RAID 49<br />
readable media 21<br />
roaming to another network 7<br />
S<br />
security, wireless 6<br />
setting password protection on<br />
wakeup 23<br />
setting power options 21<br />
setup of WLAN 6<br />
setup utility<br />
navigating and selecting 65<br />
restoring factory settings 66<br />
sharing optical drives 49<br />
shutdown 20<br />
SIM<br />
inserting 8<br />
removing 8<br />
Sleep<br />
exiting 21<br />
initiating 21<br />
slot-load optical drive 46<br />
smart card<br />
defined 34<br />
inserting 35<br />
removing 35<br />
software<br />
antivirus 58<br />
critical updates 58<br />
Disk Cleanup 43<br />
Index 81
Disk Defragmenter 43<br />
firewall 58<br />
<strong>HP</strong> Connection Manager 4<br />
storing a battery 26<br />
switch, power 20<br />
switchable graphics 29<br />
T<br />
temperature 26<br />
testing an AC adapter 28<br />
traveling with the computer 26,<br />
76<br />
tray-load optical drive 45<br />
troubleshooting resources 78<br />
turning off the computer 20<br />
turning wireless devices on or off<br />
4<br />
wireless devices, turning on or<br />
off 4<br />
wireless encryption 6<br />
wireless network (WLAN)<br />
connecting to existing 5<br />
equipment needed 6<br />
security 6<br />
writable media 21<br />
WWAN device 7<br />
U<br />
unresponsive system 20<br />
USB cable, connecting 36<br />
USB devices<br />
connecting 36<br />
description 35<br />
removing 36<br />
USB hubs 35<br />
USB legacy support 65<br />
user password 52<br />
using<br />
external AC power 27<br />
modem 9<br />
power meter 22<br />
power plans 22<br />
power-saving states 21<br />
V<br />
VGA port, connecting 16<br />
video 16<br />
volume<br />
adjusting 15<br />
buttons 15<br />
keys 15<br />
W<br />
webcam 15<br />
wireless<br />
icons 2<br />
protecting 6<br />
set up 6<br />
wireless connection, creating 2<br />
82 Index