1735 Operators Manual - Novatech Controls
1735 Operators Manual - Novatech Controls
1735 Operators Manual - Novatech Controls

You also want an ePaper? Increase the reach of your titles
YUMPU automatically turns print PDFs into web optimized ePapers that Google loves.
5. SETUP MODE<br />
This chapter describes the functions available when the SETUP mode is selected on the transmitter.<br />
The SETUP mode is accessed by pressing the SETUP key. The transmitter will return to the RUN mode<br />
when the SETUP key is pressed again or 1 minute after the last key is pressed.<br />
5.1 SETUP Mode Function Summary<br />
When the transmitter is in the SETUP mode the SETUP light will be on. The following table shows the<br />
SETUP menu functions:<br />
Menu # Function name (top line) Range Default value<br />
01 Probe 1 offset -6.0 to +6.0mV 0.0mV<br />
02 Probe 2 offset -6.0 to +6.0mV 0.0mV<br />
03 Lower line items - See SETUP function #3<br />
for details (chapter 5.2.2)<br />
04 Oxygen damping No damping, to<br />
5 seconds<br />
5 minutes of damping<br />
05 Spike Suppression Disabled / to 5 minutes Disabled<br />
06 Spike Trip Level 5mV – 100mV 10mV<br />
NOTE: The alarm levels and delay times can be shown in this menu but can only be changed in the<br />
Commissioning menu. See the <strong>1735</strong> Technical manual for details.<br />
NOTE: The alarm units and the levels will be in the units that have been selected in function #6 in the<br />
commissioning menu.<br />
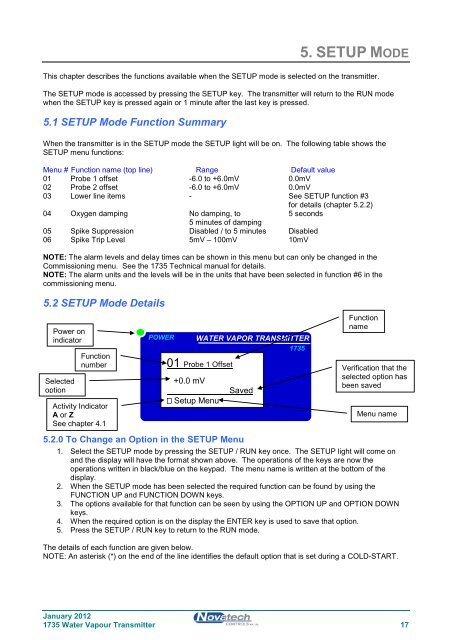
5.2 SETUP Mode Details<br />
Power on<br />
indicator<br />
Selected<br />
option<br />
Function<br />
number<br />
Activity Indicator<br />
A or Z<br />
See chapter 4.1<br />
POWER<br />
01 Probe 1 Offset<br />
+0.0 mV<br />
Setup Menu<br />
Saved<br />
5.2.0 To Change an Option in the SETUP Menu<br />
WATER VAPOR TRANSMITTER<br />
<strong>1735</strong><br />
Function<br />
name<br />
Verification that the<br />
selected option has<br />
been saved<br />
Menu name<br />
1. Select the SETUP mode by pressing the SETUP / RUN key once. The SETUP light will come on<br />
and the display will have the format shown above. The operations of the keys are now the<br />
operations written in black/blue on the keypad. The menu name is written at the bottom of the<br />
display.<br />
2. When the SETUP mode has been selected the required function can be found by using the<br />
FUNCTION UP and FUNCTION DOWN keys.<br />
3. The options available for that function can be seen by using the OPTION UP and OPTION DOWN<br />
keys.<br />
4. When the required option is on the display the ENTER key is used to save that option.<br />
5. Press the SETUP / RUN key to return to the RUN mode.<br />
The details of each function are given below.<br />
NOTE: An asterisk (*) on the end of the line identifies the default option that is set during a COLD-START.<br />
January 2012<br />
<strong>1735</strong> Water Vapour Transmitter 17