- Page 2 and 3: Network Administration withFreeBSD
- Page 4 and 5: CreditsAuthorBabak FarrokhiProject
- Page 6: About the ReviewerRoman Bogorodskiy
- Page 9 and 10: Table of ContentsCVS Branch Tag 37C
- Page 11 and 12: Table of ContentsNetwork Testing To
- Page 13 and 14: Table of ContentsWeb 227Apache 228V
- Page 15 and 16: PrefaceWhat This Book CoversChapter
- Page 17 and 18: PrefaceA block of code will be set
- Page 20 and 21: System Configuration—DisksDisk I/
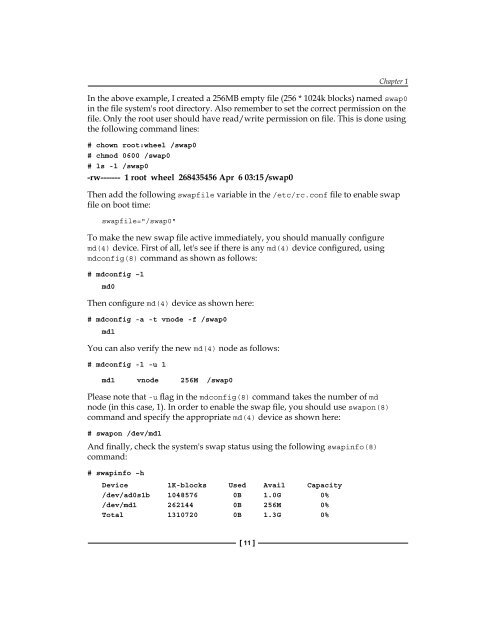
- Page 22 and 23: Chapter 1Depending on your system I
- Page 26 and 27: Chapter 1The following example show
- Page 28 and 29: Chapter 1To unmount the mounted sna
- Page 30 and 31: Chapter 1Soft limit is the conditio
- Page 32 and 33: Chapter 1A typical full backup usin
- Page 34 and 35: Chapter 1A typical restore procedur
- Page 36 and 37: Chapter 1In all the above examples,
- Page 38 and 39: Chapter 1The newly created and form
- Page 40 and 41: Chapter 1Using the activate and dea
- Page 42 and 43: System Configuration—Keeping it U
- Page 44 and 45: Chapter 2After choosing to track th
- Page 46 and 47: Chapter 2Edit src/UPDATING...Finish
- Page 48 and 49: Running CVSup brings your ports col
- Page 50 and 51: Chapter 2The FreeBSD security offic
- Page 52 and 53: Chapter 2If there is no /usr/src/sy
- Page 57 and 58: System Configuration—Keeping it U
- Page 60 and 61: System Configuration—Software Pac
- Page 62 and 63: Chapter 3# makeMaking all in script
- Page 64 and 65: Chapter 3The pkg_delete(1) needs th
- Page 66 and 67: Chapter 3Targetrmconfigrmconfig-rec
- Page 68 and 69: Chapter 3you decide to change the o
- Page 70 and 71: Chapter 3In the above example, the
- Page 72 and 73: Chapter 3# portversion -voL =thunde
- Page 74:
Chapter 3Another thing to remember
- Page 77 and 78:
System Configuration—System Manag
- Page 79 and 80:
System Configuration—System Manag
- Page 81 and 82:
System Configuration—System Manag
- Page 83 and 84:
System Configuration—System Manag
- Page 85 and 86:
System Configuration—System Manag
- Page 88 and 89:
System Configuration—JailsFreeBSD
- Page 90 and 91:
Chapter 5Setting Up a JailCreating
- Page 92 and 93:
Chapter 5The local address field ha
- Page 94 and 95:
• Set root password using the pas
- Page 96 and 97:
Chapter 5As you have noticed from t
- Page 98:
Chapter 5Jail LimitationsThe FreeBS
- Page 101 and 102:
System Configuration—Tuning Perfo
- Page 103 and 104:
System Configuration—Tuning Perfo
- Page 105 and 106:
System Configuration—Tuning Perfo
- Page 107 and 108:
System Configuration—Tuning Perfo
- Page 109 and 110:
System Configuration—Tuning Perfo
- Page 111 and 112:
System Configuration—Tuning Perfo
- Page 114 and 115:
Network Configuration—BasicsFreeB
- Page 116 and 117:
Chapter 7Flag nameLOOPBACKPOINTTOPO
- Page 118 and 119:
Chapter 7When an interface is marke
- Page 120 and 121:
Chapter 7You can also shorten the s
- Page 122 and 123:
Chapter 7Once your new kernel with
- Page 124 and 125:
Chapter 7To find out the capabiliti
- Page 126 and 127:
Chapter 7From now on, the parent in
- Page 128 and 129:
Chapter 7You have to use the tso4 a
- Page 130 and 131:
Chapter 7There may be some rare cir
- Page 132 and 133:
Default RoutingIf an outgoing packe
- Page 134 and 135:
The following is a sample resolv.co
- Page 136 and 137:
Chapter 72 8.14.32.209 (8.14.32.209
- Page 138 and 139:
Chapter 7bge1 1500 00:16:35:80:ac:
- Page 140 and 141:
Chapter 7There are several tools av
- Page 142 and 143:
For example, the following command
- Page 144:
Chapter 7SummaryFreeBSD has most of
- Page 147 and 148:
Network Configuration—TunnelingIn
- Page 149 and 150:
Network Configuration—TunnelingNo
- Page 151 and 152:
Network Configuration—TunnelingTu
- Page 153 and 154:
Network Configuration—TunnelingTh
- Page 155 and 156:
Network Configuration—TunnelingOn
- Page 157 and 158:
Network Configuration—TunnelingTo
- Page 159 and 160:
Network Configuration—PPPPPP over
- Page 161 and 162:
Network Configuration—PPPOption-d
- Page 163 and 164:
Network Configuration—PPPThe next
- Page 165 and 166:
Network Configuration—PPPAs we ha
- Page 167 and 168:
Network Configuration—PPPThere ma
- Page 170 and 171:
Network Configuration—Routing and
- Page 172 and 173:
Chapter 10192.168.129.64 ff:ff:ff:f
- Page 174 and 175:
Chapter 10You can add a route to th
- Page 176 and 177:
Chapter 10These daemons update the
- Page 178 and 179:
Chapter 10}interface fxp0{auth-key
- Page 180 and 181:
Chapter 10A sample bgpd.conf file l
- Page 182 and 183:
Chapter 10The term Forwarding Infor
- Page 184 and 185:
Chapter 1067:65:31:00:00:00 1 flags
- Page 186:
Chapter 10The keyword pub tells ARP
- Page 189 and 190:
Network Configuration—IPv6FreeBSD
- Page 191 and 192:
Network Configuration—IPv6inet6 f
- Page 193 and 194:
Network Configuration—IPv6To enab
- Page 195 and 196:
Network Configuration—IPv6A sampl
- Page 197 and 198:
Network Configuration—FirewallsPa
- Page 199 and 200:
Network Configuration—FirewallsTh
- Page 201 and 202:
Network Configuration—FirewallsYo
- Page 203 and 204:
Network Configuration—FirewallsDy
- Page 205 and 206:
Network Configuration—FirewallsKe
- Page 207 and 208:
Network Configuration—FirewallsPF
- Page 209 and 210:
Network Configuration—FirewallsTh
- Page 211 and 212:
Network Configuration—FirewallsYo
- Page 213 and 214:
Network Configuration—FirewallsAs
- Page 216 and 217:
Network Services—InternetServersF
- Page 218 and 219:
Chapter 13In case you want to add a
- Page 220 and 221:
Chapter 13Once a match is found, tc
- Page 222 and 223:
To create a SSH public/private key
- Page 224 and 225:
Chapter 13There may also be cases w
- Page 226 and 227:
Chapter 13Using this method, the SM
- Page 228 and 229:
Chapter 13Once the host is synchron
- Page 230 and 231:
Chapter 13There is another option,
- Page 232 and 233:
Chapter 13MonitoringWhile setting u
- Page 234 and 235:
Chapter 13FTPSince SFTP (from SSH t
- Page 236 and 237:
You should also fix the permissions
- Page 238 and 239:
Chapter 13Note the NONE keyword, wh
- Page 240 and 241:
Chapter 13Postfix configuration fil
- Page 242 and 243:
# rm data# ln -s homepage dataChapt
- Page 244 and 245:
Chapter 13Luckily, Squid is availab
- Page 246:
Chapter 13SummaryFreeBSD can be use
- Page 249 and 250:
Network Services—Local Network Se
- Page 251 and 252:
Network Services—Local Network Se
- Page 253 and 254:
Network Services—Local Network Se
- Page 255 and 256:
Network Services—Local Network Se
- Page 257 and 258:
Network Services—Local Network Se
- Page 259 and 260:
Network Services—Local Network Se
- Page 261 and 262:
Network Services—Local Network Se
- Page 263 and 264:
Network Services—Local Network Se
- Page 265 and 266:
Network Services—Local Network Se
- Page 267 and 268:
Network Services—Local Network Se
- Page 269 and 270:
Network Services—Local Network Se
- Page 271 and 272:
Network Services—Local Network Se
- Page 273 and 274:
Domain Name System. See DNSDynamic
- Page 275 and 276:
encryption, applying on packets 139
- Page 277 and 278:
RRAID-GEOM framework, systemconfigu