GP1670F_1870F Operator's Manual - Furuno USA
GP1670F_1870F Operator's Manual - Furuno USA
GP1670F_1870F Operator's Manual - Furuno USA

Create successful ePaper yourself
Turn your PDF publications into a flip-book with our unique Google optimized e-Paper software.
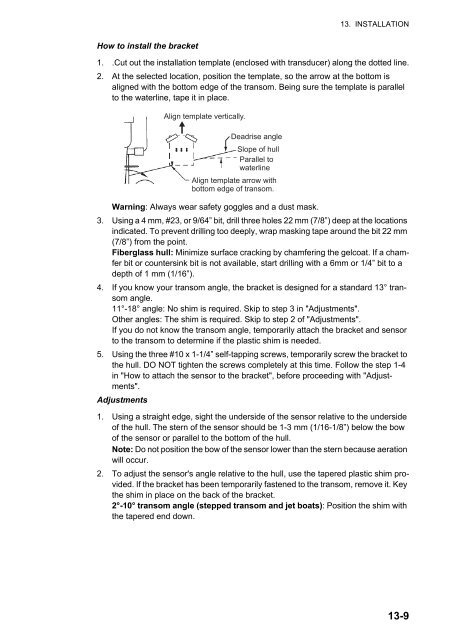
13. INSTALLATIONHow to install the bracket1. .Cut out the installation template (enclosed with transducer) along the dotted line.2. At the selected location, position the template, so the arrow at the bottom isaligned with the bottom edge of the transom. Being sure the template is parallelto the waterline, tape it in place.Align template vertically.Deadrise angleSlope of hullParallel towaterlineAlign template arrow withbottom edge of transom.Warning: Always wear safety goggles and a dust mask.3. Using a 4 mm, #23, or 9/64” bit, drill three holes 22 mm (7/8”) deep at the locationsindicated. To prevent drilling too deeply, wrap masking tape around the bit 22 mm(7/8”) from the point.Fiberglass hull: Minimize surface cracking by chamfering the gelcoat. If a chamferbit or countersink bit is not available, start drilling with a 6mm or 1/4” bit to adepth of 1 mm (1/16”).4. If you know your transom angle, the bracket is designed for a standard 13° transomangle.11°-18° angle: No shim is required. Skip to step 3 in "Adjustments".Other angles: The shim is required. Skip to step 2 of "Adjustments".If you do not know the transom angle, temporarily attach the bracket and sensorto the transom to determine if the plastic shim is needed.5. Using the three #10 x 1-1/4” self-tapping screws, temporarily screw the bracket tothe hull. DO NOT tighten the screws completely at this time. Follow the step 1-4in "How to attach the sensor to the bracket", before proceeding with "Adjustments".Adjustments1. Using a straight edge, sight the underside of the sensor relative to the undersideof the hull. The stern of the sensor should be 1-3 mm (1/16-1/8”) below the bowof the sensor or parallel to the bottom of the hull.Note: Do not position the bow of the sensor lower than the stern because aerationwill occur.2. To adjust the sensor's angle relative to the hull, use the tapered plastic shim provided.If the bracket has been temporarily fastened to the transom, remove it. Keythe shim in place on the back of the bracket.2°-10° transom angle (stepped transom and jet boats): Position the shim withthe tapered end down.13-9