
You also want an ePaper? Increase the reach of your titles
YUMPU automatically turns print PDFs into web optimized ePapers that Google loves.
Make Office Better<br />
Expert tips for every program<br />
OFFICE<br />
Check whether add-ins are<br />
destabilising your program<br />
You’re probably familiar with<br />
browser add-ons that extend the<br />
functionality of Chrome and<br />
Firefox. Office programs (Word, Excel and<br />
PowerPoint) have similar tools called<br />
‘add-ins’ that let you add extra features.<br />
To use add-ins, click the Insert tab, then<br />
click Store in the ‘Add-in’ sections at the<br />
top. Like browser add-ons, Office add-ins<br />
can sometimes make your programs<br />
unstable. So if, for example, a program is<br />
loading slowly or crashing frequently,<br />
there’s an easy way to check whether an<br />
add-in you recently installed is to blame.<br />
To do this, hold down the Ctrl key, then<br />
launch the faulty program. You’ll see a<br />
pop-up prompting you to launch the<br />
program in Safe Mode – click Yes. Th e<br />
program will now open minus any<br />
add-ins. If it opens without problems and<br />
works fi ne, then you know the add-ins<br />
are responsible for any instabilities. To<br />
remove the faulty add-in, simply reopen<br />
the program, click the Insert tab, then<br />
click ‘My Apps’ (in the ‘Add-ins’ section).<br />
Now right-click the add-in, click Remove,<br />
then Remove again.<br />
WORD<br />
Create your own ‘cover pages’<br />
If you tend to lay out the fi rst<br />
page of your Word document<br />
in a particular way (your name,<br />
address, an image or graphics, for<br />
example), then there’s an easy way to<br />
OUTLOOK<br />
Change the ‘read’ status of your emails<br />
Whenever you<br />
receive a new<br />
email in Outlook,<br />
the number next to your<br />
Inbox at the top left will<br />
increase by one and the<br />
new email is formatted in<br />
bold in your Reading Pane.<br />
By default, when you click<br />
to read this new email in<br />
your Reading Pane, it<br />
won’t lose its bold<br />
formatting and the<br />
number next to your Inbox<br />
won’t decrease. It’s only when you<br />
click another email (an older one, for<br />
example) that the formatting changes<br />
and the number decreases – indicating<br />
that the email has been ‘read’. It’s easy<br />
to change this default setting so that<br />
Outlook shows an email as ‘read’<br />
when you click it.<br />
save this template as a ‘cover<br />
page’ that you can reuse<br />
whenever you want. Th e<br />
easiest way to do this is by<br />
using Word’s Cover Page<br />
option. If you click the<br />
Insert tab, then the Cover<br />
Page dropdown menu at the<br />
top left, you’ll see a selection<br />
of cover pages that you can<br />
click to add. It’s easy to<br />
create and add your own<br />
page to this group.<br />
First, open a new<br />
document and lay out its fi rst (cover)<br />
page the way you want. Now select every<br />
element on the page, click the Insert tab,<br />
the Cover Page dropdown menu, then<br />
click ‘Save Selection to Cover Page Gallery’<br />
(see screenshot left). Next, name your<br />
cover page, then click OK. Th e next time<br />
you want to reuse this page for a document,<br />
simply click the Cover Page dropdown<br />
menu, then click the page you created.<br />
ONENOTE<br />
Create Desktop shortcuts for<br />
your notebooks and sections<br />
If you use a particular notebook<br />
or section within OneNote a lot,<br />
then you should create a Desktop<br />
shortcut for it for easy access. To create a<br />
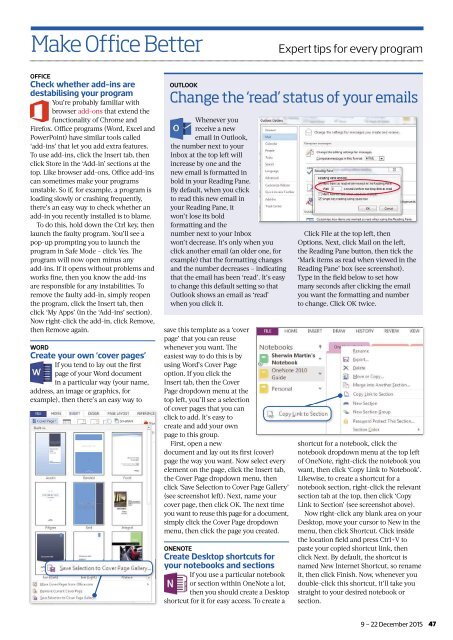
Click File at the top left, then<br />
Options. Next, click Mail on the left,<br />
the Reading Pane button, then tick the<br />
‘Mark items as read when viewed in the<br />
Reading Pane’ box (see screenshot).<br />
Type in the fi eld below to set how<br />
many seconds after clicking the email<br />
you want the formatting and number<br />
to change. Click OK twice.<br />
shortcut for a notebook, click the<br />
notebook dropdown menu at the top left<br />
of OneNote, right-click the notebook you<br />
want, then click ‘Copy Link to Notebook’.<br />
Likewise, to create a shortcut for a<br />
notebook section, right-click the relevant<br />
section tab at the top, then click ‘Copy<br />
Link to Section’ (see screenshot above).<br />
Now right-click any blank area on your<br />
Desktop, move your cursor to New in the<br />
menu, then click Shortcut. Click inside<br />
the location fi eld and press Ctrl+V to<br />
paste your copied shortcut link, then<br />
click Next. By default, the shortcut is<br />
named New Internet Shortcut, so rename<br />
it, then click Finish. Now, whenever you<br />
double-click this shortcut, it’ll take you<br />
straight to your desired notebook or<br />
section.<br />
9 – 22 December 2015 47