- Page 1 and 2:
Introducing Windows Server 2016 Joh
- Page 3 and 4:
Visit us today at microsoftpresssto
- Page 5 and 6:
Creating a cloud witness by using A
- Page 7 and 8:
DSC Local Configuration Manager ...
- Page 9 and 10:
Ramnish Singh Ritesh Modi Jason M.
- Page 11 and 12:
C H A P T E R 1 Introduction to Mic
- Page 13 and 14:
The following subsections dive deep
- Page 15 and 16:
Offer greater service availability
- Page 17 and 18:
Self-Service In the area of self-se
- Page 19 and 20:
C H A P T E R 2 Software-defined da
- Page 21 and 22:
Each nested guest VM needs to have
- Page 23 and 24:
A VM collection group is a logical
- Page 25 and 26:
Using the Get-VM cmdlet, you can se
- Page 27 and 28:
Figure 2-5: Multitier management gr
- Page 29 and 30:
Windows Server 2012 R2 took live mi
- Page 31 and 32:
Figure 2-12: VM shortcut menu To do
- Page 33 and 34:
You can confirm this by using Windo
- Page 35 and 36:
ParentSnapshotName : MemoryStartup
- Page 37 and 38:
Figure 2-19: Message indicating tha
- Page 39 and 40:
Figure 2-23: VM Task Manager showin
- Page 41 and 42:
Failover cluster By John Marlin and
- Page 43 and 44:
Figure 2-30: Entering storage accou
- Page 45 and 46:
Figure 2-34: Extending a volume in
- Page 47 and 48:
[=== Microsoft-Windows-ClusterAware
- Page 49 and 50:
Troubleshooting an event such as th
- Page 51 and 52:
Figure 2-40: Pausing cluster node N
- Page 53 and 54:
-IncludeAllSubFeature 5. Add the Wi
- Page 55 and 56:
Figure 2-50: VM Configuration Versi
- Page 57 and 58:
As Figure 2-51 illustrates, when ap
- Page 59 and 60:
There is no need for schema updates
- Page 61 and 62:
In the Configure Storage Replica Wi
- Page 63 and 64:
There are many options for the New-
- Page 65 and 66:
Deployment Choice Storage Spaces Di
- Page 67 and 68:
Figure 2-60: The Storage Spaces Dir
- Page 69 and 70:
on node A, B, and C, and the extent
- Page 71 and 72:
Figure 2-63: Old mapping versus the
- Page 73 and 74:
Multi-instance With multi-instance
- Page 75 and 76:
Figure 2-66 Network virtualization
- Page 77 and 78:
Figure 2-68: NVGRE Network Controll
- Page 79 and 80:
More info In this book, we cannot p
- Page 81 and 82:
When you have a service that requir
- Page 83 and 84:
Figure 2-72: Post deployment config
- Page 85 and 86:
Auditing access to resources Window
- Page 87 and 88:
Figure 2-77: Published web applicat
- Page 89 and 90:
Figure 2-81: Relying party options
- Page 91 and 92:
Figure 2-85: The Edit Claim Rules d
- Page 93 and 94:
This will provide you with the toke
- Page 95 and 96:
Figure 2-92: Viewing details from t
- Page 97 and 98:
Hear about it first. Get the latest
- Page 99 and 100:
Figure 3-1: Diagram showing the thr
- Page 101 and 102:
DNS server Web server running IIS A
- Page 103 and 104:
Figure 3-5: Architecture of differe
- Page 105 and 106:
Remotely managing Nano Server Nano
- Page 107 and 108:
Monitoring Nano Server You can now
- Page 109 and 110:
Figure 3-6: Conceptual container la
- Page 111 and 112:
Figure 3-7: Windows Server 2016 con
- Page 113 and 114:
Figure 3-10: Containers can write o
- Page 115 and 116:
Firewalls Every container host has
- Page 117 and 118:
C H A P T E R 4 Security and identi
- Page 119 and 120:
At this point, it might be self-def
- Page 121 and 122: UEFI BIOS configured to prevent an
- Page 123 and 124: Better protection against advanced
- Page 125 and 126: When a user attempts to remote desk
- Page 127 and 128: New fields in the process creation
- Page 129 and 130: The core areas of interest to chang
- Page 131 and 132: credentials for this account with s
- Page 133 and 134: Long-term plan The long-term goals
- Page 135 and 136: A REST Endpoint Windows PowerShell
- Page 137 and 138: Bring Your Own Device (BYOD) equipm
- Page 139 and 140: Users can add their personal Micros
- Page 141 and 142: More info For further information,
- Page 143 and 144: C H A P T E R 5 Systems management
- Page 145 and 146: Like Linux, we have some common ter
- Page 147 and 148: Name InstallationPolicy SourceLocat
- Page 149 and 150: uri='https://www.powershellgallery.
- Page 151 and 152: Figure 5-1: Sample code in the Wind
- Page 153 and 154: The first runspace, ID 1, is always
- Page 155 and 156: ConfigurationRepositoryShare This r
- Page 157 and 158: IISInstall is responsible for downl
- Page 159 and 160: DSC partial configurations One of t
- Page 161 and 162: You also need to provide the pull s
- Page 163 and 164: The .mof file is generated on the p
- Page 165 and 166: this information. Figure 5-9 shows
- Page 167 and 168: Backup and recovery Security and co
- Page 169 and 170: Figure 5-15: Connecting a storage a
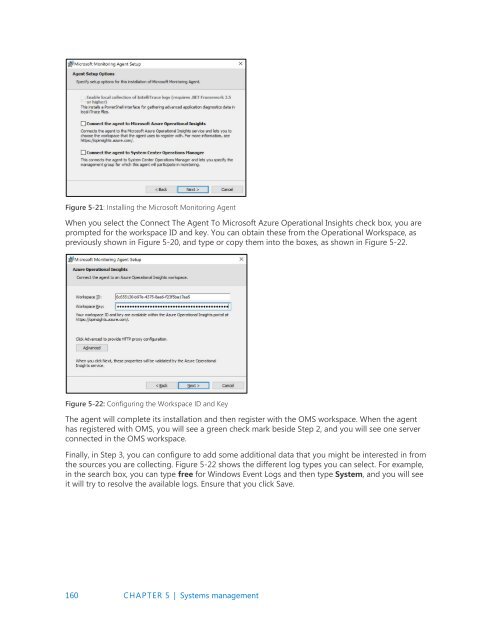
- Page 171: Figure 5-19 depicts the first step
- Page 175 and 176: Figure 5-26: Sample deployment for
- Page 177 and 178: Figure 5-28: The Windows PowerShell
- Page 179 and 180: Deployment Deployment of SMT is rel
- Page 181: Free ebooks From technical overview


