walmart-magento-m1-integration-guide-0.1.5-65

Create successful ePaper yourself
Turn your PDF publications into a flip-book with our unique Google optimized e-Paper software.
Walmart-Magento M1 Integration Guide <strong>0.1.5</strong><br />
7. Under Walmart Product Advanced Price Settings, enter the values in the corresponding fields.<br />
Walmart Product Price: This is to set a different price for all the products as shown in the<br />
following figure:<br />
User can set the price on the following basis: –<br />
Increase by Fixed Price: If selected, then the Enter Amount field appears.<br />
Increase by Fixed Percentage: If selected, then the Enter Percentage field appears.<br />
Enter the numeric value to increase the price of the the Walmart product price by the<br />
entered value % of Magento price<br />
For Example: Magento price + 5% of Magento price.<br />
Magento Price = 100<br />
Select Increase By Fixed Percentage option<br />
Enter Percentage = 5<br />
100 + 5% of 100 = 100 + 5 = 105<br />
Thus, Walmart Product Price = 105<br />
Decrease by Fixed Price: If selected, then the Enter Amount field appears.<br />
Decrease by Fixed Percentage: If selected, then the Enter Percentage field appears.<br />
Enter the numeric value to decrease the price of the the Walmart product price by the<br />
entered value % of Magento price<br />
For Example: Magento price – 5% of Magento price.<br />
Magento Price = 100<br />
Select Decrease By Fixed Percentage option<br />
Enter Percentage = 5<br />
100 – 5% of 100 = 100 – 5 = 95<br />
Thus, Walmart Product Price = 95<br />
Product TaxCode: Enter 7 digit product tax code.<br />
Fullfillment Lag Time: Enter Fullfillment Lag Time for products on Walmart.<br />
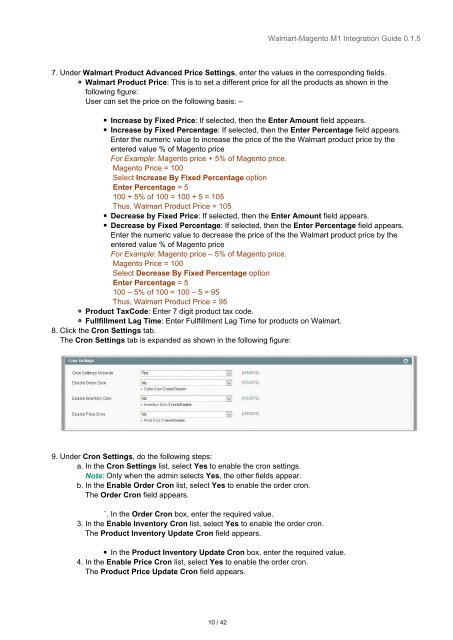
8. Click the Cron Settings tab.<br />
The Cron Settings tab is expanded as shown in the following figure:<br />
9. Under Cron Settings, do the following steps:<br />
a. In the Cron Settings list, select Yes to enable the cron settings.<br />
Note: Only when the admin selects Yes, the other fields appear.<br />
b. In the Enable Order Cron list, select Yes to enable the order cron.<br />
The Order Cron field appears.<br />
`. In the Order Cron box, enter the required value.<br />
3. In the Enable Inventory Cron list, select Yes to enable the order cron.<br />
The Product Inventory Update Cron field appears.<br />
In the Product Inventory Update Cron box, enter the required value.<br />
4. In the Enable Price Cron list, select Yes to enable the order cron.<br />
The Product Price Update Cron field appears.<br />
10 / 42


![WALMART MAGENTO 2 INTEGRATION [M2]- CedCommerce](https://img.yumpu.com/58660291/1/184x260/walmart-magento-2-integration-m2-cedcommerce.jpg?quality=85)