SUNNY WEBBOX - User Manual - SMA Solar Technology AG
SUNNY WEBBOX - User Manual - SMA Solar Technology AG
SUNNY WEBBOX - User Manual - SMA Solar Technology AG

You also want an ePaper? Increase the reach of your titles
YUMPU automatically turns print PDFs into web optimized ePapers that Google loves.
<strong>SMA</strong> <strong>Solar</strong> <strong>Technology</strong> <strong>AG</strong> Commissioning<br />
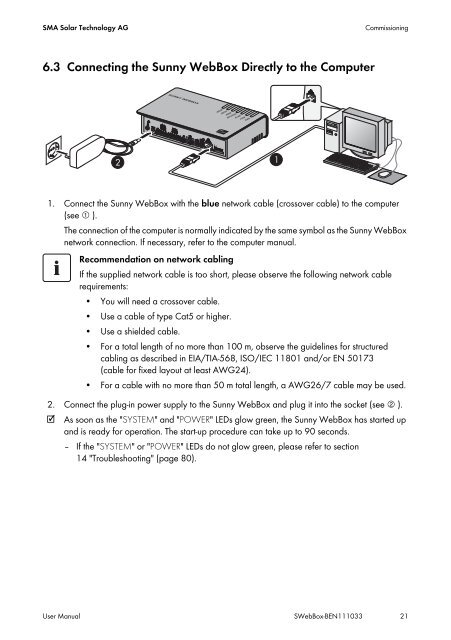
6.3 Connecting the Sunny WebBox Directly to the Computer<br />
1. Connect the Sunny WebBox with the blue network cable (crossover cable) to the computer<br />
(see ➀ ).<br />
The connection of the computer is normally indicated by the same symbol as the Sunny WebBox<br />
network connection. If necessary, refer to the computer manual.<br />
Recommendation on network cabling<br />
If the supplied network cable is too short, please observe the following network cable<br />
requirements:<br />
• You will need a crossover cable.<br />
• Use a cable of type Cat5 or higher.<br />
• Use a shielded cable.<br />
• For a total length of no more than 100 m, observe the guidelines for structured<br />
cabling as described in EIA/TIA-568, ISO/IEC 11801 and/or EN 50173<br />
(cable for fixed layout at least AWG24).<br />
• For a cable with no more than 50 m total length, a AWG26/7 cable may be used.<br />
2. Connect the plug-in power supply to the Sunny WebBox and plug it into the socket (see ➁ ).<br />
☑ As soon as the "SYSTEM" and "POWER" LEDs glow green, the Sunny WebBox has started up<br />
and is ready for operation. The start-up procedure can take up to 90 seconds.<br />
– If the "SYSTEM" or "POWER" LEDs do not glow green, please refer to section<br />
14 "Troubleshooting" (page 80).<br />
<strong>User</strong> <strong>Manual</strong> SWebBox-BEN111033 21