Manual del propietario de la bicicleta - Trek Bicycle Corporation
Manual del propietario de la bicicleta - Trek Bicycle Corporation
Manual del propietario de la bicicleta - Trek Bicycle Corporation

You also want an ePaper? Increase the reach of your titles
YUMPU automatically turns print PDFs into web optimized ePapers that Google loves.
Alineación <strong>de</strong> frenos <strong>de</strong> disco<br />
accionados por cable<br />
En este procedimiento, hay varios<br />
elementos:<br />
• Ajuste <strong>de</strong> <strong>la</strong> separación <strong>de</strong> <strong>la</strong><br />
pastil<strong>la</strong> <strong>de</strong> freno <strong>de</strong>recha y el<br />
disco<br />
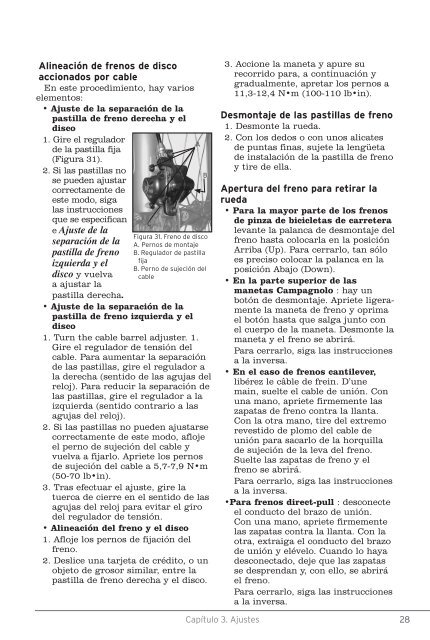
1. Gire el regu<strong>la</strong>dor<br />
<strong>de</strong> <strong>la</strong> pastil<strong>la</strong> fija<br />
(Figura 31).<br />
2. Si <strong>la</strong>s pastil<strong>la</strong>s no<br />
se pue<strong>de</strong>n ajustar<br />
correctamente <strong>de</strong><br />
este modo, siga<br />
<strong>la</strong>s instrucciones<br />
que se especifican<br />
e Ajuste <strong>de</strong> <strong>la</strong><br />
separación <strong>de</strong> <strong>la</strong><br />
pastil<strong>la</strong> <strong>de</strong> freno<br />
izquierda y el<br />
disco y vuelva<br />
a ajustar <strong>la</strong><br />
pastil<strong>la</strong> <strong>de</strong>recha.<br />
• Ajuste <strong>de</strong> <strong>la</strong> separación <strong>de</strong> <strong>la</strong><br />
pastil<strong>la</strong> <strong>de</strong> freno izquierda y el<br />
disco<br />
1. Turn the cable barrel adjuster. 1.<br />
Gire el regu<strong>la</strong>dor <strong>de</strong> tensión <strong><strong>de</strong>l</strong><br />
cable. Para aumentar <strong>la</strong> separación<br />
<strong>de</strong> <strong>la</strong>s pastil<strong>la</strong>s, gire el regu<strong>la</strong>dor a<br />
<strong>la</strong> <strong>de</strong>recha (sentido <strong>de</strong> <strong>la</strong>s agujas <strong><strong>de</strong>l</strong><br />
reloj). Para reducir <strong>la</strong> separación <strong>de</strong><br />
<strong>la</strong>s pastil<strong>la</strong>s, gire el regu<strong>la</strong>dor a <strong>la</strong><br />
izquierda (sentido contrario a <strong>la</strong>s<br />
agujas <strong><strong>de</strong>l</strong> reloj).<br />
2. Si <strong>la</strong>s pastil<strong>la</strong>s no pue<strong>de</strong>n ajustarse<br />
correctamente <strong>de</strong> este modo, afloje<br />
el perno <strong>de</strong> sujeción <strong><strong>de</strong>l</strong> cable y<br />
vuelva a fijarlo. Apriete los pernos<br />
<strong>de</strong> sujeción <strong><strong>de</strong>l</strong> cable a 5,7-7,9 N•m<br />
(50-70 lb•in).<br />
3. Tras efectuar el ajuste, gire <strong>la</strong><br />
tuerca <strong>de</strong> cierre en el sentido <strong>de</strong> <strong>la</strong>s<br />
agujas <strong><strong>de</strong>l</strong> reloj para evitar el giro<br />
<strong><strong>de</strong>l</strong> regu<strong>la</strong>dor <strong>de</strong> tensión.<br />
• Alineación <strong><strong>de</strong>l</strong> freno y el disco<br />
1. Afloje los pernos <strong>de</strong> fijación <strong><strong>de</strong>l</strong><br />
freno.<br />
2. Deslice una tarjeta <strong>de</strong> crédito, o un<br />
objeto <strong>de</strong> grosor simi<strong>la</strong>r, entre <strong>la</strong><br />
pastil<strong>la</strong> <strong>de</strong> freno <strong>de</strong>recha y el disco.<br />
C<br />
A<br />
B<br />
F gura . Freno <strong>de</strong> d sco<br />
A. Pernos <strong>de</strong> montaje<br />
B. Regu<strong>la</strong>dor <strong>de</strong> past l<strong>la</strong><br />
fija<br />
B. Perno <strong>de</strong> sujec ón <strong><strong>de</strong>l</strong><br />
cable<br />
Capítulo . Ajustes<br />
3. Accione <strong>la</strong> maneta y apure su<br />
recorrido para, a continuación y<br />
gradualmente, apretar los pernos a<br />
11,3-12,4 N•m (100-110 lb•in).<br />
Desmontaje <strong>de</strong> <strong>la</strong>s pastil<strong>la</strong>s <strong>de</strong> freno<br />
1. Desmonte <strong>la</strong> rueda.<br />
2. Con los <strong>de</strong>dos o con unos alicates<br />
<strong>de</strong> puntas finas, sujete <strong>la</strong> lengüeta<br />
<strong>de</strong> insta<strong>la</strong>ción <strong>de</strong> <strong>la</strong> pastil<strong>la</strong> <strong>de</strong> freno<br />
y tire <strong>de</strong> el<strong>la</strong>.<br />
Apertura <strong><strong>de</strong>l</strong> freno para retirar <strong>la</strong><br />
rueda<br />
• Para <strong>la</strong> mayor parte <strong>de</strong> los frenos<br />
<strong>de</strong> pinza <strong>de</strong> <strong>bicicleta</strong>s <strong>de</strong> carretera<br />
levante <strong>la</strong> pa<strong>la</strong>nca <strong>de</strong> <strong>de</strong>smontaje <strong><strong>de</strong>l</strong><br />
freno hasta colocar<strong>la</strong> en <strong>la</strong> posición<br />
Arriba (Up). Para cerrarlo, tan sólo<br />
es preciso colocar <strong>la</strong> pa<strong>la</strong>nca en <strong>la</strong><br />
posición Abajo (Down).<br />
• En <strong>la</strong> parte superior <strong>de</strong> <strong>la</strong>s<br />
manetas Campagnolo : hay un<br />
botón <strong>de</strong> <strong>de</strong>smontaje. Apriete ligeramente<br />
<strong>la</strong> maneta <strong>de</strong> freno y oprima<br />
el botón hasta que salga junto con<br />
el cuerpo <strong>de</strong> <strong>la</strong> maneta. Desmonte <strong>la</strong><br />
maneta y el freno se abrirá.<br />
Para cerrarlo, siga <strong>la</strong>s instrucciones<br />
a <strong>la</strong> inversa.<br />
• En el caso <strong>de</strong> frenos cantilever,<br />
libérez le câble <strong>de</strong> frein. D’une<br />
main, suelte el cable <strong>de</strong> unión. Con<br />
una mano, apriete firmemente <strong>la</strong>s<br />
zapatas <strong>de</strong> freno contra <strong>la</strong> l<strong>la</strong>nta.<br />
Con <strong>la</strong> otra mano, tire <strong><strong>de</strong>l</strong> extremo<br />
revestido <strong>de</strong> plomo <strong><strong>de</strong>l</strong> cable <strong>de</strong><br />
unión para sacarlo <strong>de</strong> <strong>la</strong> horquil<strong>la</strong><br />
<strong>de</strong> sujeción <strong>de</strong> <strong>la</strong> leva <strong><strong>de</strong>l</strong> freno.<br />
Suelte <strong>la</strong>s zapatas <strong>de</strong> freno y el<br />
freno se abrirá.<br />
Para cerrarlo, siga <strong>la</strong>s instrucciones<br />
a <strong>la</strong> inversa.<br />
•Para frenos direct-pull : <strong>de</strong>sconecte<br />
el conducto <strong><strong>de</strong>l</strong> brazo <strong>de</strong> unión.<br />
Con una mano, apriete firmemente<br />
<strong>la</strong>s zapatas contra <strong>la</strong> l<strong>la</strong>nta. Con <strong>la</strong><br />
otra, extraiga el conducto <strong><strong>de</strong>l</strong> brazo<br />
<strong>de</strong> unión y elévelo. Cuando lo haya<br />
<strong>de</strong>sconectado, <strong>de</strong>je que <strong>la</strong>s zapatas<br />
se <strong>de</strong>sprendan y, con ello, se abrirá<br />
el freno.<br />
Para cerrarlo, siga <strong>la</strong>s instrucciones<br />
a <strong>la</strong> inversa.