H51308-v0A Manuale Istruzioni VTNC - Rhoss
H51308-v0A Manuale Istruzioni VTNC - Rhoss
H51308-v0A Manuale Istruzioni VTNC - Rhoss
Create successful ePaper yourself
Turn your PDF publications into a flip-book with our unique Google optimized e-Paper software.
SECTION I: USER<br />
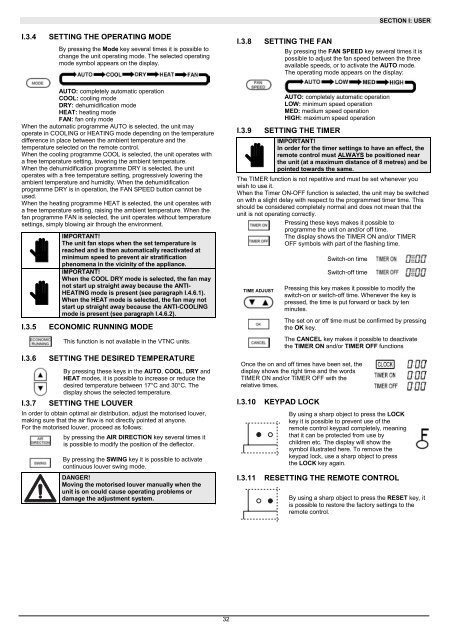
I.3.4<br />
SETTING THE OPERATING MODE<br />
By pressing the Mode key several times it is possible to<br />
change the unit operating mode. The selected operating<br />
mode symbol appears on the display.<br />
I.3.8<br />
SETTING THE FAN<br />
By pressing the FAN SPEED key several times it is<br />
possible to adjust the fan speed between the three<br />
available speeds, or to activate the AUTO mode.<br />
The operating mode appears on the display:<br />
AUTO: completely automatic operation<br />
COOL: cooling mode<br />
DRY: dehumidification mode<br />
HEAT: heating mode<br />
FAN: fan only mode<br />
When the automatic programme AUTO is selected, the unit may<br />
operate in COOLING or HEATING mode depending on the temperature<br />
difference in place between the ambient temperature and the<br />
temperature selected on the remote control.<br />
When the cooling programme COOL is selected, the unit operates with<br />
a free temperature setting, lowering the ambient temperature.<br />
When the dehumidification programme DRY is selected, the unit<br />
operates with a free temperature setting, progressively lowering the<br />
ambient temperature and humidity. When the dehumidification<br />
programme DRY is in operation, the FAN SPEED button cannot be<br />
used.<br />
When the heating programme HEAT is selected, the unit operates with<br />
a free temperature setting, raising the ambient temperature. When the<br />
fan programme FAN is selected, the unit operates without temperature<br />
settings, simply blowing air through the environment.<br />
I.3.5<br />
I.3.6<br />
IMPORTANT!<br />
The unit fan stops when the set temperature is<br />
reached and is then automatically reactivated at<br />
minimum speed to prevent air stratification<br />
phenomena in the vicinity of the appliance.<br />
IMPORTANT!<br />
When the COOL DRY mode is selected, the fan may<br />
not start up straight away because the ANTI-<br />
HEATING mode is present (see paragraph I.4.6.1).<br />
When the HEAT mode is selected, the fan may not<br />
start up straight away because the ANTI-COOLING<br />
mode is present (see paragraph I.4.6.2).<br />
ECONOMIC RUNNING MODE<br />
This function is not available in the <strong>VTNC</strong> units.<br />
SETTING THE DESIRED TEMPERATURE<br />
By pressing these keys in the AUTO, COOL, DRY and<br />
HEAT modes, it is possible to increase or reduce the<br />
desired temperature between 17°C and 30°C. The<br />
display shows the selected temperature.<br />
I.3.7 SETTING THE LOUVER<br />
In order to obtain optimal air distribution, adjust the motorised louver,<br />
making sure that the air flow is not directly pointed at anyone.<br />
For the motorised louver, proceed as follows:<br />
by pressing the AIR DIRECTION key several times it<br />
is possible to modify the position of the deflector.<br />
By pressing the SWING key it is possible to activate<br />
continuous louver swing mode.<br />
DANGER!<br />
Moving the motorised louver manually when the<br />
unit is on could cause operating problems or<br />
damage the adjustment system.<br />
I.3.9<br />
AUTO: completely automatic operation<br />
LOW: minimum speed operation<br />
MED: medium speed operation<br />
HIGH: maximum speed operation<br />
SETTING THE TIMER<br />
IMPORTANT!<br />
In order for the timer settings to have an effect, the<br />
remote control must ALWAYS be positioned near<br />
the unit (at a maximum distance of 8 metres) and be<br />
pointed towards the same.<br />
The TIMER function is not repetitive and must be set whenever you<br />
wish to use it.<br />
When the Timer ON-OFF function is selected, the unit may be switched<br />
on with a slight delay with respect to the programmed timer time. This<br />
should be considered completely normal and does not mean that the<br />
unit is not operating correctly.<br />
Pressing these keys makes it possible to<br />
programme the unit on and/or off time.<br />
The display shows the TIMER ON and/or TIMER<br />
OFF symbols with part of the flashing time.<br />
TIME ADJUST<br />
Switch-on time<br />
Switch-off time<br />
Pressing this key makes it possible to modify the<br />
switch-on or switch-off time. Whenever the key is<br />
pressed, the time is put forward or back by ten<br />
minutes.<br />
The set on or off time must be confirmed by pressing<br />
the OK key.<br />
The CANCEL key makes it possible to deactivate<br />
the TIMER ON and/or TIMER OFF functions<br />
Once the on and off times have been set, the<br />
display shows the right time and the words<br />
TIMER ON and/or TIMER OFF with the<br />
relative times.<br />
I.3.10<br />
I.3.11<br />
KEYPAD LOCK<br />
By using a sharp object to press the LOCK<br />
key it is possible to prevent use of the<br />
remote control keypad completely, meaning<br />
that it can be protected from use by<br />
children etc. The display will show the<br />
symbol illustrated here. To remove the<br />
keypad lock, use a sharp object to press<br />
the LOCK key again.<br />
RESETTING THE REMOTE CONTROL<br />
By using a sharp object to press the RESET key, it<br />
is possible to restore the factory settings to the<br />
remote control.<br />
32


