Instruction Book DC2010 - Janome
Instruction Book DC2010 - Janome
Instruction Book DC2010 - Janome
You also want an ePaper? Increase the reach of your titles
YUMPU automatically turns print PDFs into web optimized ePapers that Google loves.
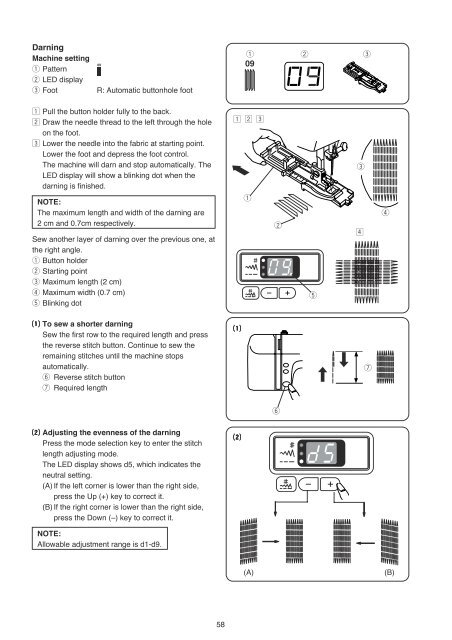
DarningMachine settingq Patternw LED displaye FootR: Automatic buttonhole footq w ez Pull the button holder fully to the back.x Draw the needle thread to the left through the holeon the foot.c Lower the needle into the fabric at starting point.Lower the foot and depress the foot control.The machine will darn and stop automatically. TheLED display will show a blinking dot when thedarning is finished.z x ceNOTE:The maximum length and width of the darning are2 cm and 0.7cm respectively.Sew another layer of darning over the previous one, atthe right angle.q Button holderw Starting pointe Maximum length (2 cm)r Maximum width (0.7 cm)t Blinking dotqwtvra To sew a shorter darningSew the first row to the required length and pressthe reverse stitch button. Continue to sew theremaining stitches until the machine stopsautomatically.y Reverse stitch buttonu Required lengthauys Adjusting the evenness of the darningPress the mode selection key to enter the stitchlength adjusting mode.The LED display shows d5, which indicates theneutral setting.(A) If the left corner is lower than the right side,press the Up (+) key to correct it.(B) If the right corner is lower than the right side,press the Down (–) key to correct it.sNOTE:Allowable adjustment range is d1-d9.(A)(B)58


