

Instruction Book DC2010 - Janome
Instruction Book DC2010 - Janome
Instruction Book DC2010 - Janome

You also want an ePaper? Increase the reach of your titles
YUMPU automatically turns print PDFs into web optimized ePapers that Google loves.
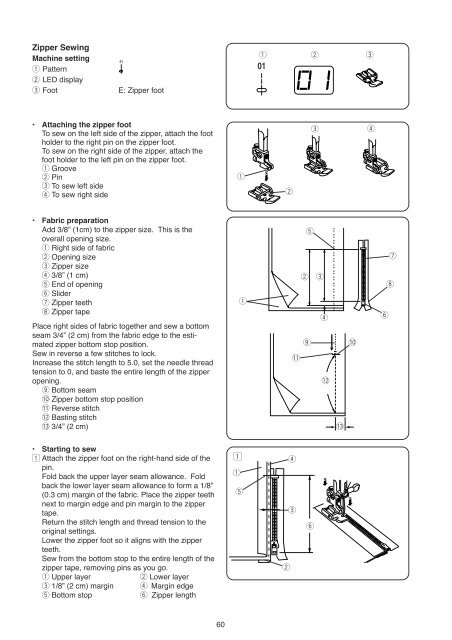
Zipper SewingMachine settingq Patternw LED displaye FootE: Zipper footq w e• Attaching the zipper footTo sew on the left side of the zipper, attach the footholder to the right pin on the zipper foot.To sew on the right side of the zipper, attach thefoot holder to the left pin on the zipper foot.q Groovew Pine To sew left sider To sew right sideqwer• Fabric preparationAdd 3/8” (1cm) to the zipper size. This is theoverall opening size.q Right side of fabricw Opening sizee Zipper sizer 3/8” (1 cm)t End of openingy Slideru Zipper teethi Zipper tapePlace right sides of fabric together and sew a bottomseam 3/4” (2 cm) from the fabric edge to the estimatedzipper bottom stop position.Sew in reverse a few stitches to lock.Increase the stitch length to 5.0, set the needle threadtension to 0, and baste the entire length of the zipperopening.o Bottom seam!0 Zipper bottom stop position!1 Reverse stitch!2 Basting stitch!3 3/4” (2 cm)qtw ero !0!1!2!3yui• Starting to sewz Attach the zipper foot on the right-hand side of thepin.Fold back the upper layer seam allowance. Foldback the lower layer seam allowance to form a 1/8”(0.3 cm) margin of the fabric. Place the zipper teethnext to margin edge and pin margin to the zippertape.Return the stitch length and thread tension to theoriginal settings.Lower the zipper foot so it aligns with the zipperteeth.Sew from the bottom stop to the entire length of thezipper tape, removing pins as you go.q Upper layerw Lower layere 1/8” (2 cm) margin r Margin edget Bottom stopy Zipper lengthzqtwrey60


