Isofix - Chicco
Isofix - Chicco
Isofix - Chicco

Create successful ePaper yourself
Turn your PDF publications into a flip-book with our unique Google optimized e-Paper software.
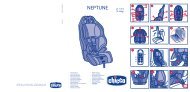
E. Restraint harness adjustment button<br />
F. Restraint harness adjustment strap<br />
G. Harness open / close buckle<br />
H. Seat fabric<br />
I. Padded crotch strap<br />
J. Car seat base<br />
K. Seat<br />
L. Handle to release the ISOFIX system<br />
Diag. 2 (Back)<br />
M. Headrest adjustment button<br />
N. Homologation labels<br />
O. Plate for locking the belts<br />
P1 ISOFIX system<br />
P2 Top Tether<br />
Diag. 3 (Profile)<br />
Q. Lever for reclining the seat<br />
R. Pocket for storing the instructions booklet<br />
S. Guide for inserting the lap section of the<br />
3-point car safety belt<br />
S1. Guide for inserting the diagonal section of<br />
the 3-point car safety belt<br />
T. Clamp for fastening the diagonal section of<br />
the car safety belt<br />
U. Installation instructions labels<br />
V. ISOFIX System<br />
Diag. 4 (ISOFIX System Detail)<br />
W. Connectors<br />
X. Protective caps<br />
Y. Release buttons<br />
Z. Locking indicators<br />
Diag. 5 (TOP TETHER Detail)<br />
AA. Belt<br />
BB. Adjuster<br />
CC. Tension indication<br />
DD. Hook<br />
RESTRICTIONS AND REQUISITES REGAR-<br />
DING THE USE OF THE PRODUCT AND CAR<br />
SEAT<br />
CAUTION! Read these use restrictions and<br />
requisites carefully to ensure the product is<br />
used safely.<br />
• The child car seat is suitable for children<br />
from 9 up to 18 Kg of weight.<br />
• If the child car seat is fitted into the car<br />
seat with the car safety belt, the car seat<br />
must be equipped with a 3-point static or<br />
3-point retractor safety belt, approved to<br />
UN/ECE No. 16 regulation or other equivalent<br />
standards (diag 6).<br />
• The child car seat can be fitted with the<br />
ISOFIX system in the positions indicated in<br />
the instructions for use of the vehicle.<br />
• The child car seat can be fitted into the<br />
front passenger seat or any other back<br />
seats, always in a forward facing direction.<br />
Never use this child car seat fitted into car<br />
seats facing sideways or facing rearwards<br />
(diag. 7).<br />
WARNING! According to car accident statistics,<br />
the rear seats of a car are generally safer<br />
than the front seat: it is therefore recommended<br />
to fit the child car seat into the rear seats<br />
of the car. In particular, the central rear seat is<br />
the safest. If the child car seat is fitted in the<br />
front seat of the car, in order to ensure maximum<br />
safety, it is recommended to push the<br />
seat back as much as possible, bearing in mind<br />
the comfort of the passenger sitting in the<br />
seat directly behind it and adjusting the backrest<br />
to the most vertical position. If the car is<br />
equipped with a safety belt height adjuster, fix<br />
it in the lowest position, then check that the<br />
car seat safety belt adjuster is either in a backward<br />
position with respect to the backrest of<br />
the car seat (or at least aligned to it).<br />
It is not recommended to fit the child car seat<br />
into a front seat equipped with airbag. If you<br />
wish to fit the child car seat in any seat protected<br />
by airbag, always refer to the vehicle<br />
instructions manual.<br />
WARNING! Never fit the child car seat to a<br />
seat that is only equipped with a horizontal<br />
2-point safety belt (diag. 8).<br />
FITTING THE CHILD CAR SEAT INTO THE<br />
CAR WITH THE ISOFIX SYSTEM<br />
PREPARING THE INSTALLATION<br />
1. Pull the unlocking handle of the ISOFIX system<br />
externally (diag. 9).<br />
2. While keeping the handle pulled, pull out<br />
the ISOFIX system COMPLETELY from the<br />
rear of the backrest (diag. 10). Ensure that<br />
the system has been pulled out completely.<br />
3. Push the two red buttons (Y) of the ISO-<br />
FIX connectors inside (diag. 11a) and, while<br />
keeping them pressed down, remove the<br />
two protective caps (X) (diag. 11b).<br />
4. Place the two caps into the appropriate<br />
housings, located under the base (diagrams<br />
12a - 12b).<br />
WARNING! Store the caps in a safe place,<br />
since they are indispensable for reinserting<br />
the ISOFIX system inside the base when the<br />
system is not in use.<br />
HOW TO FIT THE CHILD CAR SEAT<br />
35