Introduction to Microcontrollers Lab Manual - Microchip
Introduction to Microcontrollers Lab Manual - Microchip
Introduction to Microcontrollers Lab Manual - Microchip

You also want an ePaper? Increase the reach of your titles
YUMPU automatically turns print PDFs into web optimized ePapers that Google loves.
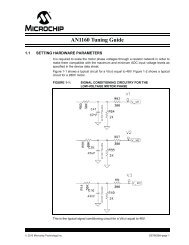
6.3 THE LAB<br />
The first code transition occurs when the input voltage is ((VR+) – (VR-))/1024 or 1 LSb<br />
• Output 1 is centered at VR- + (1.5 • ((VR+) – (VR-))/1024)<br />
• Output 512 is centered at VREFL + (512.5 • ((VR+) – (VR-))/1024)<br />
• An input voltage less than VR- + (((VR-) – (VR-))/1024) converts as 0<br />
• An input voltage greater than (VR-) + (1023((VR+) – (VR-))/1024) converts as<br />
1023<br />
6.3.1 Objective<br />
This lab is similar <strong>to</strong> the previous Compara<strong>to</strong>r <strong>Lab</strong>. However, this time we will use the<br />
10-bit A/D Converter module <strong>to</strong> create a more accurate voltage meter.<br />
The 10-bit A/D Converter has an array of timing and control selections, which allows<br />
the user <strong>to</strong> create flexible scanning sequences. Conversions can be started individually<br />
by program control, continuously free running, or triggered by selected hardware<br />
events.<br />
This lab is flexible in allowing you <strong>to</strong> configure the A/D Converter module any way you<br />
choose <strong>to</strong> complete the task.<br />
This lab including program flow chart assumes the A/D Converter “au<strong>to</strong>-conversion trigger”<br />
and the “ADC1 Conversion Done” interrupt is being used.<br />
6.3.2 Setup<br />
• ADC input <strong>to</strong> AN4 (pin 21), which is the same input that was used for the<br />
Compara<strong>to</strong>r <strong>Lab</strong>.<br />
• VR+ = AVSS<br />
• VR- = AVDD<br />
• Setup the 10-Bit A/D Converter module <strong>to</strong> measure an input voltage on AN4.<br />
• Then use the UART <strong>to</strong> send the measured voltage <strong>to</strong> a terminal program.<br />
• You will be required <strong>to</strong> do some formatting <strong>to</strong> the A/D Converter output value and<br />
send back the voltage as a four digit number formatted similar <strong>to</strong> “1.234V”.<br />
• The expected output is illustrated in the Figure 6-4.<br />
FIGURE 6-4: EXAMPLE TERMINAL OUTPUT<br />
2011 <strong>Microchip</strong> Technology Inc. DS51963A-page 47