TELE INTERNATIONAL - TELE-satellite International Magazine
TELE INTERNATIONAL - TELE-satellite International Magazine
TELE INTERNATIONAL - TELE-satellite International Magazine

You also want an ePaper? Increase the reach of your titles
YUMPU automatically turns print PDFs into web optimized ePapers that Google loves.
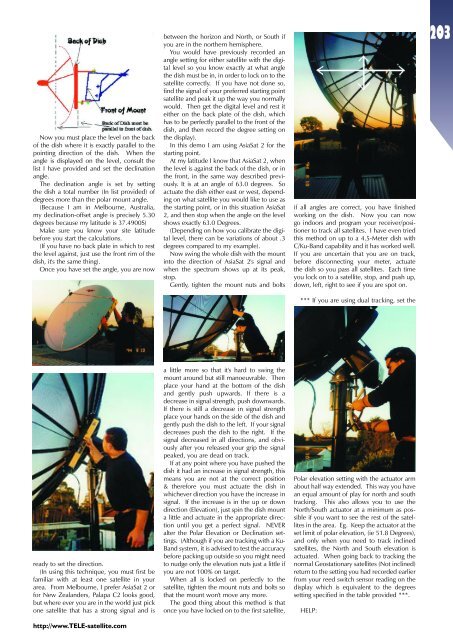
Now you must place the level on the back<br />
of the dish where it is exactly parallel to the<br />
pointing direction of the dish. When the<br />
angle is displayed on the level, consult the<br />
list I have provided and set the declination<br />
angle.<br />
The declination angle is set by setting<br />
the dish a total number (In list provided) of<br />
degrees more than the polar mount angle.<br />
(Because I am in Melbourne, Australia,<br />
my declination-offset angle is precisely 5.30<br />
degrees because my latitude is 37.4900S)<br />
Make sure you know your site latitude<br />
before you start the calculations.<br />
(If you have no back plate in which to rest<br />
the level against, just use the front rim of the<br />
dish, it's the same thing).<br />
Once you have set the angle, you are now<br />
ready to set the direction.<br />
(In using this technique, you must first be<br />
familiar with at least one <strong>satellite</strong> in your<br />
area. From Melbourne, I prefer AsiaSat 2 or<br />
for New Zealanders, Palapa C2 looks good,<br />
but where ever you are in the world just pick<br />
one <strong>satellite</strong> that has a strong signal and is<br />
http://www.<strong>TELE</strong>-<strong>satellite</strong>.com<br />
between the horizon and North, or South if<br />
you are in the northern hemisphere.<br />
You would have previously recorded an<br />
angle setting for either <strong>satellite</strong> with the digital<br />
level so you know exactly at what angle<br />
the dish must be in, in order to lock on to the<br />
<strong>satellite</strong> correctly. If you have not done so,<br />
find the signal of your preferred starting point<br />
<strong>satellite</strong> and peak it up the way you normally<br />
would. Then get the digital level and rest it<br />
either on the back plate of the dish, which<br />
has to be perfectly parallel to the front of the<br />
dish, and then record the degree setting on<br />
the display).<br />
In this demo I am using AsiaSat 2 for the<br />
starting point.<br />
At my latitude I know that AsiaSat 2, when<br />
the level is against the back of the dish, or in<br />
the front, in the same way described previously.<br />
It is at an angle of 63.0 degrees. So<br />
actuate the dish either east or west, depending<br />
on what <strong>satellite</strong> you would like to use as<br />
the starting point, or in this situation AsiaSat<br />
2, and then stop when the angle on the level<br />
shows exactly 63.0 Degrees.<br />
(Depending on how you calibrate the digital<br />
level, there can be variations of about .3<br />
degrees compared to my example).<br />
Now swing the whole dish with the mount<br />
into the direction of AsiaSat 2's signal and<br />
when the spectrum shows up at its peak,<br />
stop.<br />
Gently, tighten the mount nuts and bolts<br />
a little more so that it's hard to swing the<br />
mount around but still manoeuvrable. Then<br />
place your hand at the bottom of the dish<br />
and gently push upwards. If there is a<br />
decrease in signal strength, push downwards.<br />
If there is still a decrease in signal strength<br />
place your hands on the side of the dish and<br />
gently push the dish to the left. If your signal<br />
decreases push the dish to the right. If the<br />
signal decreased in all directions, and obviously<br />
after you released your grip the signal<br />
peaked, you are dead on track.<br />
If at any point where you have pushed the<br />
dish it had an increase in signal strength, this<br />
means you are not at the correct position<br />
& therefore you must actuate the dish in<br />
whichever direction you have the increase in<br />
signal. If the increase is in the up or down<br />
direction (Elevation), just spin the dish mount<br />
a little and actuate in the appropriate direction<br />
until you get a perfect signal. NEVER<br />
alter the Polar Elevation or Declination settings.<br />
(Although if you are tracking with a Ku-<br />
Band system, it is advised to test the accuracy<br />
before packing up outside so you might need<br />
to nudge only the elevation nuts just a little if<br />
you are not 100% on target.<br />
When all is locked on perfectly to the<br />
<strong>satellite</strong>, tighten the mount nuts and bolts so<br />
that the mount won't move any more.<br />
The good thing about this method is that<br />
once you have locked on to the first <strong>satellite</strong>,<br />
if all angles are correct, you have finished<br />
working on the dish. Now you can now<br />
go indoors and program your receiver/positioner<br />
to track all <strong>satellite</strong>s. I have even tried<br />
this method on up to a 4.5-Meter dish with<br />
C/Ku-Band capability and it has worked well.<br />
If you are uncertain that you are on track,<br />
before disconnecting your meter, actuate<br />
the dish so you pass all <strong>satellite</strong>s. Each time<br />
you lock on to a <strong>satellite</strong>, stop, and push up,<br />
down, left, right to see if you are spot on.<br />
*** If you are using dual tracking, set the<br />
Polar elevation setting with the actuator arm<br />
about half way extended. This way you have<br />
an equal amount of play for north and south<br />
tracking. This also allows you to use the<br />
North/South actuator at a minimum as possible<br />
if you want to see the rest of the <strong>satellite</strong>s<br />
in the area. Eg. Keep the actuator at the<br />
set limit of polar elevation, (ie 51.8 Degrees),<br />
and only when you need to track inclined<br />
<strong>satellite</strong>s, the North and South elevation is<br />
actuated. When going back to tracking the<br />
normal Geostationary <strong>satellite</strong>s (Not inclined)<br />
return to the setting you had recorded earlier<br />
from your reed switch sensor reading on the<br />
display which is equivalent to the degrees<br />
setting specified in the table provided ***.<br />
HELP:<br />
203