- Page 1 and 2:
Operating Instructions ATS Software
- Page 3 and 4:
4.3.1 Cable adapter for EnDat 2.2.
- Page 5 and 6:
1.2 Safety Precautions Note Observe
- Page 7 and 8:
1.4 IK 215 Adjusting and Testing Pa
- Page 9 and 10:
1.7 PWM 20 Encoder Diagnostic Kit ,
- Page 11 and 12:
Qty. Description ID ExI 11xx/13xx a
- Page 13 and 14:
14 HEIDENHAIN ATS Software Operatin
- Page 15 and 16:
2.3 Installing the ATS Software 2.4
- Page 17 and 18:
18 HEIDENHAIN ATS Software Operatin
- Page 19 and 20:
3.2 Connect Encoder Connect the en
- Page 21 and 22:
3.2.1 Automatic encoder identificat
- Page 23 and 24:
If the ATS software has found a dif
- Page 25 and 26:
In the Encoder selection box, click
- Page 27 and 28:
Typical error message of purely ser
- Page 29 and 30:
3.3 Basic Functions Note Display an
- Page 31 and 32:
Status display Each time position d
- Page 33 and 34:
Detailed display of encoder status
- Page 35 and 36:
Open the directory tree "Parameters
- Page 37 and 38:
Detailed display of encoder status
- Page 39 and 40:
Connection to EIB interface electro
- Page 41 and 42:
Note The warning in the Encoder sta
- Page 43 and 44:
Clear incremental counter Equate fu
- Page 45 and 46:
The bit length may vary and depends
- Page 47 and 48:
2. Non EnDat-compliant datum shift
- Page 49 and 50:
Press the "function-specific view"
- Page 51 and 52:
2. Editing in the datum shift windo
- Page 53 and 54:
The green annulus represents the to
- Page 55 and 56:
3.3.3 Display encoder memory Callin
- Page 57 and 58:
Load encoder configuration from enc
- Page 59 and 60:
Apply encoder configuration Functio
- Page 61 and 62:
Binary value display Hexadecimal va
- Page 63 and 64:
Setting write protection for memory
- Page 65 and 66: The log window ("Protocol") appears
- Page 67 and 68: 3.3.5 Voltage display Voltage: Disp
- Page 69 and 70: Temperature sensor 1: External sens
- Page 71 and 72: Double-click "Absolute/incremental
- Page 73 and 74: If the deviation span is extremely
- Page 75 and 76: At the beginning of the Diagnostic
- Page 77 and 78: 3.5.3.1 Open Loop function Click O
- Page 79 and 80: When you click the "Encoder paramet
- Page 81 and 82: 3.5.4.2 Closed Loop function Click
- Page 83 and 84: 3.6.1 Configure hardware 1 PCI bus
- Page 85 and 86: 3.6.3 Manage product keys In additi
- Page 87 and 88: 3.6.4 Display software version To d
- Page 89 and 90: 3.7.1 Exl Check Function Step 1: Co
- Page 91 and 92: Step 2: Checking the scanning gap
- Page 93 and 94: Explanation on mounting quality: Th
- Page 95 and 96: 3.7.2 ExI mounting function Step 1:
- Page 97 and 98: Step 2: Adjusting the scanning gap
- Page 99 and 100: The tolerance range must be reached
- Page 101 and 102: The encoder is aligned manually by
- Page 103 and 104: 3.9 Supported Interfaces 3.9.1 SSI,
- Page 105 and 106: 3.9.2 FANUC and MITSUBISHI The soft
- Page 107 and 108: The information transferred via DRI
- Page 109 and 110: Display of encoder parameters The m
- Page 111 and 112: p10101: This parameter defines the
- Page 113 and 114: 4.2 EnDat 2.1 / 2.2 with Incrementa
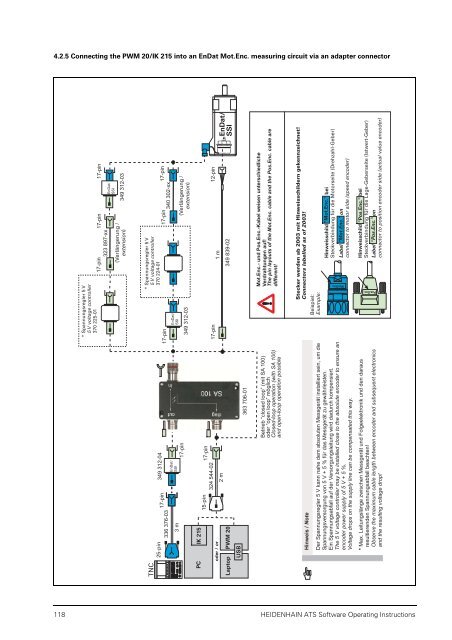
- Page 115: 4.2.3 Connecting the PWM 20/IK 215
- Page 119 and 120: 4.3.2 Cable adapter for APE 3xx and
- Page 121 and 122: 4.5 FANUC 4.5.1 Measuring the FANUC
- Page 123 and 124: 4.7 SSI 4.7.1 Connecting the PWM 20
- Page 125 and 126: 5.3 Pin Layout of PCB Connector of
- Page 127 and 128: 5.5 FANUC Pin Layout 128 HEIDENHAIN
- Page 129 and 130: 130 HEIDENHAIN ATS Software Operati
- Page 131: 132 HEIDENHAIN ATS Software Operati