Therma-Tru Slim-Line Sliding Patio Door Assembly and Installation
Therma-Tru Slim-Line Sliding Patio Door Assembly and Installation
Therma-Tru Slim-Line Sliding Patio Door Assembly and Installation
You also want an ePaper? Increase the reach of your titles
YUMPU automatically turns print PDFs into web optimized ePapers that Google loves.
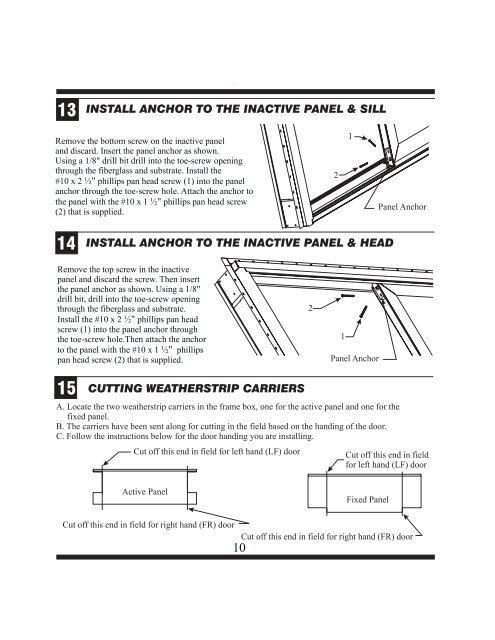
13<br />
15<br />
INSTALL ANCHOR TO THE INACTIVE PANEL & SILL<br />
Remove the bottom screw on the inactive panel<br />
<strong>and</strong> discard. Insert the panel anchor as shown.<br />
Using<br />
a 1/8" drill bit drill into the toe-screw opening<br />
through the fiberglass <strong>and</strong> substrate. Install the<br />
#10 x 2 ½" phillips pan head screw (1) into the panel<br />
anchor through the toe-screw hole. Attach<br />
the anchor to<br />
the panel with the #10 x 1 ½" phillips pan head screw<br />
(2) that is supplied.<br />
14<br />
INSTALL ANCHOR TO THE INACTIVE PANEL & HEAD<br />
Remove the top screw in the inactive<br />
panel <strong>and</strong> discard the screw. Then insert<br />
the panel anchor as shown. Using a 1/8"<br />
drill bit, drill into the toe-screw opening<br />
through the fiberglass <strong>and</strong> substrate.<br />
Install the #10 x 2 ½" phillips pan head<br />
screw (1) into the panel anchor through<br />
the toe-screw hole.Then attach the anchor<br />
to the panel with the #10 x 1 ½" phillips<br />
pan head screw (2) that is supplied.<br />
CUTTING WEATHERSTRIP CARRIERS<br />
A. Locate the two weatherstrip carriers in the frame box, one for the active panel <strong>and</strong> one for the<br />
fixed panel.<br />
B. The carriers have been sent along for cutting in the field based on the h<strong>and</strong>ing of the door.<br />
C. Follow the instructions below for the door h<strong>and</strong>ing you are installing.<br />
Cut off this end in field for left h<strong>and</strong> (LF) door<br />
Active Panel<br />
Cut off this end in field for right h<strong>and</strong> (FR) door<br />
10<br />
2<br />
Cut off this end in field<br />
for left h<strong>and</strong> (LF) door<br />
Fixed Panel<br />
Cut off this end in field for right h<strong>and</strong> (FR) door<br />
2<br />
1<br />
1<br />
Panel Anchor<br />
Panel Anchor


