Therma-Tru Slim-Line Sliding Patio Door Assembly and Installation
Therma-Tru Slim-Line Sliding Patio Door Assembly and Installation
Therma-Tru Slim-Line Sliding Patio Door Assembly and Installation

You also want an ePaper? Increase the reach of your titles
YUMPU automatically turns print PDFs into web optimized ePapers that Google loves.
26<br />
27<br />
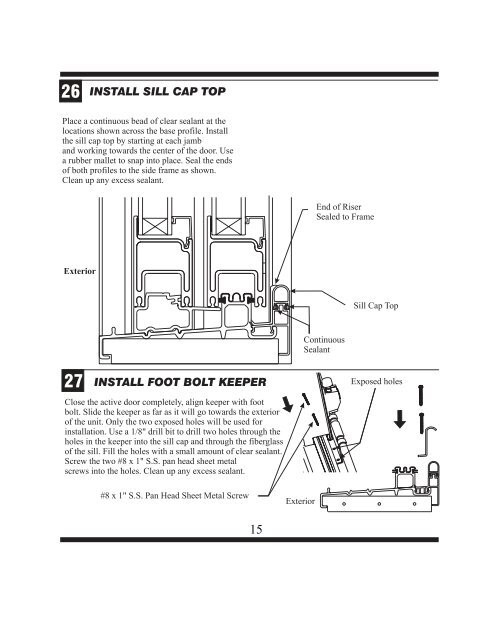
INSTALL SILL CAP TOP<br />
Place a continuous bead of clear sealant at the<br />
locations shown across the base profile. Install<br />
the sill cap top by starting at each jamb<br />
<strong>and</strong> working towards the center of the door. Use<br />
a rubber mallet to snap into place. Seal the ends<br />
of both profiles to the side frame as shown.<br />
Clean up any excess sealant.<br />
Exterior<br />
INSTALL FOOT BOLT KEEPER<br />
Close the active door completely, align keeper with foot<br />
bolt. Slide the keeper as far as it will go towards the exterior<br />
of the unit. Only the two exposed holes will be used for<br />
installation. Use a 1/8" drill bit to drill two holes through the<br />
holes in the keeper into the sill cap <strong>and</strong> through the fiberglass<br />
of the sill. Fill the holes with a small amount of clear sealant.<br />
Screw the two #8 x 1" S.S. pan head sheet metal<br />
screws into the holes. Clean up any excess sealant.<br />
#8 x 1" S.S. Pan Head Sheet Metal Screw<br />
15<br />
Exterior<br />
End of Riser<br />
Sealed to Frame<br />
Continuous<br />
Sealant<br />
Sill Cap Top<br />
Exposed holes