Therma-Tru Slim-Line Sliding Patio Door Assembly and Installation
Therma-Tru Slim-Line Sliding Patio Door Assembly and Installation
Therma-Tru Slim-Line Sliding Patio Door Assembly and Installation

Create successful ePaper yourself
Turn your PDF publications into a flip-book with our unique Google optimized e-Paper software.
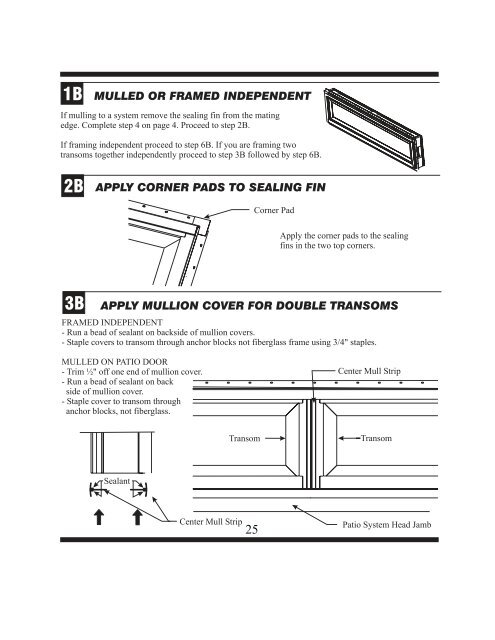
1B<br />
2B<br />
MULLED OR FRAMED INDEPENDENT<br />
If mulling to a system remove the sealing fin from the mating<br />
edge. Complete step 4 on page 4. Proceed to step 2B.<br />
If framing independent proceed to step 6B. If you are framing two<br />
transoms together independently proceed to step 3B followed by step 6B.<br />
APPLY CORNER PADS TO SEALING FIN<br />
Corner Pad<br />
Apply the corner pads to the sealing<br />
fins in the two top corners.<br />
3B APPLY MULLION COVER FOR DOUBLE TRANSOMS<br />
FRAMED INDEPENDENT<br />
- Run a bead of sealant on backside of mullion covers.<br />
- Staple covers to transom through anchor blocks not fiberglass frame using 3/4" staples.<br />
MULLED ON PATIO DOOR<br />
- Trim ½" off one end of mullion cover.<br />
- Run a bead of sealant on back<br />
side of mullion cover.<br />
- Staple cover to transom through<br />
anchor blocks, not fiberglass.<br />
Sealant<br />
Center Mull Strip<br />
Transom<br />
25<br />
Center Mull Strip<br />
Transom<br />
<strong>Patio</strong> System Head Jamb