Therma-Tru Slim-Line Sliding Patio Door Assembly and Installation
Therma-Tru Slim-Line Sliding Patio Door Assembly and Installation
Therma-Tru Slim-Line Sliding Patio Door Assembly and Installation

Create successful ePaper yourself
Turn your PDF publications into a flip-book with our unique Google optimized e-Paper software.
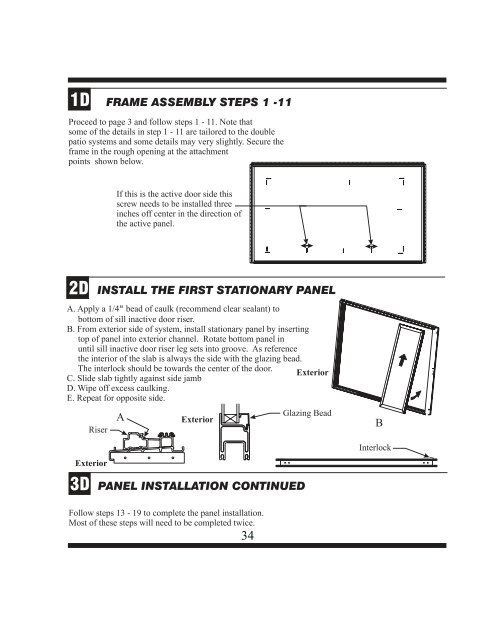
1D FRAME ASSEMBLY STEPS 1 -11<br />
Proceed to page 3 <strong>and</strong> follow steps1-11.Note that<br />
some of the details in step1-11aretailored to the double<br />
patio systems <strong>and</strong> some details may very slightly. Secure the<br />
frame in the rough opening at the attachment<br />
points shown below.<br />
2D INSTALL THE FIRST STATIONARY PANEL<br />
A. Apply a 1/4” bead of caulk (recommend clear sealant) to<br />
bottom of sill inactive door riser.<br />
B. From exterior side of system, install stationary panel by inserting<br />
top of panel into exterior channel. Rotate bottom panel in<br />
until sill inactive door riser leg sets into groove. As reference<br />
the interior of the slab is always the side with the glazing bead.<br />
The interlock should be towards the center of the door.<br />
Exterior<br />
C. Slide slab tightly against side jamb<br />
D. Wipe off excess caulking.<br />
E. Repeat for opposite side.<br />
3D<br />
Riser<br />
Exterior<br />
If this is the active door side this<br />
screw needs to be installed three<br />
inches off center in the direction of<br />
the active panel.<br />
A<br />
Exterior<br />
PANEL INSTALLATION CONTINUED<br />
Follow steps 13 - 19 to complete the panel installation.<br />
Most of these steps will need to be completed twice.<br />
34<br />
Glazing Bead<br />
B<br />
Interlock