Therma-Tru Slim-Line Sliding Patio Door Assembly and Installation
Therma-Tru Slim-Line Sliding Patio Door Assembly and Installation
Therma-Tru Slim-Line Sliding Patio Door Assembly and Installation

You also want an ePaper? Increase the reach of your titles
YUMPU automatically turns print PDFs into web optimized ePapers that Google loves.
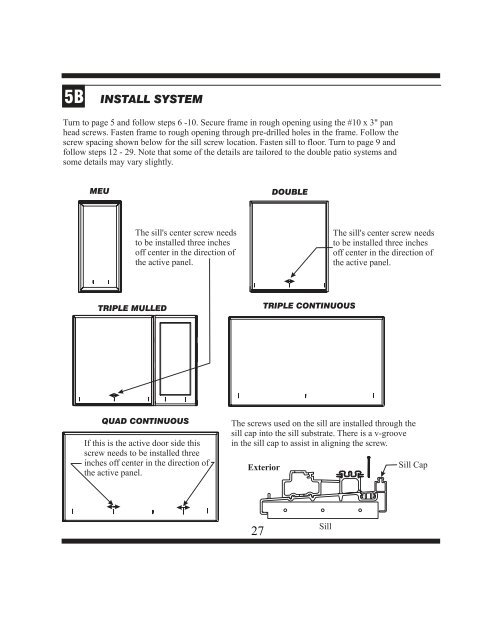
5B INSTALL SYSTEM<br />
Turn to page 5 <strong>and</strong> follow steps 6 -10. Secure frame in rough opening using the #10 x 3" pan<br />
head screws. Fasten frame to rough opening through pre-drilled holes in the frame. Follow the<br />
screw spacing shown below for the sill screw location. Fasten sill to floor. Turn to page 9 <strong>and</strong><br />
follow steps 12 - 29. Note that some of the details are tailored to the double patio systems <strong>and</strong><br />
some details may vary slightly.<br />
MEU DOUBLE<br />
TRIPLE MULLED<br />
The sill's center screw needs<br />
to be installed three inches<br />
off center in the direction of<br />
the active panel.<br />
27<br />
TRIPLE CONTINUOUS<br />
The sill's center screw needs<br />
to be installed three inches<br />
off center in the direction of<br />
the active panel.<br />
QUAD CONTINUOUS The screws used on the sill are installed through the<br />
If this is the active door side this<br />
screw needs to be installed three<br />
inches off center in the direction of<br />
the active panel.<br />
sill cap into the sill substrate. There is a v-groove<br />
in the sill cap to assist in aligning the screw.<br />
Exterior<br />
Sill<br />
Sill Cap